Thursday, September 30, 2010

Christmas Shaker Gift Bag

Yesterday, after making my first Christmas card for this year, I was feeling a bit Christmassy and decided to make a Christmas gift bag for the current Hero Arts challenge and the All Wrapped Up Challenge at Moxie Fab World. I absolutely love this shaker card that Sally made recently so I decided to make gift bag with a shaker on it.

Christmas gift bag with shaker.
Stamps (Hero Arts) Holiday Dolls & Three Trees

I recycled a bag like this one for my base. To cover up the name of the shop on the front of the bag I stitched the embossed snowflakes panel to pink card. For the sky inside the shaker I embossed various snowflakes in white and applied broken china distress ink. The doll is coloured with Promarkers and I added diamond stickles to the bobble on her hat. I stamped the sentiment on the acetate cover and added some punched snowflakes and beads to the shaker. To finish I just added a clear button which I had covered with glitter and tulle for the handles.

Shaker on gift bag

If anyone has any tips on taking photos of acetate, I’d love to hear them – I was nearly driven demented trying to get a photo without reflections!

Wednesday, September 29, 2010

Sparkling Snowflakes

This is a card I made for the Get Sketchy challenge #57 and the Jolly Holiday Greetings Challenge in the Moxie Fab World.


Unfortunately the photo isn’t great as I found it hard to photograph the glitter and the colour didn’t turn out true to life – it’s a bit paler than it looks in the photo.

Sparkling Snowflakes
Stamps (Hero Arts) - Stunning Snowflakes & Holiday Dolls

I embossed the snowflakes, one of my favourite Christmas stamps from Hero Arts, in white on white card, applied broken china distress ink and spritzed with water. Then I machine stitched the piece of white card, which had been embossed in the Cuttlebug, onto the background. I added glitter and gems to the die cut snowflake (Cuttlebug ice crystal) and am still finding bits of glitter all over the place! I just embossed the sentiment in silver and added lots and lots of gems for some more sparkle. Thanks to Sue for all of the gems I used here!

Sparkling Snowflakes

This is my first Christmas card for 2010 and now I’m really in the mood for making some more!

Tuesday, September 28, 2010

Clean and Simple\Plain and Simple

This is a card I made for the Caardvarks Clean and Simple challenge, the Allsorts Plain and Simple challenge and the clean and simple challenge at My Partner in Crafting Crime. The Scrappy Saturday Challenge this week is CAS and\or tags so I'm submitting to that challenge too.


CAS House
Stamp (Hero Arts) - House with Plant

I really admire CAS cards but I find them very difficult to make. With this one I embossed the house in white and added the Hero Arts heart pearl to the door. Then I machine stitched the frame and ground around the house. I added some twine that Sue had kindly sent me a while ago along with lots more fab goodies - thanks again Sue. After that I needed to sit on my hands or tie them behind my back so I wouldn’t fiddle around with the card anymore or add anything else – oh it was so hard to resist doing something else with it! So I quickly took a photo and uploaded it.

Saturday, September 25, 2010

September CCC Cards

I love taking part in Deborah’s Card Chain Challenge and because of this month's challenge I received a wonderful card from Kelly in the U.S. and sent Corey, also in the U.S., a card. Deborah is currently taking names for her October Card Chain Challenge (wonderful choice of colours, template and themes) so if you’d like to take part, you can put your name down here to join in the fun!


Stamp (Hero Arts) - Flower Chick

Above is the fantastic card I was lucky enough to have received from the super talented Kelly, along with some lovely goodies - thanks again Kelly! I love the design, vibrant colours and of course the wonderfully coloured chick with Kelly's signature flower in the chick's hair.


Autumn Colours - CCC card for Corey
Stamps (Hero Arts) - Silhouette Grass, Outline Flowers, Scattered Leaves & Messages

The card above is the one I made for Corey. I had read somewhere that she likes chocolate brown so I used brown for the card base and followed Deborah’s colour palette (loosely!) and friendship theme. The Grass Silhouette is embossed in white and I decided to use one of the flowers from the Outline Flower background. I love this stamp but haven't used it recently so thought it was time to ink it up again.


I stamped the flower three times, coloured with watercolour pencils, layered and added dots of diamond stickles to the stamens. The leaves are stamped using a couple of chalk inks and the butterflies are punched from a scrap of card, left over from another project, which had been sponged with spiced marmalade distress inks.

I'm submitting the card into Hero Arts Everything Autumn challenge. I'm really going to have to think about getting a Pro account on Flickr - big difference between photos uploaded from Flickr and straight from the computer! I've had a mad, busy week this week so hopefully I'll do some catching up on blogs and everything over the weekend!

Thursday, September 23, 2010

PaperPlay Challenge – Coffee and Cream

The challenge on PaperPlay this week is to use browns and creams only on your card/project. Phindy’s Place is kindly sponsoring the challenge and the lucky winner will receive a $15 gift certificate and can choose from the wonderful range available here.


When I was about seven I went to ballet lessons but after a short time moved on to do something else. I still remember how much I loved twirling around in my pink tutu and flouncing up all the layers of tulle! So I was delighted to get a chance to use this adorable image, Twick or Tweet from Phindy’s Place, of a little girl trick or treating in her tutu and wings. I coloured the image with watercolour pencils and added diamond stickles to the wings and copper stickles to the tiara.


Stamps: Twick or Tweet (Phindy's Place) & Flourish Background (Hero Arts).

On a piece of cream pearlescent card I masked a circle for the moon, clear embossed the Flourish Background and then applied some antique linen distress ink. The ground is a scrap of card left over from another project, which has water stamping (Flourish Background) and splashing on walnut stain distress ink. I just added some tulle and a button to finish.

I hope you will join us for coffee and cream this week at PaperPlay!

Sunday, September 19, 2010

Keep Out!

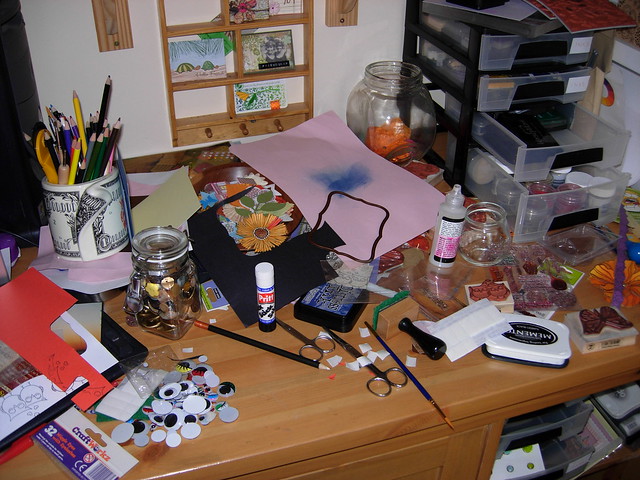
Although we have a great time at Halloween and the kids and I love it so much, I’ve never made a Halloween card before. As I don’t have any Halloween stamps I thought I'd try to make a little Halloween scene. Robin has made wonderful Halloween cards using houses, see here and here, so I thought I’d have a go at a spooky Halloween house too. It took me a while to make but I just had so much fun putting all the bits and pieces together.

Keep Out!

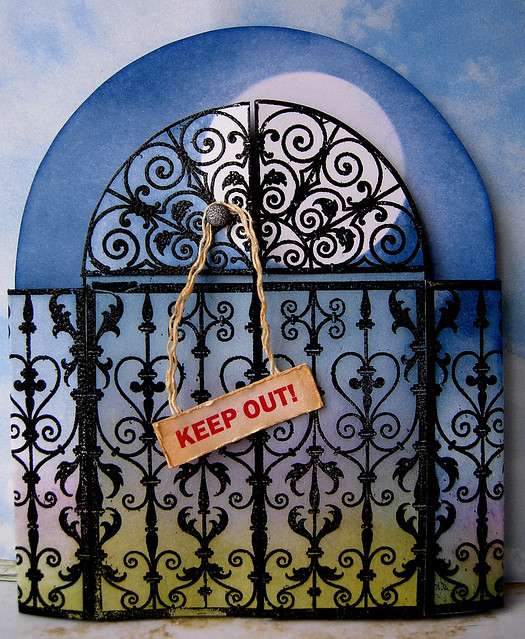
Where to start with a description! The gates\fence are embossed in black and after adding a mask for the moon I applied distress inks (shabby shutters, dusty concord, broken china & faded jeans) for the background. I printed the “KEEP OUT” sign from Word, distressed the edges and applied antique linen distress ink. I used a piece of string (with some antique linen on it) and a sparkly brad to attach the sign to the gate.


Keep Out!

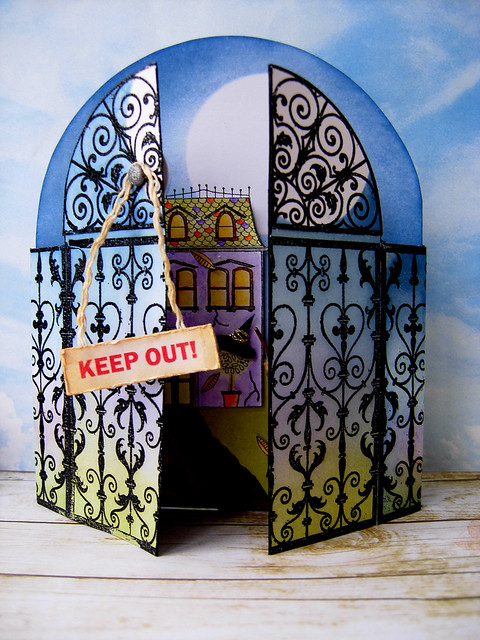
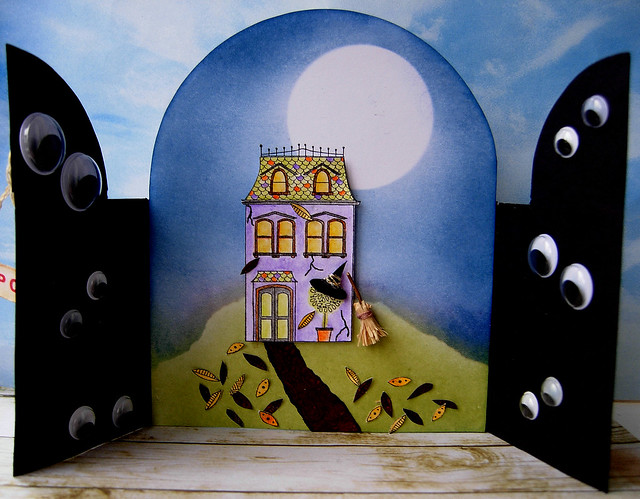
Now to the inside of the card. I made the background for the house using distress inks (shabby shutters, dusty concord, broken china & faded jeans) and masks for the moon and hill. The path is a scrap (with walnut stain distress ink) left over from another project. I coloured the house with watercolour pencils and added some cracks to the wall with a marker. The occupant of the house has left her broomstick and hat outside – fiddly but fun to make. The tree in the pot has little dots on it so I added an extra dot beside each one to make it look likes eyes peeking out of the greenery. I love decorating our house for Halloween and on the day itself we fill the driveway with leaves so the trick or treaters have to rustle through the leaves up to our “haunted house”. So I had to add some leaves on the ground and on the house like we do at home. Then I just added some googly eyes to finish.

Keep Out!

I made this card for Hero Arts’ current challenge “Everything Autumn” as well as Jenny’s Wee Memories Challenge #23 - S.O.S..


The S.O.S. Challenge is to incorporate any 2 of the 3 designs, Scallops, Orange or String into a card\project. So I’ve got the scallops (on the roof), orange (leaves & on house) and string (tied to raffia on broomstick, gold string on witch’s hat & on the keep out sign).


Stamps (Hero Arts) Flourish Grids, House with Plant & Tree, Birds and Messages

The CRAFT CRITIQUE blog is having a HALLOWEEN BLOG CARNIVAL where you can see and share all kinds of Halloween related crafty projects; cards, scrapbook pages, knits, jewellery, clothes, gifts, foods, costumes etc. The Halloween Carnival will run until 14th October so if you have a crafty Halloween project you’d like to share it has to be linked to their blog before that date.

Friday, September 17, 2010

Swirling Autumn Leaves

The starting point for this card was when I saw the Offset Scallop Gallop Challenge in the Moxie Fab World. I really liked the idea of using offset scallops on a card and wanted to use an autumn theme for Jenny’s "Fall into Autumn"challenge and Hero Arts’ “Everything Autumn” challenge.

Swirling Autumn Leaves
Stamps (Hero Arts) Scattered Leaves, Flourish Background, Scallop Borders and Messages.

I embossed the Flourish Background in white on a piece of fabric from an upholstery fabric sample book. The leaves are clear embossed on scraps of upholstery fabric. Because the embossing is all over the leaves they didn’t fray when I cut them. Even if they did fray I wouldn’t mind because it would give that tattered autumn look. I clear embossed some pieces of card with a scallop from the Scallop Borders set and layered them. To finish I just added some gems and machine stitching.

I hope you all have a great weekend!

Monday, September 13, 2010

Hero Arts' Virtual Cardmaking Party

Over the weekend Hero Arts held a Virtual Cardmaking Party in celebration of Operation Write Home’s birthday. There were lots of great challenges and fun games to take part in. Amazingly, over 600 cards were created by members of the HA Flickr group during the weekend to donate to Operation Write Home. These are the cards I made over the weekend.

Froggy Greeting
Stamps (Hero Arts) Froggy, Clouds Background, Write Your Message and Flourish Background.


Birthday Messages
Stamp (Hero Arts) Birthday Messages.


Froggy
Stamps (Hero Arts) Froggy & You’re the Best.


Moonlight Romance
Stamps (Hero Arts) Heart Owls, Flourish Background & Branch Background.


Happy Birthday Butterflies
Stamps (Hero Arts) Antique Engravings & Birthday Messages.

A big thanks to Hero Arts and everyone in the HA Flickr group for making it such a brilliant, fun weekend!

Work (or I should say making a mess) in progress.

As you can see I had fun getting inky!

Shades of Autumn

This is a card I made for three challenges - Jenny's Challenge #22 - Fall into Autumn, Hero Arts' Everything Autumn Challenge and Allsorts Week 69 - Colours of Autumn.


I love Jenny's inspiration photos but now I have a yen for toffee apples - I must make some!

Happy Birthday Butterflies

Stamps (Hero Arts) - Antique Engravings & Birthday Messages.

Except for the white base, everything on this card is from my scrap drawer. The butterflies are coloured with ProMarkers and I added thread for the antennae. I used the Cuttlebug distress stripes embossing folder for the top part of the card, embossed the sentiment in white and added some more scraps with machine stitching. The card was made for Hero Arts' weekend-long Virtual Cardmaking Party in celebration of Operation Write Home’s birthday. I'll include the other cards I made over the weekend in my next post.

Thursday, September 9, 2010

PaperPlay Challenge – Autumn is a Comin’

Julie set the challenge on PaperPlay this week and it is to use an autumnal colour scheme on your card\project. I love all the glorious colours of autumn so I can’t wait to see what everyone comes up with!

Simon Says Stamp is kindly sponsoring this week's challenge and the lucky winner will receive $15 to spend in the store. There are so many wonderful goodies to choose from here.

Autumn Sunset

Stamps used (Hero Arts) – Antique Engravings, Scattered Leaves & Flourish Background

I used distress inks (worn lipstick & spiced marmalade) for the sky and stamped the wheat using two brown chalk inks. The dragonflies are stamped on acetate and I added copper stickles to the wings for some sparkle.


I stamped the leaves with shabby shutters distress ink and an orange chalk ink. Then I raided the garden shed for the raffia and snipped some berries off a wreath I have around a candle. For a bit of sheen I covered the berries with glossy accents. I clear embossed the Flourish Background on the cream card and added machine stitching using a dull gold thread.


I’m submitting the card into the current Hero Arts challenge – Everything Autumn.

Wednesday, September 8, 2010

A few of my favourite things gift bag

Part of the Hero Arts' challenge this month (Everything Autumn) is to make a gift bag. Sometimes I recycle bags from shops and use them for gift bags and here is the one I used today.


I decided to add a few of my favourite things to the bag - the Large Flower, Scallop Borders and fabric. To start with I cut a piece of upholstery fabric from a sample book for the background. Then I white embossed the flowers on vellum and embossed parts of the petals using sparkling stardust embossing powder.

A few of my favourite things giftbag
Stamps (Hero Arts) - Large Flower & Scallop Borders

I layered the flowers and added assorted beads and pearls to the centres. For the scallop edging on the top of the bag I white embossed one of the scallops from the Scallop Borders set and applied worn lipstick distress ink. I used some left over pieces of tulle for the handles.


It's such a cloudy day here today so I'm afraid the photos aren't great and don't capture the sparkle on the flowers.

Friday, September 3, 2010

More cards from Linda

As I've mentioned before I love being in the Hero Arts Flickr group for all the inspiration and fun. It has also been brilliant getting to know the lovely and talented ladies in the group like Linda (ScrappinBari on Flickr). Because of a comment that she left on one of my cards, we recently ended up doing a little card swap.

Linda surprised me with this absolutely adorable card which I had included in my favourites in the Flick group. The flower box with the beautiful flowers has such gorgeous dimension, colours and colouring.


Stamps (Hero Arts) - Curly Flowers & Easter Set AR176 (exclusive to Archiver's)

And who could resist this cute little bunny peeking out from the ribbon and flowers?


Linda also sent me a mini card and ATC which she had made at an Archiver's class. The mini card is 3 inches square and is such a dote! If you know me you'll know I love sewing so I've put the card on the shelf above my sewing machine so I can see it as I'm sewing away. I wish my sewing machine looked as pretty as this one!


Stamps (Hero Arts) - Sew Artsy

Unfortunately my photo doesn't capture how beautiful Linda's ATC is in real life. The distressing and stamping are wonderful and there is such a delicate sparkle off the pretty butterflies.


Stamps (Tim Holtz) - Urban Chic

Here is a link to Linda's photostream where you can see lots more of her gorgeous cards.

This is the card I sent to Linda (more details here)

Crackled Butterflies
Stamps used (Hero Arts):- Antique Engravings, Wild Flowers & Messages

and the ATC is below. The butterfly is embossed on a shimmery fabric using sparkly embossing powder and the background is one of the beautiful papers from a Kaiser Craft pad that Paula and Dawn sent me. Thanks again Paula and Dawn!


Stamp (Hero Arts)- Heart Winged Butterfly

Thanks again Linda for the fun swap and for all the gorgeous goodies you sent me to play with!

Wednesday, September 1, 2010

Butterflies, flowers and a teabag.

I keep seeing Lin creating wonderful cards like this and these for The Shabby Tea Room Challenges and keep thinking I must try the challenge. Although I love shabby chic style cards I find them very hard to make and never know if I’ve added too much or too little on my cards – maybe too much on this one! So here's is my first attempt at the challenge.

Stamps used (Hero Arts):- Antique Engravings & Silhouette Grass

The current Shabby Tea Room challenge is to use something old and something new. Since I only started making cards less than two years ago, I don’t have anything very old in my stash. So the things on the card that qualify as being old are the buttons which I’ve cut off old clothes over the years and the copper and diamond stickles which I bought when I first started making cards. The new things are the rhinestone flourishes, a technique which is new to me, the lace and a new teabag! Because of the faded flowers and the wheat in the background, I'm also submitting the card to the Everything Autumn Challenge at Hero Arts.


I just came across this brilliant video for making paper flowers and had to try it out. It’s great fun and I’ll definitely make lots of these in different colours and shapes. I made the two bigger flowers using this technique and the smaller flower is made up of two layers of Hero Arts flowers – thanks so much Vanessa and Linda for these!

I clear embossed the Silhouette Grass on a piece of silk and dyed the lace (originally white) with tea. The butterflies are stamped on paper which is cream and has green and copper swirls – thanks Paula and Dawn, I’m enjoying using the goodies you sent me. Sue (Stampersuzz) sent me these gorgeous rhinestone flourishes - thanks again Sue. I'm delighted to have used so many items on this card from blogging and non blogging (you need to start a blog Linda!) buddies in the U.S., Germany, Australia and New Zealand!


To finish I just added machine stitching, thread for the antennae, stickles and lots of buttons and beads.
Related Posts with Thumbnails