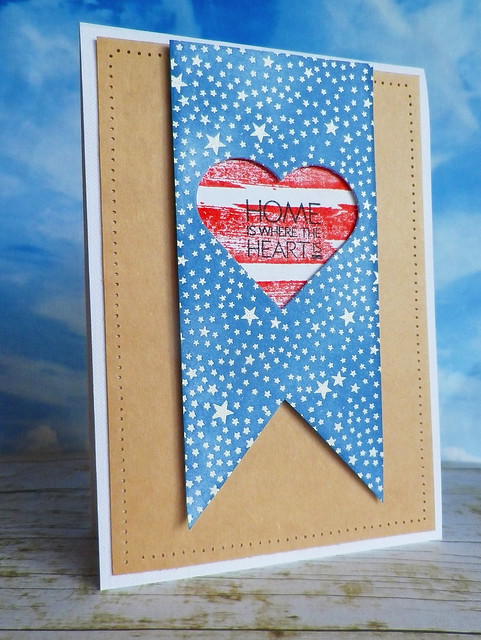
I've been having great fun trying out different things with Hero Arts' Brush Strokes set, but as soon as the Tiny Star Background (love this new stamp!) arrived the other day, I knew I wanted to combine it with one of the brush stroke images.
Stamps (Hero Arts) - Tiny Star Background, Brush Strokes and Right at Home
I love this fun card by Kelly Rasmussen and fell for the tiny banner at the top of the card with the heart cut out. So I thought I'd make a banner with a cut out heart too but have it as the focal point on my card. I embossed the stars in white, applied faded jeans distress ink and cut out the heart and banner shape. On another panel of white card I stamped the brush strokes using barn door distress ink and placed this behind the banner using foam pads.
I used a lovely sentiment from the Right at Home set brought out by Hero Arts for Operation Write Home.
By changing the sentiment I could also use the card for a 4th July card or for our older son's birthday as he was born on 4th July. I'm submitting this card into the Color Media Challenge in the Moxie Fab World and the current Hero Arts Challenge.
Hope you have a great weekend:)
Saturday, September 28, 2013
Thursday, September 26, 2013
Gossamer Wings in Handmade Cards
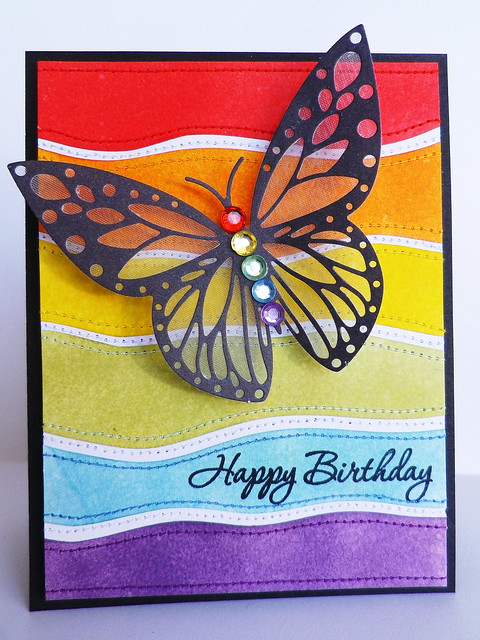
I like when I can combine a bit of stamping and a bit of stitching on my cards. In the case of this card today, there’s a little stamping and a lot of stitching.
Stamp (Hero Arts) – It’s Your Day
Die (Hero Arts) – Butterfly
The card was recently published in the fabric and fibres section of Paper Crafts Handmade Cards. When I came home from work this evening, I started poring over the digital version of the magazine. It looks like it's packed full of wonderful projects and I'm not even halfway through the magazine yet.
For the background I used lots of distress inks (barn door, spiced marmalade, mustard seed, shabby shutters, tumbled glass and dusty concord) and went with matching threads on each panel. After die cutting the butterfly, I added a piece of silver organza to the back to give parts of the wings a semi transparent look. To finish it off I added a bit of bling. Thanks for visiting:)
Saturday, September 21, 2013
Splatter Ghosts
When I was playing with images from the Brush Strokes set from Hero Arts, the bigger splatters reminded me of the fingerprint ghosts my boys used to make in school when they were younger. So I thought I'd make a Halloween card using these splatters.
Stamps (Hero Arts) - Ghostly Greetings & Brush Strokes
I embossed the splatters on black card and cut eyes and mouths out of black card. After adhering these to the ghosts I applied a layer of glossy accents for some sheen. It's impossible to see from the photo but I also stamped some cobwebs in black on the background. The sentiment was also embossed and I popped up the little ghost on the sentiment panel on a foam pad. To finish I just added a few gems and baker's twine.
I'm submitting this card into the current Hero Arts Challenge as the card was inspired by the super cute Halloween card (splatters on the background and popped up ghost) on page 28 of Hero Arts' Holiday & Stamp Your Story catalogue. Edited to add - I've just found out that Lisa Spangler made the card in the catalogue. You can see more on her fun card here.
Hope you are having a fun and inky weekend!
Labels:
baker’s twine,
Brush Strokes,
embossing,
gems,
Ghostly Greetings,
Halloween cards,
Hero Arts
Sunday, September 15, 2013
Happy Mail and Trio of Christmas Cards
When I came home from work one evening this week, I was so excited to find a package waiting for me from my good friend Linda. Included in the package was this wonderful card Linda had made, it's so pretty and soft looking – I love it. Linda always seems to know exactly what I love and this time was no exception – look at this brilliant array of goodies. Thanks again for everything, Linda:)
Well talk about spoiled for choice and not knowing where to start! I’ve been having great fun playing with the Brush Strokes set but the first items I completed were three Christmas cards using Shari Carroll’s fab Christmas Trees from Hero Arts. I wanted to make three cards that are quite different to each other and also wanted to reflect something from the images on the rest of my card. As I was inspired by the Hero Arts blog I’m submitting these cards into the current Hero Arts Challenge.
The first card was inspired by the design and traditional colour scheme in this gorgeous card by Jennifer McGuire. As the Christmas tree made me think of an appliquéd pattern, I added lots of faux stitching after colouring the tree. Because of the design of the tree I tilted the background stamping.
Stamps (Hero Arts) – Shari’s Tree No 3, Very Merry Christmas & Precious Baby Boy
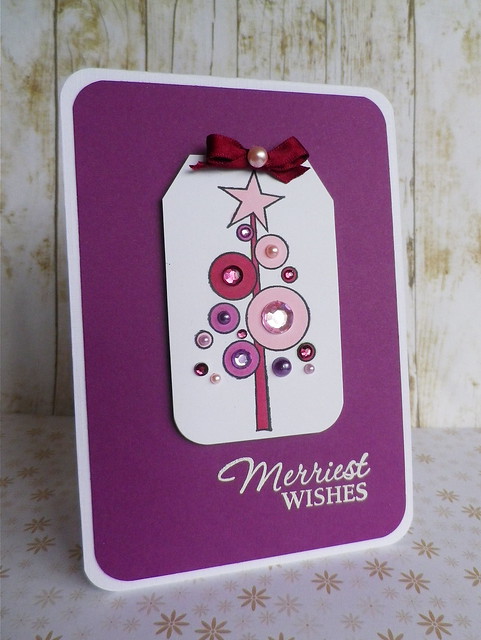
For the second card I went with non traditional colours and lots of embellishing. I was inspired by the repeating of the circular shapes, rounded corners and added bling in this wonderful card by Kelly Rasmussen.
Stamps (Hero Arts) – Shari’s Tree No. 2 & Very Merry Christmas
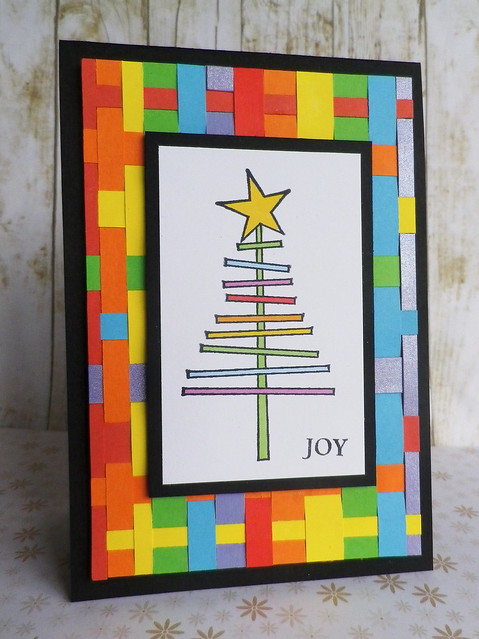
The third card was inspired by the thin branches on the Christmas tree and the colours and lines in Tami Hartley’s fab tag here. After colouring a rainbow Christmas tree, I wove thin strips of card into a colourful background to tie in with the tree and “Joy” sentiment.
Stamps (Hero Arts) – Shari’s Tree No. 1 & Very Merry Christmas
I’m planning on making a card organiser today – thanks for the great idea, Linda! So hopefully as the weeks go by I’ll be adding more and more Christmas cards to it and won’t be dashing around at the last minute, as I usually do, making cards!
Wednesday, September 4, 2013
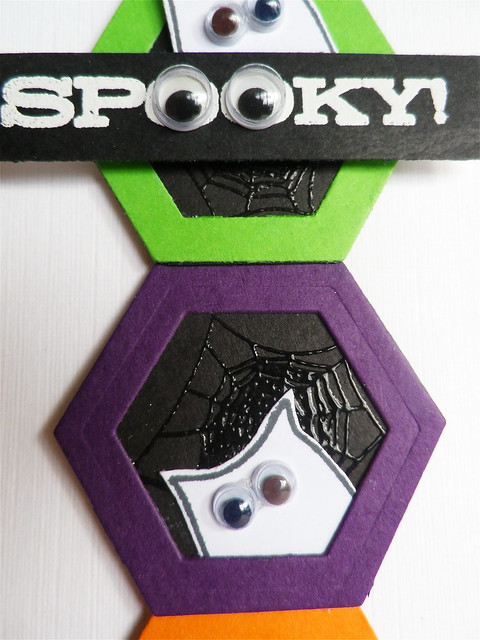
Spooky!
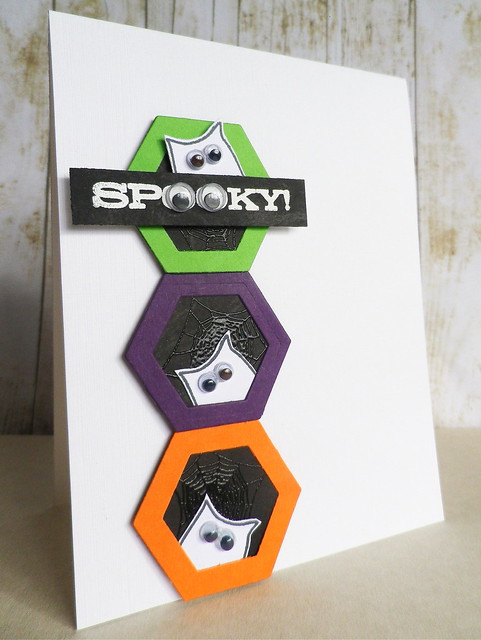
My last post was a Christmas one, but today I'm thinking of another fun time of the year - Halloween. Much and all as I love Halloween, there really isn't a tradition of sending Halloween cards to each other here. But this card is for a sweet girl in the US, whose mum is a friend of mine. The card and some Irish spooky trick or treat goodies will be winging their way to her in October.
Stamp - Ghostly Greetings (Hero Arts) Die - Geometric Shapes (Hero Arts)
I started by die cutting the hexagons and clear embossing the spider webs on the black card. The sentiment was also embossed. Then I stamped and cut out the ghost owls, added them to the hexagons and stacked them on the card.
To finish, I added some googly eyes. Lol can you tell I sorted out and stuck on the googly eyes at night, in the dimmer light of energy saving light bulbs? It was only this morning that I noticed my mistake - two of the owls have different coloured eyes! Oh well, I've seen this in people and animals in real life so I just left them this way!
I'm submitting this card into the current Hero Arts Challenge as the stamp set and die are from the Holiday catalogue. The card was inspired by this card by Jennifer McGuire - the geometric shape framing the character, the stamped background within the frame and also the added embellishment to the eyes.
Monday, September 2, 2013
Gingerbread Christmas Wishes and a Trip to Trim
Today is the last day for submitting items into Holiday Home Decor Challenge in the Moxie Fab World so I thought I'd make a little decoration to hang somewhere around the house at Christmas.
I embossed the little gingerbread men and did a bit of paper piecing. Then I added some diamond stickles to the white parts of their Santa hats for a little bit of shimmer.
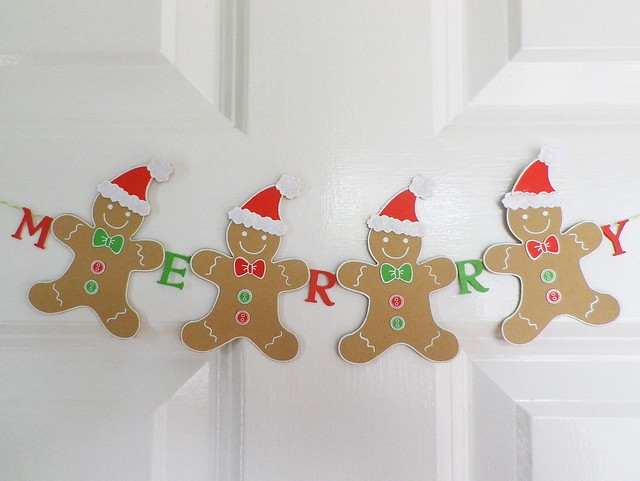
Stamp (Hero Arts) - Gingerbread Fun
The letters were die cut and I stuck them and the little gingerbread men to a piece of baker's twine.
A couple of weekends ago we had a fun day out at Trim Castle during the celebration of National Heritage Week. If you've seen the film Braveheart you will have seen Trim Castle and other historical buildings in the area that were used for the shoot.
There were fun activities outside the castle walls that day including this poor knight who had to battle off soggy sponges being catapulted at him by the kids!
One of my knights enjoyed trying on a typical helmets and battle armour. Seemingly the armour a knight had to wear in those days could weigh up to 35kg - I don't know how they managed to walk around not to mind go into battle!
A birds of prey exhibition was also there - these owls were gorgeous and super soft to the touch.
We had a great tour of the keep and grounds within the castle walls.
I'm never the best at heights but the views from the top of the castle were well worth the jitters I had at the top!
These walkways within the castle were a great way of seeing various sections of the castle
including the small chapel with this holy water font.
I fell in love with this pretty row of colourful houses in the town of Trim
and thought these were a couple of interesting buildings near where we parked, with the windows in this one decorated with old Guinness advertisements
and the great mural and old messenger bike atop this one.
Labels:
Christmas,
embossing,
Gingerbread Fun,
Hero Arts,
Ireland,
Moxie Fab World
Subscribe to:
Posts (Atom)