I wanted to make a birthday card with a space theme for a two year old boy so pulled out a cute freebie stamp set (Rocket Thanks) that Hero Arts recently gave out with orders.
After stamping and cutting out the rocket, I coloured it with Promarkers and added stardust stickles to the flame. The star background was made by applying distress inks (salty ocean, peacock feathers & faded jeans) to white card and stamping the stars in faded jeans distress ink.
Stamps (Hero Arts) - Rocket Thanks, Fantastic Birthday & Tiny Star Background
Die (Tonic) - Advent Drawer Deco Die
I die cut numbers out of the side of the card base and added a panel of acetate behind the number two so that I could inlay the birthday boy's age. As I wanted it to appear that the rocket flame had ignited the number, I coloured it in the same colour as the flame and applied stardust stickles.
I'm submitting this card into Allsorts' Numbers Challenge and Simon Says Stamp's Anything Goes Challenge.
Showing posts with label Tiny Star Background. Show all posts
Thursday, October 1, 2015
Saturday, August 30, 2014
Mark's Monster and Messing with Paints
Earlier today I had fun messing with watercolour paints to make backgrounds. I squirted some watercolour paints from tubes onto my largest acrylic block and added only little splashes of water as I wanted to paint to remain thick and add texture to my panels. Then I squished panels of watercolour card onto the block and ended up with a batch of panels like the ones below.
Lol I haven't a clue what I'm going to do with some of them (the odder looking ones may end up being die cut into butterflies or sentiments!) but I used one of the orange panels to make the background for my card. I stamped Hero Arts Tiny Star Background on the panel in barn door distress ink and embossed the sentiment on a piece of black scrap card. As I don't have any monster stamps I asked my son Mark to draw a few for me. After seeing one of the bigger guys I thought he would be perfect for a sorry card.
Monster image by Mark
Stamps (Hero Arts) - Tiny Star Background & Everyday Sayings
I coloured the monster with ProMarkers and gave him a spotty look with the blender pen. To finish I just added some glossy accents to his horns, eye and tooth.
I'm submitting this card into Simon Says Stamp's Anything Goes Challenge.
Lol I haven't a clue what I'm going to do with some of them (the odder looking ones may end up being die cut into butterflies or sentiments!) but I used one of the orange panels to make the background for my card. I stamped Hero Arts Tiny Star Background on the panel in barn door distress ink and embossed the sentiment on a piece of black scrap card. As I don't have any monster stamps I asked my son Mark to draw a few for me. After seeing one of the bigger guys I thought he would be perfect for a sorry card.
Monster image by Mark
Stamps (Hero Arts) - Tiny Star Background & Everyday Sayings
I coloured the monster with ProMarkers and gave him a spotty look with the blender pen. To finish I just added some glossy accents to his horns, eye and tooth.
I'm submitting this card into Simon Says Stamp's Anything Goes Challenge.
Thursday, August 7, 2014
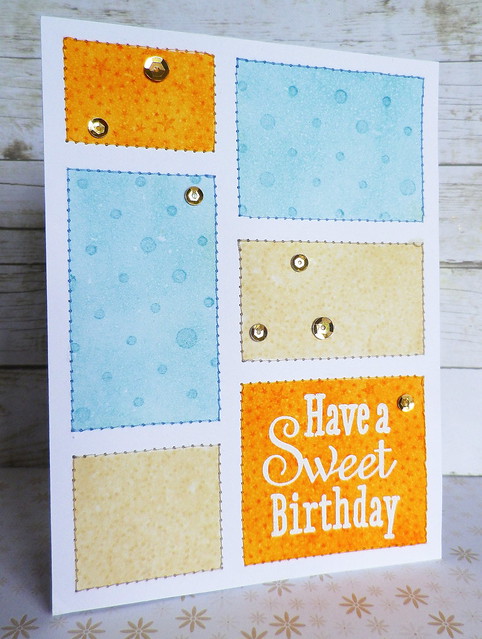
One Layer Blocks
Today I made another one layer card using the same method I used in the first card in this post.
This time I masked off areas in blocks and applied distress inks. After applying the inks and spritzing with water I stamped images on the blocks using the same distress inks.

Stamps (Hero Arts) - Fantastic Birthday, Magical Background, Tiny Star Background and Solid Dots Pattern
Once the card had dried completely I embossed the sentiment and machine stitched frames around the blocks. Sequins were added for a touch of sparkle.
I'm submitting this card into Hero Arts' One Layer Challenge and Simon Says Stamp's Make it Sparkle Challenge.
This time I masked off areas in blocks and applied distress inks. After applying the inks and spritzing with water I stamped images on the blocks using the same distress inks.

Stamps (Hero Arts) - Fantastic Birthday, Magical Background, Tiny Star Background and Solid Dots Pattern
Once the card had dried completely I embossed the sentiment and machine stitched frames around the blocks. Sequins were added for a touch of sparkle.
I'm submitting this card into Hero Arts' One Layer Challenge and Simon Says Stamp's Make it Sparkle Challenge.
Saturday, May 10, 2014
ATC Trade With Marilyn
Recently over in the Hero Arts Flick group I came across some fabulous ATCs that Marilyn had up for trade. Needless to say I jumped at the chance to add these beauties to my ATC collection and was delighted when Marilyn said she'd trade with me. Marilyn, a great big thanks yet again for swapping with me:) For a little bit of extra fun we decided to make an ATC background for the other person to complete. Apologies in advance for the photo heavy post, but I forget to photograph the ATCs and backgrounds in groups before I sent them to Marilyn! I haven't made ATCs in quite a while but now after making these ones I'm itching to make more!
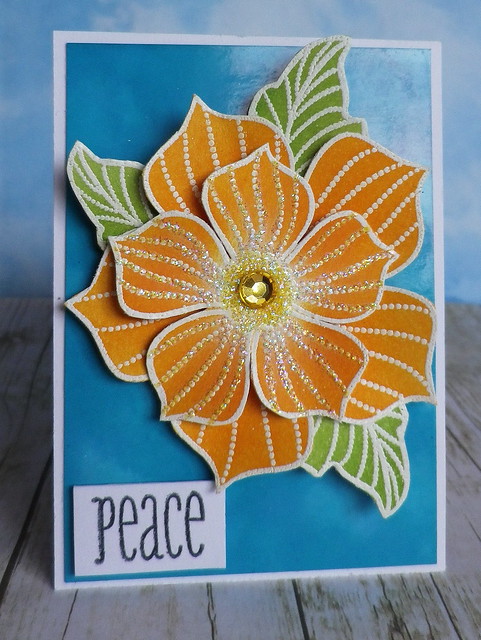
For my first ATC I used a flower set I love from Penny Black.

Stamps - Party Petals (Penny Black) & Woodland Wreaths (WPlus9)
I made a background with glossy card and alcohol inks and then embossed flowers and leaves from the Penny Black set. After applying distress inks I layered the flower and added lots of diamond stickles and a gem to finish.
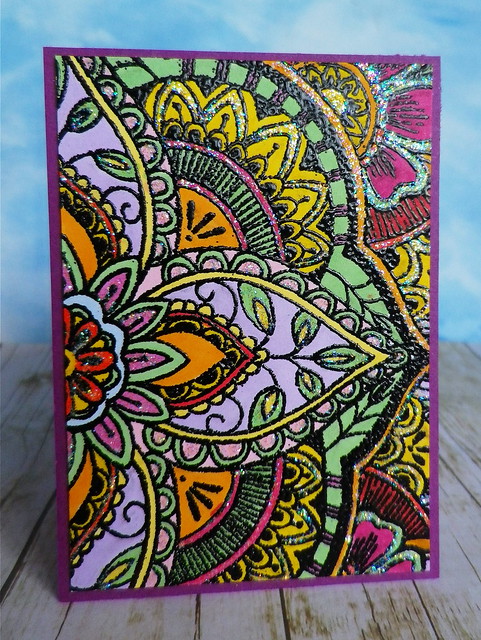
One of my newer stamps which I hadn't used before is the Large Petal Background from Hero Arts. For its first outing I decided to emboss it and colour a portion of it with ProMarkers.
.
Stamp (Hero Arts) - Large Petal Background
I must have been in a sparkly humour that day because I ended up adding diamond stickles to lots of different areas on the ATC. It's nice and shimmery in real life but hard to capture in a photo! I'm submitting this ATC into a2z Scrapbooking How Does Your Garden Grow linky party.
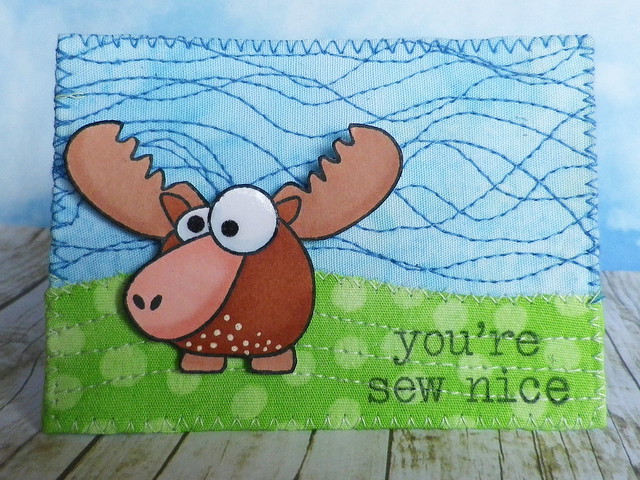
If you've seen my last two posts you'll know that a certain funny moose has become a firm favourite of mine so of course I had to include him on one of my ATCs!

Stamps (Hero Arts) - Missing You & Sew Artsy
I used a couple of fabrics for the background and added lots of machine stitching. The moose was coloured with ProMarkers and I added some dots with a white gel pen and glossy accents to the eyes. Stitching is the theme for Virginia's View Challenge #3 so I'm submitting this ATC into Virginia's fun challenge.
I'm submitting the two floral ATCs into Simon Says Spring Flower Challenge.
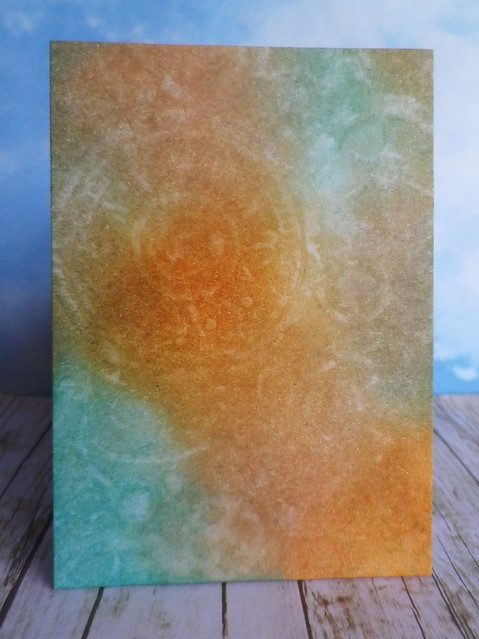
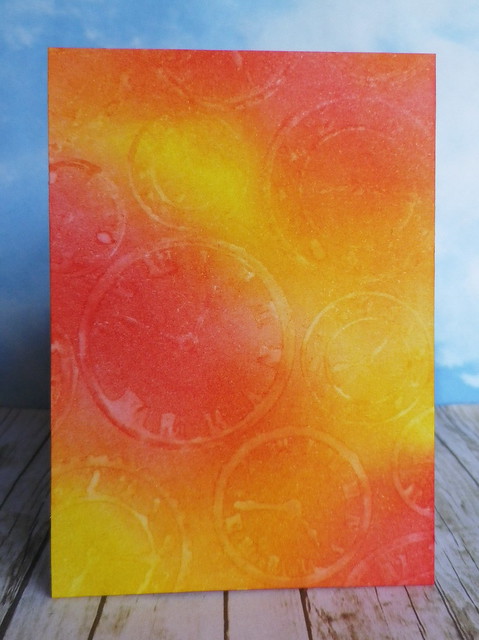
Next up are the backgrounds. We were only going to swap one background, but I made three and couldn't decide which one to send to Marilyn, so ended up sending the three of them. They were made by applying distress inks to white card and stamping with water instead of ink.

Stamp (Hero Arts) - Watch Gears

Stamp (Hero Arts) - Tiny Star Background

Stamp (Hero Arts) - Time to Stamp
I'm really looking forward to receiving Marilyn's ATCs and her mystery ATC background which I know will be great fun to play with! It looks like we're in for a bit of a soggy day here today but I suppose that's always a good excuse for doing a bit of stamping;) I hope you have a fun and inky weekend!
For my first ATC I used a flower set I love from Penny Black.

Stamps - Party Petals (Penny Black) & Woodland Wreaths (WPlus9)
I made a background with glossy card and alcohol inks and then embossed flowers and leaves from the Penny Black set. After applying distress inks I layered the flower and added lots of diamond stickles and a gem to finish.
One of my newer stamps which I hadn't used before is the Large Petal Background from Hero Arts. For its first outing I decided to emboss it and colour a portion of it with ProMarkers.
. Stamp (Hero Arts) - Large Petal Background
I must have been in a sparkly humour that day because I ended up adding diamond stickles to lots of different areas on the ATC. It's nice and shimmery in real life but hard to capture in a photo! I'm submitting this ATC into a2z Scrapbooking How Does Your Garden Grow linky party.
If you've seen my last two posts you'll know that a certain funny moose has become a firm favourite of mine so of course I had to include him on one of my ATCs!

Stamps (Hero Arts) - Missing You & Sew Artsy
I used a couple of fabrics for the background and added lots of machine stitching. The moose was coloured with ProMarkers and I added some dots with a white gel pen and glossy accents to the eyes. Stitching is the theme for Virginia's View Challenge #3 so I'm submitting this ATC into Virginia's fun challenge.
I'm submitting the two floral ATCs into Simon Says Spring Flower Challenge.
Next up are the backgrounds. We were only going to swap one background, but I made three and couldn't decide which one to send to Marilyn, so ended up sending the three of them. They were made by applying distress inks to white card and stamping with water instead of ink.

Stamp (Hero Arts) - Watch Gears

Stamp (Hero Arts) - Tiny Star Background

Stamp (Hero Arts) - Time to Stamp
I'm really looking forward to receiving Marilyn's ATCs and her mystery ATC background which I know will be great fun to play with! It looks like we're in for a bit of a soggy day here today but I suppose that's always a good excuse for doing a bit of stamping;) I hope you have a fun and inky weekend!
Monday, March 10, 2014
Scramble Rainbows
I always enjoy the 90 minute Scrambles over at the Hero Arts Flickr Group and on Saturday had fun hosting one. The theme I went for was making any project using mainly neutral colours with dashes of at least three other colours. Over here you'll see all the amazing cards everyone came up during the scramble.
I made a couple of sample cards using the theme and time limit. For the first one I embossed the owls and thought bubble and cut out a window in the bubble.

Stamps (Hero Arts) - Lil Hoot & Write Your Message
Then I embossed the sentiment on a piece of white card, applied distress inks (barn door, spiced marmalade, mustard seed, mowed lawn and broken china) and placed it behind the speech bubble. If I had more time I probably would have added machine stitching but because I was in a hurry just added faux stitching with a white pen. To finish I added googly eyes - I have to start using up the collection I've accumulated over time!
I have lots of little scraps of white card left over from other projects so I decided to use some of these on my second card.

Stamps (Hero Arts) - Tiny Star Background & It's Your Day
I applied distress inks (barn door, spiced marmalade, mustard seed, mowed lawn, broken china and milled lavender) to some of these scraps and stamped the star background on them using the same inks. These pieces were placed behind circular windows I had die cut in a panel of card. Then I just stamped the sentiment and added die cut frames around the windows.
I'm submitting the second card into the rainbow of colour section of Hero Arts birthday challenge.
I made a couple of sample cards using the theme and time limit. For the first one I embossed the owls and thought bubble and cut out a window in the bubble.
Stamps (Hero Arts) - Lil Hoot & Write Your Message
Then I embossed the sentiment on a piece of white card, applied distress inks (barn door, spiced marmalade, mustard seed, mowed lawn and broken china) and placed it behind the speech bubble. If I had more time I probably would have added machine stitching but because I was in a hurry just added faux stitching with a white pen. To finish I added googly eyes - I have to start using up the collection I've accumulated over time!
I have lots of little scraps of white card left over from other projects so I decided to use some of these on my second card.
Stamps (Hero Arts) - Tiny Star Background & It's Your Day
I applied distress inks (barn door, spiced marmalade, mustard seed, mowed lawn, broken china and milled lavender) to some of these scraps and stamped the star background on them using the same inks. These pieces were placed behind circular windows I had die cut in a panel of card. Then I just stamped the sentiment and added die cut frames around the windows.
I'm submitting the second card into the rainbow of colour section of Hero Arts birthday challenge.
Saturday, February 22, 2014
Birthday Rocket
I love making cards for kids and for this one pulled out one of the images from the BAM! set that I often use for cards for boys big and small.

Stamps (Hero Arts) - BAM!, Tiny Star Background & It's Your Day
For the background I applied spiced marmalade distress ink to white card and spritzed it with water. After cutting out the shape I wanted, I stamped the sentiment. For the blue panels I applied faded jeans distress ink to white card and using the same ink stamped the star background. The green strips were originally white card which I coloured with a green ProMarker and pierced.
The rocket was coloured with ProMarkers and a silver gel pen was used on the rivets. To finish I added a generous coat of glossy accents to the rocket and added star dust stickles to the flames.

I'm submitting this card into Hero Arts' birthday challenge (kids cards category).
Well I had fun making this card but I suppose I better go catch up on my ironing now! Hope you have a great and inky weekend:)
Stamps (Hero Arts) - BAM!, Tiny Star Background & It's Your Day
For the background I applied spiced marmalade distress ink to white card and spritzed it with water. After cutting out the shape I wanted, I stamped the sentiment. For the blue panels I applied faded jeans distress ink to white card and using the same ink stamped the star background. The green strips were originally white card which I coloured with a green ProMarker and pierced.
The rocket was coloured with ProMarkers and a silver gel pen was used on the rivets. To finish I added a generous coat of glossy accents to the rocket and added star dust stickles to the flames.
I'm submitting this card into Hero Arts' birthday challenge (kids cards category).
Well I had fun making this card but I suppose I better go catch up on my ironing now! Hope you have a great and inky weekend:)
Wednesday, January 22, 2014
Hero Arts Hostess Blog Hop
Hello and welcome to your next stop on the Hero Arts Hostess Hop, featuring fabulous stamps from the new 2014 release!
You should have arrived here from the blog of my friend, the super talented Sally Sherfield. If you come across a broken link, you can find a master list of the hop links at the Hero Club Blog. Also, please report broken links to blog@heroarts.com.
Don’t forget to leave comments as you hop. Hero Arts will be awarding prizes from randomly drawn comments. For a chance to win, simply comment on ANY of the stops along the hop on ANY day, including each day’s starting post at the Hero Club Blog. The more comments you leave, the better your chance of winning. I know Hero Arts prizes are always fantastic, so best of luck! I have comment moderator switched on, so don’t worry if your comment doesn’t appear immediately.
Every year I look forward with great anticipation to Hero Arts’ new releases and the 2014 catalogue is packed full of so many wonderful products! Thanks to the generosity of Hero Arts, I’ve had a chance to play with some of the new stamps and oh my goodness what fun I’ve had getting inky with them since they arrived!
For my first card I started off by using the cute owls and a sentiment from the Lil Hoot set. I think the Lil Hoot set is so adorable, with super cute images and a lovely range of sentiments. This set also happens to be one of Hero Arts Operation Write Home stamps. Hero Arts donates 25% of the profits from the sale of its OWH stamps to the Operation Write Home organisation. The frame for the owl was made from the outer part of the main image from the A Little set. On this card I also used the Tiny Flags and Tiny Star backgrounds which are such great background stamps and are ones I know I will use over and over again.
Supplies: Stamps (Hero Arts Lil Hoot, Hero Arts Tiny Flags, Hero Arts A Little and Hero Arts Tiny Star Background), card (white, kraft, blue & pink), VersaMark, white embossing powder, black ink, distress inks (antique linen & faded jeans), ProMarkers and glossy accents.
For the next card I again used the A Little stamp set. Although I've only had this set a little over a week, I have already lost track of the amount of times I’ve inked it up – I LOVE it so much. The other day I used it to make a wrap for a chocolate bar and I’ve also made numerous gift tags, using a variety of the sentiments, for use at a later date. This time I made another card and went on a bit of a pink rampage as you can see!
Supplies: Hero Arts A Little stamp set, pink & white card, pink Core'dinations card, Hero Arts pale tomato mid-tone shadow ink, VersaMark, white embossing powder, Sizzix dotted lattice embossing folder and heart rhinestones.
As I mentioned, there are lots of fun sentiments included in the A Little set, but I decided to add a different one to the little tag below:)
Stamp: Hero Arts A Little
Coming up to my birthday and Christmas, I may just have to strategically place the catalogue and tag somewhere in my house as a subtle, or maybe not so subtle, hint;)
Because I love all of the critters in the Lil Hoot set so much, I couldn’t stop at making one card and ended up making a little set of cards. It's hard to tell from the photos but parts of the images are layered on foam pads for some extra dimension. This was a really quick and easy process because of the way that the critters are drawn. I pulled the Tiny Flags background back out again for a bit of embossing on the backgrounds.
Supplies: Stamps (Hero Arts Lil Hoot, Hero Arts Tiny Flags and Hero Arts Be Happy), card (white, kraft, yellow, orange, green, blue and pink), black ink, VersaMark, clear embossing powder, glossy accents, ProMarkers, Nestabilities (circles and inverted scalloped circles), sewing machine and threads.
I just want to say thanks a million to Hero Arts for their generosity and yet another release packed full of must haves. A great big thanks to you too for visiting and to my hosti sisters who are so much fun and so inspiring! Now it’s time for you to hop to your next stop where the sweet and very talented Arlene McClung awaits your visit.
You should have arrived here from the blog of my friend, the super talented Sally Sherfield. If you come across a broken link, you can find a master list of the hop links at the Hero Club Blog. Also, please report broken links to blog@heroarts.com.
Don’t forget to leave comments as you hop. Hero Arts will be awarding prizes from randomly drawn comments. For a chance to win, simply comment on ANY of the stops along the hop on ANY day, including each day’s starting post at the Hero Club Blog. The more comments you leave, the better your chance of winning. I know Hero Arts prizes are always fantastic, so best of luck! I have comment moderator switched on, so don’t worry if your comment doesn’t appear immediately.
Every year I look forward with great anticipation to Hero Arts’ new releases and the 2014 catalogue is packed full of so many wonderful products! Thanks to the generosity of Hero Arts, I’ve had a chance to play with some of the new stamps and oh my goodness what fun I’ve had getting inky with them since they arrived!
For my first card I started off by using the cute owls and a sentiment from the Lil Hoot set. I think the Lil Hoot set is so adorable, with super cute images and a lovely range of sentiments. This set also happens to be one of Hero Arts Operation Write Home stamps. Hero Arts donates 25% of the profits from the sale of its OWH stamps to the Operation Write Home organisation. The frame for the owl was made from the outer part of the main image from the A Little set. On this card I also used the Tiny Flags and Tiny Star backgrounds which are such great background stamps and are ones I know I will use over and over again.
Supplies: Stamps (Hero Arts Lil Hoot, Hero Arts Tiny Flags, Hero Arts A Little and Hero Arts Tiny Star Background), card (white, kraft, blue & pink), VersaMark, white embossing powder, black ink, distress inks (antique linen & faded jeans), ProMarkers and glossy accents.
For the next card I again used the A Little stamp set. Although I've only had this set a little over a week, I have already lost track of the amount of times I’ve inked it up – I LOVE it so much. The other day I used it to make a wrap for a chocolate bar and I’ve also made numerous gift tags, using a variety of the sentiments, for use at a later date. This time I made another card and went on a bit of a pink rampage as you can see!
Supplies: Hero Arts A Little stamp set, pink & white card, pink Core'dinations card, Hero Arts pale tomato mid-tone shadow ink, VersaMark, white embossing powder, Sizzix dotted lattice embossing folder and heart rhinestones.
As I mentioned, there are lots of fun sentiments included in the A Little set, but I decided to add a different one to the little tag below:)
Stamp: Hero Arts A Little
Coming up to my birthday and Christmas, I may just have to strategically place the catalogue and tag somewhere in my house as a subtle, or maybe not so subtle, hint;)
Because I love all of the critters in the Lil Hoot set so much, I couldn’t stop at making one card and ended up making a little set of cards. It's hard to tell from the photos but parts of the images are layered on foam pads for some extra dimension. This was a really quick and easy process because of the way that the critters are drawn. I pulled the Tiny Flags background back out again for a bit of embossing on the backgrounds.
Supplies: Stamps (Hero Arts Lil Hoot, Hero Arts Tiny Flags and Hero Arts Be Happy), card (white, kraft, yellow, orange, green, blue and pink), black ink, VersaMark, clear embossing powder, glossy accents, ProMarkers, Nestabilities (circles and inverted scalloped circles), sewing machine and threads.
I just want to say thanks a million to Hero Arts for their generosity and yet another release packed full of must haves. A great big thanks to you too for visiting and to my hosti sisters who are so much fun and so inspiring! Now it’s time for you to hop to your next stop where the sweet and very talented Arlene McClung awaits your visit.
Sunday, December 8, 2013
Secret Santa
Over at the Hero Arts group on Flickr we have a little Secret Santa fun going on. Each Secret Santa is sending a Christmas card, a Christmas ATC and a little present to someone else who is taking part in the exchange. We'll only find out who our Secret Santa is when the package pops in through the letterbox.
I was playing Secret Santa to Laura and now that Laura has received her parcel I can show photos here. Well this Secret Santa was a forgetful Santa and forgot to take a photo of the little pressie but I did take photos of the ATC and card.
I just love the happy reindeer in the Christmas Reindeer set and pulled out one of them for the ATC.

Stamps (Hero Arts) - Christmas Reindeer, Tiny Star Background, Designer Snowflakes
and Special Delivery
The reindeer was coloured with ProMarkers and layered in places for some dimension. To make the background, I applied distress inks (broken china, faded jeans & tumbled glass) to white card, spritzed water on the star background and stamped the panel. Then I stamped some snowflakes using faded jeans distress ink and embossed the sentiment. I wanted lots of sparkle on the ATC so added stickles to the snowy ground and white dots on the reindeer's jumper (sweater). In case it wasn't sparkly enough I also added a glittery red frame.
Next up is the card.

Stamps (Hero Arts) - Designer Snowflakes and Special Delivery
For this one I embossed snowflakes on a panel of kraft card, inked the edges with white ink and did a bit of distressing. After stamping the sentiment and adding some gems, I layered the sentiment circle on a glittery die cut. To finish I just added a strip of ribbon and a bow.
I really enjoyed making the ATC and card for Laura and needless to say a trip to my lss to buy some little bits and pieces for her was fun too:) Hope you are having a fun and inky weekend:)
I was playing Secret Santa to Laura and now that Laura has received her parcel I can show photos here. Well this Secret Santa was a forgetful Santa and forgot to take a photo of the little pressie but I did take photos of the ATC and card.
I just love the happy reindeer in the Christmas Reindeer set and pulled out one of them for the ATC.
Stamps (Hero Arts) - Christmas Reindeer, Tiny Star Background, Designer Snowflakes
and Special Delivery
The reindeer was coloured with ProMarkers and layered in places for some dimension. To make the background, I applied distress inks (broken china, faded jeans & tumbled glass) to white card, spritzed water on the star background and stamped the panel. Then I stamped some snowflakes using faded jeans distress ink and embossed the sentiment. I wanted lots of sparkle on the ATC so added stickles to the snowy ground and white dots on the reindeer's jumper (sweater). In case it wasn't sparkly enough I also added a glittery red frame.
Next up is the card.
Stamps (Hero Arts) - Designer Snowflakes and Special Delivery
For this one I embossed snowflakes on a panel of kraft card, inked the edges with white ink and did a bit of distressing. After stamping the sentiment and adding some gems, I layered the sentiment circle on a glittery die cut. To finish I just added a strip of ribbon and a bow.
I really enjoyed making the ATC and card for Laura and needless to say a trip to my lss to buy some little bits and pieces for her was fun too:) Hope you are having a fun and inky weekend:)
Friday, November 22, 2013
Christmas Blessings
I'm off work today, so the weekend has started for me - yippee:)

Stamps (Hero Arts) - Greatest Gift & Tiny Star Background
I thought I'd make another Christmas card using the Greatest Gift set from Hero Arts. To start with I cut out the banner and die cut an opening for the Nativity scene. Then I embossed the sentiment and added some faux stitching.
To make the background for the Nativity scene, I inked a panel of white card with distress inks (broken china, tumbled glass and faded jeans). Then I spritzed water on the Tiny Star background and stamped on the panel. I also added some splashes of water from a paintbrush.

Once this was dry I stamped the scene and added a frame, a twine bow and a couple of gems to finish.
I'm submitting this card into the current Hero Arts Challenge (A Few of My Favourite Things category, as I used a favourite technique - stamping on distress ink with water) and the Die Cut Divas' Let's Celebrate Challenge. Hope you have a great weekend!
Stamps (Hero Arts) - Greatest Gift & Tiny Star Background
I thought I'd make another Christmas card using the Greatest Gift set from Hero Arts. To start with I cut out the banner and die cut an opening for the Nativity scene. Then I embossed the sentiment and added some faux stitching.
To make the background for the Nativity scene, I inked a panel of white card with distress inks (broken china, tumbled glass and faded jeans). Then I spritzed water on the Tiny Star background and stamped on the panel. I also added some splashes of water from a paintbrush.
Once this was dry I stamped the scene and added a frame, a twine bow and a couple of gems to finish.
I'm submitting this card into the current Hero Arts Challenge (A Few of My Favourite Things category, as I used a favourite technique - stamping on distress ink with water) and the Die Cut Divas' Let's Celebrate Challenge. Hope you have a great weekend!
Sunday, November 10, 2013
Snowy Village
It's getting a bit cooler here now, but so far we've had no snow. I do love snowy winter scenes on Christmas cards and wanted to use Hero Arts' pretty New England Winter stamp for my next Christmas card. I can just imagine sitting beside the fire sipping hot chocolate in one of those snowbound houses:)

Stamps (Hero Arts) - New England Winter, Tiny Star Background & Christmas Reindeer
As I was going to cut out the building and pop them on foam pads for some dimension, I thought I'd go with a starry background instead of the snowflake background on the village stamp. So to start with I embossed the stars on a panel of pierced kraft card that I'd left aside from another project. The buildings were stamped using barn door distress ink. It's hard to tell from the photo but there is a lot of depth in the card as the snow banks, buildings and panel are all on foam pads. I embossed the sentiment and lightly applied some white ink to the edges of the die cut sentiment piece. To finish I added lots and lots of stickles to the card to try to mimic the lovely sparkle of snow.

Sorry for the slightly blurry photo but I couldn't seem to get a clear one! I'm submitting this card into the current Hero Arts Challenge and the Die Cut Divas Let's Celebrate Challenge.
Stamps (Hero Arts) - New England Winter, Tiny Star Background & Christmas Reindeer
As I was going to cut out the building and pop them on foam pads for some dimension, I thought I'd go with a starry background instead of the snowflake background on the village stamp. So to start with I embossed the stars on a panel of pierced kraft card that I'd left aside from another project. The buildings were stamped using barn door distress ink. It's hard to tell from the photo but there is a lot of depth in the card as the snow banks, buildings and panel are all on foam pads. I embossed the sentiment and lightly applied some white ink to the edges of the die cut sentiment piece. To finish I added lots and lots of stickles to the card to try to mimic the lovely sparkle of snow.
Sorry for the slightly blurry photo but I couldn't seem to get a clear one! I'm submitting this card into the current Hero Arts Challenge and the Die Cut Divas Let's Celebrate Challenge.
Sunday, October 6, 2013
Happy Happy Birthday
Given the day that was in it, I was delighted to have a chance to join in on Jennifer's fun scramble yesterday afternoon. The theme of the scramble was to make a birthday card for someone aged between one and eighteen years old.
One of my favourite stamps for birthday cards for boys is a cute rocket from the BAM! set by Hero Arts. So I inked it up yet again for this card.

Stamps (Hero Arts) - BAM!, Tiny Star Background and Fantastic Birthday
To make the stars for the background, I embossed the Tiny Star Background in white, applied faded jeans distress ink and die cut into stars. I wanted a few more stars in the background so added tiny star gems, again from Hero Arts.
Initially I paper pieced a rocket, but it looked too dull so I just layered it with another rocket that I coloured with ProMarkers and a silver gel pen.

The sentiment was also stamped with faded jeans distress ink. I'm submitting this card into the Color Media Challenge in the Moxie Fab World. Hope you had a wonderful World Card Making Day yesterday too!
One of my favourite stamps for birthday cards for boys is a cute rocket from the BAM! set by Hero Arts. So I inked it up yet again for this card.
Stamps (Hero Arts) - BAM!, Tiny Star Background and Fantastic Birthday
To make the stars for the background, I embossed the Tiny Star Background in white, applied faded jeans distress ink and die cut into stars. I wanted a few more stars in the background so added tiny star gems, again from Hero Arts.
Initially I paper pieced a rocket, but it looked too dull so I just layered it with another rocket that I coloured with ProMarkers and a silver gel pen.
The sentiment was also stamped with faded jeans distress ink. I'm submitting this card into the Color Media Challenge in the Moxie Fab World. Hope you had a wonderful World Card Making Day yesterday too!
Saturday, September 28, 2013
Home Is Where the Heart Is
I've been having great fun trying out different things with Hero Arts' Brush Strokes set, but as soon as the Tiny Star Background (love this new stamp!) arrived the other day, I knew I wanted to combine it with one of the brush stroke images.

Stamps (Hero Arts) - Tiny Star Background, Brush Strokes and Right at Home
I love this fun card by Kelly Rasmussen and fell for the tiny banner at the top of the card with the heart cut out. So I thought I'd make a banner with a cut out heart too but have it as the focal point on my card. I embossed the stars in white, applied faded jeans distress ink and cut out the heart and banner shape. On another panel of white card I stamped the brush strokes using barn door distress ink and placed this behind the banner using foam pads.
I used a lovely sentiment from the Right at Home set brought out by Hero Arts for Operation Write Home.

By changing the sentiment I could also use the card for a 4th July card or for our older son's birthday as he was born on 4th July. I'm submitting this card into the Color Media Challenge in the Moxie Fab World and the current Hero Arts Challenge.
Hope you have a great weekend:)
Stamps (Hero Arts) - Tiny Star Background, Brush Strokes and Right at Home
I love this fun card by Kelly Rasmussen and fell for the tiny banner at the top of the card with the heart cut out. So I thought I'd make a banner with a cut out heart too but have it as the focal point on my card. I embossed the stars in white, applied faded jeans distress ink and cut out the heart and banner shape. On another panel of white card I stamped the brush strokes using barn door distress ink and placed this behind the banner using foam pads.
I used a lovely sentiment from the Right at Home set brought out by Hero Arts for Operation Write Home.
By changing the sentiment I could also use the card for a 4th July card or for our older son's birthday as he was born on 4th July. I'm submitting this card into the Color Media Challenge in the Moxie Fab World and the current Hero Arts Challenge.
Hope you have a great weekend:)
Subscribe to:
Posts (Atom)