Showing posts with label Magical Background. Show all posts

Thursday, August 7, 2014

One Layer Blocks

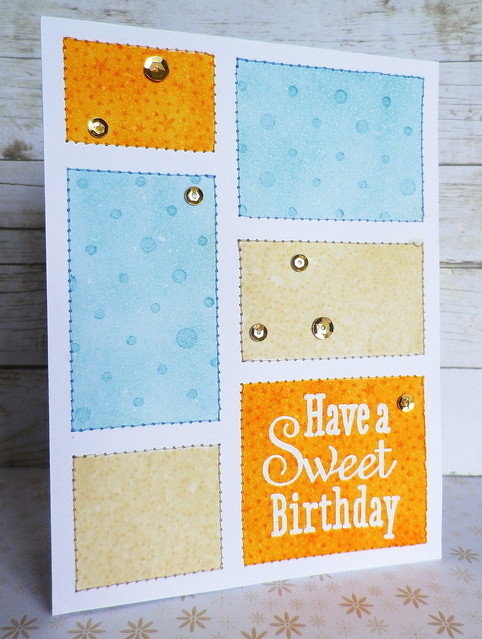
Today I made another one layer card using the same method I used in the first card in this post.

This time I masked off areas in blocks and applied distress inks. After applying the inks and spritzing with water I stamped images on the blocks using the same distress inks.

IMGP3813
Stamps (Hero Arts) - Fantastic Birthday, Magical Background, Tiny Star Background and Solid Dots Pattern

Once the card had dried completely I embossed the sentiment and machine stitched frames around the blocks. Sequins were added for a touch of sparkle.

I'm submitting this card into Hero Arts' One Layer Challenge and Simon Says Stamp's Make it Sparkle Challenge.

Sunday, July 14, 2013

Flying Scramble

Last night Jayne hosted a fun and challenging scramble over at the Hero Arts Flickr group.

Jayne was inspired by baseball in picking the theme for her challenge and went for a triple play. I haven't a clue what that means in baseball terms but our scramble card had to include a triple play of trends - 1) use a photo frame 2) have at least one element on a slant and 3) have a metallic element.

Daytime photo of scramble card

Stamps (Hero Arts) - Magical Background, BAM! & Ghostly Greetings

I haven't had a chance to play along in the scrambles in quite a while and had forgotten how quickly those 90 minutes whizz by! The fact that about 20 minutes of my time was taken up searching for my craft knife didn't exactly help, lol! I had tried cutting the photo frame with a scissors but it looked so bockety that way! I've seen YouTube videos of people completing a card in 10 minutes - lol I don't think I'll ever be capable of that!

For the background I stamped the Magical Background on blue card using faded jeans distress ink. I stamped the rocket twice, coloured and layered in parts for some extra dimension. To complete the metallic element part of the theme I added gold stickles to the flame from the rocket and silver pen to the rivets and piece protruding from the rocket nose.


Yikes got a bit splodgy with the stamping but that's what happens when you're scrambling! The next scramble in the group will be hosted by Janet on 28th July. If you'd like to join in on this scramble you'll find more details here.

Thursday, March 21, 2013

ATCs Swapped with Libby

Last week I blogged about the fabulous ATCs I received from Libby in a swap organised over at the Hero Arts Flickr Group. Now Libby has finally received the ATCs I sent her. Unfortunately, this set was made in bit of a hurry as I mislaid the set I had originally made for Libby, so please ignore the dodgy bits on the ATCs! Libby came up with the great idea of making the ATCs based on what we love, so here are some of the things I love:

1. Family and home & 2. Gardening and butterflies
ATC Swap With Libby 5 & 6

Stamps (Hero Arts) 1. House with Plant & Right at Home 2. Leafy Vines

On the first ATC I just applied distress inks to a piece of paper from a book and coloured the house with markers. For the second one I embossed the vines, applied mowed lawn distress ink and spritzed with a mix of perfect pearls and water. The tiny layered butterflies were punched out.

3. Sewing/fabric & 4. Ireland

ATC Swap With Libby 3 & 4

Stamps (Hero Arts) 3. Sew Artsy & Be Happy 4. Postcard Collage

For the sewing ATC I embossed the machine, cut out the image and added some thread. Then I frayed some fabric for the background, stamped the sentiment and hand stitched over it. On the Ireland ATC I just stamped the map on some kraft card, distressed the edges and used markers to colour the map of Ireland.

5. Hillwalking & 6. Glendalough/historical places

ATC Swap With Libby 1 & 2

Stamps (Hero Arts) 5. Be Happy 6. Scattered Leaves & Magical Background

On the hillwalking card I rummaged through my fabrics for a mix of colours, shades and patterns and tried to make a background that looked like a lake and mountains. The sun was stamped on card with distress ink applied. Then on my last ATC I framed a photo from Glendalough in a die cut window and added it to a background which had been covered with distress ink and stamped with the Magical Background and leaves.

I had so much fun making these little cards and really enjoyed my swap with Libby.


Sunday, March 17, 2013

Double Rainbow Shamrock

Happy St Patrick's Day! This morning (I know I'm very late!), I decided to make a St Patrick's Day card to celebrate the day that's in it.

Of all the symbols associated with Ireland I think my favourite has to be the shamrock, because of how pretty it looks and the story of it and St Patrick. So I thought I'd do something a little different with the shamrock and play on another symbol associated with St Patrick's Day - rainbows.

Double Rainbow Shamrock

Stamps (Hero Arts) - Magical Background & Celebrate Everyday


To make the shamrock I took scraps in a rainbow of colours and cut the bigger hearts using my Silhouette Cameo and punched out the smaller hearts. Then I layered them up and added some stitching. As I can't draw to save my life, I used the outline of one of the bigger hearts to make the stem of the shamrock. Then it was just a matter of stamping the sentiment and adding a background stamp.

Close up of the Double Rainbow Shamrock

After looking through my stamps, I picked the Magical Background stamp as it reminds me of the circular patterns often found carved into stone in historical places here including Newgrange, Knowth and Dowth in the Boyne Valley.


Carved stone at Knowth


The Tuesday Trigger: Elegant Emerald over at Moxie Fab World inspired the use of a number of different shades of green on the card and I added the layers and layers of hearts to represent the ruffles.


I'm also submitting the card into the Happy St Patrick's Day Challenge at Whimsical Designs.

Yikes I just looked out the window and it looks like we might have a bit of white to add to the green today - it's snowing lightly! Well I'm off to enjoy the day. Hope you have a fun St Patrick's Day!

Friday, March 15, 2013

ATC Heaven!

I was so excited when I got home from work the other night and discovered a package from the very talented and sweet Libby Hickson. Libby and I were paired up in an ATC swap over at the Hero Arts Flickr group. We did our swap at a leisurely pace, in my case at a very leisurely pace indeed as I mislaid the first set of ATCs I had made for Libby! Anyway I'm hoping that Libby will receive the ATCs I made any day now, but for the moment I'd love to show you the amazing ATCs I received from Libby. It's a pity my photos don't do any justice to just how beautiful they are in real life.

For our swap Libby came up with the great idea of making ATCs based on what we love and I had fun guessing what Libby would come up with. Lol now why is it that I don't have a chocolate stamp in my stash?! If you know Libby at all, you'll know that one of her big loves is cycling so I was delighted to see this fun biking scene with the cute glittery bicycle and sweet banners. Being a bit of a fabric fiend I just love the way Libby used canvas on the seashell ATC and layered the images so beautifully, to show her love for the oceans, aquariums and fish. Not only does the ATC look pretty but it feels lovely too.


Stamps (Hero Arts) - 1. Cloud Backgrounds, Envelope Pattern, 2. Antique Engravings

Next up is a gorgeous, gorgeous ATC representing Libby's love of poppies, flowers and gardens. Not only is the colouring fab but I wish you could see the wonderful glimmering gold background in all its glory. Isn't the veggie ATC showing Libby's love for cooking and vegetables just the cutest? I have to say I'm a girl (or I should say auld wan!) who loves her veggies and this ATC just makes me smile.


Stamps (Hero Arts)- 1. Delicate Blossoms & Friend Definition 2. Kiss the Cook

Now we're off travelling with Libby to a couple of her favourite places - Texas and New York. Again there's wonderful colouring, distressing and layering on Libby's Texas ATC and it's just such a fun one. I've never been to Texas but I'm with Libby on loving New York City. It's such a brilliant place to visit and I love the wonderful, atmospheric sky Libby has created as a backdrop to this lovely skyscraper skyline stamp.


Stamps (Hero Arts)- 1. Howdy, Magical Background 2. Newspaper Skyline

As you can probably tell I just LOVE all of these ATCs! I included the names of stamps when I recognise them but I'm afraid I've missed out on a few. Libby, thanks again for swapping with me, I enjoyed it so much! Also thanks for all the yummy goodies you included in your package, I'm going to have great fun playing with them:)You can find Libby's inspiring blog here.


Wednesday, July 25, 2012

Rainbow Star

Recently I’ve been busy, busy with a lot of things going on here, but I knew with the Hooked on Hexagons Challenge going on currently over at the MoxieFab World, it wouldn’t be long before I'd start playing with hexagons again!

DSCN0387

Stamps (Hero Arts) – Sew Artsy, Woodgrain Background, Magical Background, Friend Definition, Dot Flower Pattern, Lattice Background and Hydrangea.

As I was trying to make different patterns out of hexagons, I realised that by removing one from the centre of a cluster of hexagons, I could form a star shape. So I used up lots of little scraps, which had already been stamped, to fill my star centre. Then I just added some machine stitching and a sentiment to finish.

One of the things that has been keeping me busy is preparing for a class I'm doing in An Siopa Bui in Spiddal on Saturday and I just finished cutting 75 circles of fabric (thank goodness for Cuttlebugs!) as part of the preparation - phew! Kerry has some sneak peeks here of some of the cards we'll be making. I can't wait for it!


Sunday, December 18, 2011

A Gift Card Hidden in the Snow

The current Hero Arts challenge includes a pocket card category, so I thought I’d make a little card for a gift token I’m giving at Christmas.

A Gift Card in the Snow
Stamps (Hero Arts) – Snowy House, Magical Background, Friendly Flags and Very Merry Christmas.

For the front of the card I applied tumbled glass distress ink to white card and using the same ink, stamped it with the magical background. The ground was embossed with snowflakes and some stickles added for a bit of sparkle. I coloured the house with a ProMarker and watercolour pencil, layer it and added stickles for yet more sparkle – lol went a bit sparkle mad on this card! I loved the way Kelly Rasmussen used one of the flags from the Friendly Flag set for Christmas trees on this gorgeous pocket card. So I decided to use a flag with a scallop pattern for my tree here. I layered the tree to add some dimension and added some pink gems and a star to finish. The sentiment is embossed in white.

A Gift Card in the Snow
The inside of the card was made in the same way as the outside, except instead of sticking down the snowdrifts I just attached them to the card on three sides using machine stitching.

A Gift Card in the Snow - inside
My little fella is hoping for it to be as snowy here as on the card on Christmas Eve\Day to make it easier for Santa to get here. Although we've had flurries of snow and a cold snap over the last little while, it's supposed to get warmer during the week. Do you think you will have snow in your neck of the woods for Santa next week??

Wednesday, August 10, 2011

Happy Birthday Honey

I love the cute little bees from the Be Happy set and decided to use them on my hubby’s birthday card this year.

Happy Birthday Honey
Stamps (Hero Arts) - Be Happy, Clouds, Magical Background, Birthday Messages, Envelope Pattern & Heart Owls

The clouds are stamped with tumbled glass distress ink which had been lightly spritzed with water. All of the hills and the sun came from pieces in my scrap mountain. I coloured the little bees with a ProMarker and colouring pencil. To finish I just added a little diamond stickles to the bees’ wings and Glossy Accents to all the hearts. It’s hard to tell from the photo, but the red background is stamped with the Magical Background using VersaMark.

A quick post today, but right now I have a slice of birthday cake calling me!

Wednesday, July 27, 2011

Bucket and Pillow of Shells

It’s been ages since I posted, but now I’m back from holidays and feeling on track again after a bad cold. I wanted to cover two themes in Hero Arts’ July challenge (summertime and parties), the Fanatical About Botanical Challenge in the Moxie Fab World and the Simon Says Stamp and Show Anything Goes Challenge.

Bucket and pillow of shells
Stamps (Hero Arts) - Antique Engravings, Magical Background & Messages

For my kids the ideal summer would include a trip to the beach every day, so when I think of summer, I think of making sandcastles, gathering shells and traisping through the rough grass in the sand dunes. So with this in mind I made these treat containers, which might be suitable for a summer party, and included bits and pieces that I associate with the beach. Then I filled them with chocolate shells - one of my favourites!

Bucket of shells

For the sand bucket, I covered a coffee cup with sand patterned paper. The handle was made with florists wire and pearls from a cheap necklace. I applied tumbled glass distress ink to white card and using the same ink stamped it with the Magical Background. I added a strip of this, some May Arts ribbon, raffia and a stamped shell to the bucket.

Pillow of shells

For the pillow box I applied tumbled glass distress ink to white card, stamped with the magical background using the same ink and die cut a window when the pillow shape was cut out. To finish I just added the shell and raffia.

Now I'm off to have some shells and a cuppa!

Monday, May 9, 2011

Rainbow of ATCs

Part of the May challenge on the Hero Arts blog is to make ATCs. I haven’t made ATCs in a while and had forgotten how fun it is to make them. Another bonus to making ATCs is all the scraps I get to use up!

I wanted to make an ATC for each colour of the rainbow so just picked the first stamp that came to mind when I thought of each colour. All stamps mentioned are by Hero Arts.
Rainbow of ATCs


The Poppy Background was embossed in red and I added some beads to the flower centre.


I applied spiced marmalade distress ink to white card and stamped the Exotic Bloom in black. Then I just added punched butterflies.


I clear embossed the Clouds Background on yellow card. The bees were embossed in black and I coloured them with a yellow ProMarker and added diamond stickles to the wings. Trinh, thanks again for the black & white baker's twine:)


For the background I applied shabby shutters distress ink to white card, using the same ink stamped with the Envelope Pattern and embossed. Froggy was stamped on patterned paper and coloured in places with a ProMarker. To finish I added some leaves and green & white baker's twine (thanks again, Linda!).


On this one I clear embossed the Friend Definition on blue card for the background. The sewing machine was stamped on gingham patterned paper and I just added some thread and a fabric scrap to finish.


I applied some worn lipstick distress ink to white card, clear embossed the Magical Background and then applied dusty concord and faded jeans distress inks. The butterfly from the Antiques Engravings set was embossed in white and some purple pearls (thanks again, Sharon!) added to the centre.


Now I better go catch up on what I should have done yesterday instead of making these!

Tuesday, April 19, 2011

Thanks Patricia & Same Stamp Challenge

Firstly, I'd like to say a great big thanks again to my friend Patricia for the wonderful new banner she sent me. She knows I love owls and this banner is so adorable and perfect for my blog!

Over at the Hero Arts Flick group we have a “use the same stamp” challenge going on. Linda, Anita, Sharon, Sally and I decided it would be fun for us all to make cards using the same stamp. We all love the Antiques Engravings set and decided to go with stamps from that set. We haven’t seen each other’s cards so each day this week we’ll get to see one of the cards. Linda started off yesterday with this gorgeous card here and it’s my turn to post today. You don’t need to have the Antique Engravings set to join in on the challenge - you can team up with someone who has a stamp in common with you. If you’d like to join in on the fun, full details are here.

Butterfly Thanks – Same Stamp Challenge
Stamps (Hero Arts) - Antique Engravings, Magical Background, Earth Flowers, Messages and Old Letter Writing

My card is (loosely!) based on one of the sketches for this month’s challenge at Hero Arts – the butterfly just fluttered away a little bit! For the bottom part of the background I applied faded jeans distress to white card and white embossed the Magical Background. On the upper part of the background the Earth Flowers were stamped using VersaMark. I had a scrap of card (white card with antique linen distress ink applied to it and stamped with Old Letter Writing) left over from another project and used this for the butterfly and sentiment. The sentiment is stamped using faded jeans distress ink. I love this pretty lace ribbon from Hero Arts and ended up using two strips of it on the card. The paper flowers have been in my flower drawer for ages so I’m glad to have finally found a home for them!

Tuesday, April 12, 2011

Card, Treat Holder and Jelly Beans

I’ve wanted to make a couple of projects for the past few days and was delighted to finally get a bit of time to make them today.


The first one is a card I made for Kathy's Colour Throw Down at Lily Pad Cards. I didn’t have the exact colours for the challenge but used colours as close as possible to them. I used a sketch from the current Hero Arts challenge and because of the masculine theme in the challenge went for a card for a little (or maybe not so little!) guy.

Lily Pad and Sketch challenge
Stamps (Hero Arts) – Clouds, Going, Envelope Pattern, Magical Background, Be Happy and Birthday Messages.

To start with I applied broken china distress ink to the Clouds Background, spritzed liberally with water and stamped on white card. I coloured the car with Promarkers and applied a layer of Glossy Accents for some sheen. For the sun I applied spiced marmalade distress ink to white card and stamped with the Envelope Pattern using the same ink. On the bottom strip of the card I applied shabby shutters distress ink to white card and stamped the Magical Background using the same ink. The sentiment is embossed.

I made a treat container to go with the card and am submitting it into the Food Wrap Challenge in the Moxie Fab World.


Going Treat Container
Stamps (Hero Arts) – Clouds, Going, Envelope Pattern & Be Happy.

The cloud background, sun and car were all made in the same way as on the card above. I just added a little peep hole for the jelly beans. Both my kids said they preferred the treat container to the card but I’m wondering if that had anything to do with the jelly beans they had as a result of me making the container!

Sunday, March 27, 2011

Wild Flowers with Flower Brooches

After watching Kelly Rasmussen make fabulous fabric flowers and use them in brilliant ways in a video on the Hero Arts blog, I just had to give it a go. So I made quite a few the other day using different colours and fabrics. I'll add them to cards, bags, tops and like Kelly did use them for hair accessories.


I love the gorgeous colour combination for the Play Date Cafe Challenge this week and made a couple of the flowers using these colours. The flowers have pins on the backs so can be used as brooches.

Wild Flowers with Flower Brooches
Stamps (Hero Arts) - Wild Flowers and Birthday Messages

I applied broken china distress ink to the Wild Flowers stamp, spritzed with water and stamped on watercolour paper. Then I lightly distressed the edges to go with the slightly frayed flowers and added some gems. When I have very small scraps left over from projects, I often punch butterflies from them and keep them in a jar for another time. The butterfly here is one of these and had been from a project where I used dusty concord distress ink. I just added the little heart pearl to the body.

Below are some of the flowers I made – I won’t bore you with them all! All the stamps mentioned are by Hero Arts.

Denim from an old pair of jeans stamped with the Magical Background (the pattern is more obvious in real life) using faded jeans distress ink.


Gingham with the button stamped with the Envelope Pattern using worn lipstick distress in
k

Hand dyed fabric stamped with the Envelope Pattern


Another hand dyed fabric


Cotton on the bottom layer (stamped with Old Letter Writing)......


.... with a layer of organza petals on top


When I folded each petal in half, I didn’t fold them perfectly but offset them a bit to get a more ruffled look.


If you'd like to make these kind of fabric flowers you should watch Kelly's brilliant video.

Saturday, March 12, 2011

Dotty Butterflies

This is another card I made for the Moxie Fab World Paper Piecing Challenge, this month’s Hero Arts challenge and Simon Says Stamp Anything Goes Challenge and . It's great that because of these challenges I’m getting lots of birthday cards ready in advance for family and friends rather than rushing at the last minute as often happens with me!

DSCN7378
Stamps (Hero Arts) – Antique Engravings, Magical Background, Envelope Pattern and Birthday Wishes.

For the top part of the background I applied broken china distress ink to white card, spritzed with water, stamped the Envelope Pattern using the same ink and white embossed with the Magical Background.


I white embossed the butterflies on vellum, added beads and paper pieced some scraps of vellum which had alcohol inks applied. I had been messing around with vellum and alcohol inks after seeing Sue’s wonderful video here. The sentiment was stamped using broken china distress ink (can you tell that’s my favourite one?!) and I just added some machine stitching and string to finish.

Hope you are all having a wonderful weekend:)

Sunday, March 6, 2011

Crazy in two ways for paper piecing!

Below is a birthday card I made for a quilting friend. I was going to put the birthday sentiment on the outside but with so much going on there as it was, I decided to put it inside instead. I’m submitting the card into the Play Date Cafe Challenge Colour Splash Week and the Moxie Fab World Paper Piecing Challenge. This month’s challenge at Hero Arts includes the theme of birthdays.


To start with I stamped the Envelope Pattern in white on red card. Then I stamped this and two pieces of white card with the sewing machine and paper pieced it – yikes those pieces were tiny but I love paper piecing anyway! On a piece of white patterned fabric I stamped the sentiment and hand stitched it with red thread. Then I just threaded up the pieced machine, added a gem and some machine stitching on the black background.

Crazy for Piecing - and you can take that title both ways!

Stamps (Hero Arts) - Sew Artsy, Classic Fabric Design, Large Canvas Stripes, Flourish Background, Magical Background & Envelope Pattern.

For the patterned background I white embossed pieces of black card with the Magical and Flourish Backgrounds and stamped the Classic Fabric Design and Large Canvas Stripe in black on white card. These were then cut into strips. I cut a square of white card into four triangles applied the strips, trimmed and put the square back together again. I think I can safely say this card takes the record for the most time I’ve ever spent making a card but I had great fun making it!

Crazy for Piecing! Close up

Hope you’re all having a wonderful weekend!
Related Posts with Thumbnails