I wanted to make a birthday card with a space theme for a two year old boy so pulled out a cute freebie stamp set (Rocket Thanks) that Hero Arts recently gave out with orders.
After stamping and cutting out the rocket, I coloured it with Promarkers and added stardust stickles to the flame. The star background was made by applying distress inks (salty ocean, peacock feathers & faded jeans) to white card and stamping the stars in faded jeans distress ink.
Stamps (Hero Arts) - Rocket Thanks, Fantastic Birthday & Tiny Star Background
Die (Tonic) - Advent Drawer Deco Die
I die cut numbers out of the side of the card base and added a panel of acetate behind the number two so that I could inlay the birthday boy's age. As I wanted it to appear that the rocket flame had ignited the number, I coloured it in the same colour as the flame and applied stardust stickles.
I'm submitting this card into Allsorts' Numbers Challenge and Simon Says Stamp's Anything Goes Challenge.
Showing posts with label Fantastic Birthday. Show all posts
Thursday, October 1, 2015
Thursday, September 3, 2015
Two Card Makeovers and a Little Recycling
Hero Arts' fun Makeover Challenge gives us a chance to makeover old projects. I definitely have plenty that could do with changes but picked two butterfly cards for makeovers today.
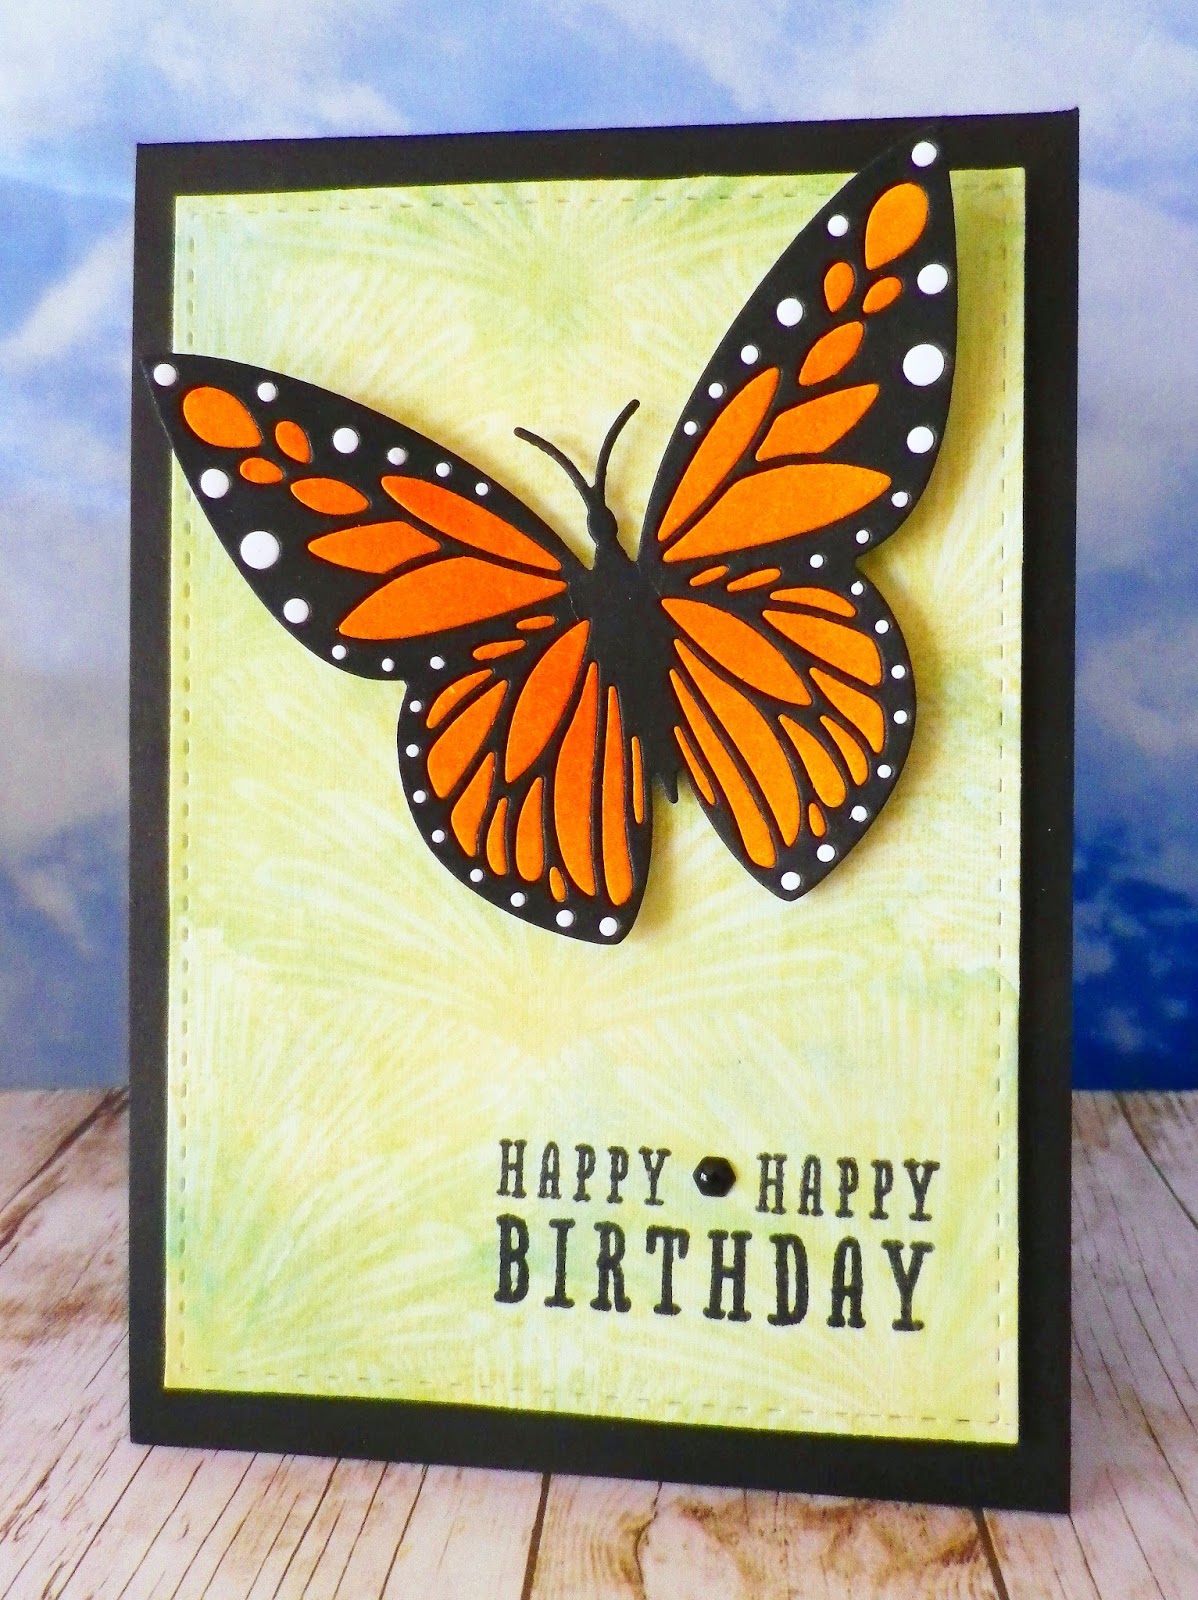
The first card I picked is this one.
I wanted to make a butterfly in the same colours using the same inlay technique but changed the background and used less enamel hexagons. For the background I light applied distress inks (broken china, tumbled glass & shabby shutters) onto white card. Then I inked the background stamp with shabby shutters distress ink, spritzed with water and stamped on the panel. After stamping the sentiment I added one little enamel hexagon to finish.
Stamps (Hero Arts) - Tropical Background & Fantastic Birthday
Dies - Butterfly (Hero Arts) & Bundle of Stitched Shapes (Simon Says Stamp)
Next in line for a makeover was this card.
With this one I wanted to reverse the colours and add even more sparkle to the butterfly. I inked up the background stamp by dragging Hero Arts' mint julep to emerald green ombré ink pad across and down it. Then I stamped the image on a panel of white card and applied peacock feathers distress ink. Once the panel was dry, I embossed the sentiment.
Stamps (Hero Arts) - Tropical Background & Celebrate Everyday
Dies - Butterfly (Hero Arts) & Bundle of Stitched Shapes (Simon Says Stamp)
Next it was time to do a bit of recycling to make the sparkly butterfly. I die cut the butterfly from a piece of white glitter card I had saved from a Christmas card. The butterfly was backed with glittered tulle taken from a mini bag I had received a pressie in. After adding a few gems to the butterfly's body, it was adhered to the card with foam pads and I added some sequins to finish.
Have you seen Hero Arts' new website? It looks wonderful, has a fantastic ideas area filled with inspiration and of course there are so many tempting goodies in the shop. I couldn't resist ordering lots of new stamps and dies the other day and thanks to Hero Arts' super speedy service they are already winging their way to me - can't wait!
The first card I picked is this one.
I wanted to make a butterfly in the same colours using the same inlay technique but changed the background and used less enamel hexagons. For the background I light applied distress inks (broken china, tumbled glass & shabby shutters) onto white card. Then I inked the background stamp with shabby shutters distress ink, spritzed with water and stamped on the panel. After stamping the sentiment I added one little enamel hexagon to finish.
Stamps (Hero Arts) - Tropical Background & Fantastic Birthday
Dies - Butterfly (Hero Arts) & Bundle of Stitched Shapes (Simon Says Stamp)
Next in line for a makeover was this card.
With this one I wanted to reverse the colours and add even more sparkle to the butterfly. I inked up the background stamp by dragging Hero Arts' mint julep to emerald green ombré ink pad across and down it. Then I stamped the image on a panel of white card and applied peacock feathers distress ink. Once the panel was dry, I embossed the sentiment.
Stamps (Hero Arts) - Tropical Background & Celebrate Everyday
Dies - Butterfly (Hero Arts) & Bundle of Stitched Shapes (Simon Says Stamp)
Next it was time to do a bit of recycling to make the sparkly butterfly. I die cut the butterfly from a piece of white glitter card I had saved from a Christmas card. The butterfly was backed with glittered tulle taken from a mini bag I had received a pressie in. After adding a few gems to the butterfly's body, it was adhered to the card with foam pads and I added some sequins to finish.
Have you seen Hero Arts' new website? It looks wonderful, has a fantastic ideas area filled with inspiration and of course there are so many tempting goodies in the shop. I couldn't resist ordering lots of new stamps and dies the other day and thanks to Hero Arts' super speedy service they are already winging their way to me - can't wait!
Sunday, August 24, 2014
Adam's First Challenges
My twelve year old son Adam was very excited when he heard about Simon Says Stamp's Summer Vacation Kid’s Challenge and this morning decided to make a card before his breakfast.
It took him a bit longer than he thought it would to make the card (lol that happens to me all the time too!) but he just wouldn't take a break for breakfast until he was finished. Well first off he rummaged through my stamps to find all the images he liked and then he drew a rough idea of what he wanted to do.
He particularly loved using the Big Shot and was delighted with how quickly he could cut a strip of grass with it.
Die - Grassy Border (Lawn Fawn)
Something else he really enjoyed was doing the colouring on the dog and ice cream. His first practice stamping is on the piece of scrap paper underneath.
Stamp - Critters at the Dog Park (Lawn Fawn)
Stamp - Fantastic Birthday (Hero Arts)
Here he is sticking the last stamped piece to his card and the final touch was when he added sprinkles to the ice cream.
The bonus was eating the extra sprinkles that he had "accidentally" poured out for the top of the ice cream;)
So here's the end result of all his hard work, fueled only be some sprinkles:)
Stamps - Hero Arts (Be Happy, Picnic & Fantastic Birthday) & Lawn Fawn (Critters at the Dog Park)
I just love Adam's card and all the fun he had from start to finish making it. The super happy dog with the best ever treat in his bowl and the sun with the happy face and sunglasses make me smile every time I look at this card:):) Hope you enjoy it too!
As Adam added texture to his card by using sprinkles he's also submitting his card into Lawnscaping's Texture Challenge.
It took him a bit longer than he thought it would to make the card (lol that happens to me all the time too!) but he just wouldn't take a break for breakfast until he was finished. Well first off he rummaged through my stamps to find all the images he liked and then he drew a rough idea of what he wanted to do.
He particularly loved using the Big Shot and was delighted with how quickly he could cut a strip of grass with it.
Die - Grassy Border (Lawn Fawn)
Something else he really enjoyed was doing the colouring on the dog and ice cream. His first practice stamping is on the piece of scrap paper underneath.
Stamp - Critters at the Dog Park (Lawn Fawn)
Stamp - Fantastic Birthday (Hero Arts)
Here he is sticking the last stamped piece to his card and the final touch was when he added sprinkles to the ice cream.
The bonus was eating the extra sprinkles that he had "accidentally" poured out for the top of the ice cream;)
So here's the end result of all his hard work, fueled only be some sprinkles:)
Stamps - Hero Arts (Be Happy, Picnic & Fantastic Birthday) & Lawn Fawn (Critters at the Dog Park)
I just love Adam's card and all the fun he had from start to finish making it. The super happy dog with the best ever treat in his bowl and the sun with the happy face and sunglasses make me smile every time I look at this card:):) Hope you enjoy it too!
As Adam added texture to his card by using sprinkles he's also submitting his card into Lawnscaping's Texture Challenge.
Thursday, August 7, 2014
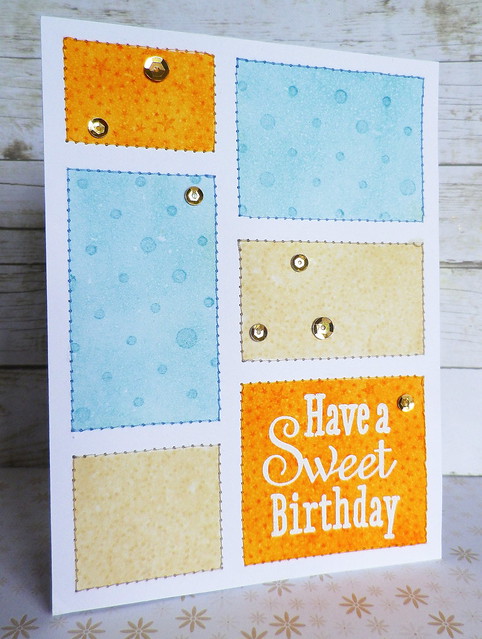
One Layer Blocks
Today I made another one layer card using the same method I used in the first card in this post.
This time I masked off areas in blocks and applied distress inks. After applying the inks and spritzing with water I stamped images on the blocks using the same distress inks.

Stamps (Hero Arts) - Fantastic Birthday, Magical Background, Tiny Star Background and Solid Dots Pattern
Once the card had dried completely I embossed the sentiment and machine stitched frames around the blocks. Sequins were added for a touch of sparkle.
I'm submitting this card into Hero Arts' One Layer Challenge and Simon Says Stamp's Make it Sparkle Challenge.
This time I masked off areas in blocks and applied distress inks. After applying the inks and spritzing with water I stamped images on the blocks using the same distress inks.

Stamps (Hero Arts) - Fantastic Birthday, Magical Background, Tiny Star Background and Solid Dots Pattern
Once the card had dried completely I embossed the sentiment and machine stitched frames around the blocks. Sequins were added for a touch of sparkle.
I'm submitting this card into Hero Arts' One Layer Challenge and Simon Says Stamp's Make it Sparkle Challenge.
Saturday, August 2, 2014
Waiting for the Rainbows
We're enjoying an extra long weekend here with it being a bank holiday on Monday. But unfortunately the weather has taken a turn for the worse and it's expected that we'll have very heavy rain all day today and tomorrow. It has been raining constantly for the past six hours so I really am waiting for the rainbows after the rain! Anyway what better excuse to do a bit of stamping with water and rainbows in mind.
For both of the cards I made today I used the same colours and same technique. I just love distress inks and the way they react to water so made my backgrounds by applying distress inks to white card and stamping with water instead of ink.
Stamps (Hero Arts) - Simple Leaf Background & Lil Hoot
For the card above I stated by masking off a frame around my card and cut thin strips of washi tape to create blocks on the card.
Then I applied distress inks (worn lipstick, spiced marmalade, mustard seed, mowed lawn and peacock feathers) diagonally across the card. I didn't worry about carefully blending the inks as I knew I was going to add lots of water and the inks would move around a bit.
After that I spritzed lots and lots of water on my background stamp and stamped on the card.
I left it for a little while so that the water and ink would have lots of time to react with each other and then I dabbed off the excess water. After ensuring that the ink was completely dry I peeled off the washi tape and added the sentiment and some machine stitching.
As I had all these inks out I thought I might as well make another simpler card.
Stamps (Hero Arts) - Simple Leaf Background & Fantastic Birthday
For this one I again masked a frame around the card, applied distress inks and stamped with water. This time I just added a sprinkling of sequins to finish.
I'm submitting both cards into Hero Arts One Layer Challenge and Simon Says Stamp Anything Goes Challenge. I'm also submitting the first card into a2z Scrapbooking Encouragement Challenge.
I hope you are having a great weekend and that it's not as soggy in your part of the world as it is here:)
For both of the cards I made today I used the same colours and same technique. I just love distress inks and the way they react to water so made my backgrounds by applying distress inks to white card and stamping with water instead of ink.
Stamps (Hero Arts) - Simple Leaf Background & Lil Hoot
For the card above I stated by masking off a frame around my card and cut thin strips of washi tape to create blocks on the card.
Then I applied distress inks (worn lipstick, spiced marmalade, mustard seed, mowed lawn and peacock feathers) diagonally across the card. I didn't worry about carefully blending the inks as I knew I was going to add lots of water and the inks would move around a bit.
After that I spritzed lots and lots of water on my background stamp and stamped on the card.
I left it for a little while so that the water and ink would have lots of time to react with each other and then I dabbed off the excess water. After ensuring that the ink was completely dry I peeled off the washi tape and added the sentiment and some machine stitching.
As I had all these inks out I thought I might as well make another simpler card.
Stamps (Hero Arts) - Simple Leaf Background & Fantastic Birthday
For this one I again masked a frame around the card, applied distress inks and stamped with water. This time I just added a sprinkling of sequins to finish.
I'm submitting both cards into Hero Arts One Layer Challenge and Simon Says Stamp Anything Goes Challenge. I'm also submitting the first card into a2z Scrapbooking Encouragement Challenge.
I hope you are having a great weekend and that it's not as soggy in your part of the world as it is here:)
Sunday, February 23, 2014
A Couple of Rainbows
It's unusual for me to post two days in a row but I just had the urge and the time to stamp this morning so made the most of it!
There are a couple of rainbow themed challenges going on at the moment and as I love using a rainbow of colours on my cards sometimes, I thought I'd give it a whirl. As part of Hero Arts' birthday challenge there is a category called rainbow of colour and A Blog Named Hero has a challenge called Roy G. Biv. I have to say I've never heard of that expression before, in school we learned the colours of the rainbow by using the term Richard of York gave battle in vain - did anyone else use this one?

Stamps (Hero Arts) - A Little, Tiny Flags Background, Fantastic Birthday and It's Your Day
My first card is the birthday card. To make the background I stamped the Tiny Flags Background on coloured card using distress inks (barn door, spiced marmalade, mustard seed, mowed lawn and broken china). I left out violet as I only have a very dark purple in my collection of distress inks. After cutting out the strips in various colours I matched them up to make the background. I embossed the frame for the A Little set and also the birthday sentiment, substituting a little candle for the "i". The "happy" sentiment was also stamped with distress inks and they are popped up on foam pads.

I'm not sure which Hero Arts set the little star came from as it has become separated from the original packaging, but the stars were embossed too and I added some star dust stickles to them and the candle flame.

Stamps (Hero Arts) - Tiny Flags Background & A Little
The second card was made in the same way except this time I used the complete image from the A Little set. I hope you're enjoying your weekend. We had another storm blow through last night but thankfully no damage here!
There are a couple of rainbow themed challenges going on at the moment and as I love using a rainbow of colours on my cards sometimes, I thought I'd give it a whirl. As part of Hero Arts' birthday challenge there is a category called rainbow of colour and A Blog Named Hero has a challenge called Roy G. Biv. I have to say I've never heard of that expression before, in school we learned the colours of the rainbow by using the term Richard of York gave battle in vain - did anyone else use this one?
Stamps (Hero Arts) - A Little, Tiny Flags Background, Fantastic Birthday and It's Your Day
My first card is the birthday card. To make the background I stamped the Tiny Flags Background on coloured card using distress inks (barn door, spiced marmalade, mustard seed, mowed lawn and broken china). I left out violet as I only have a very dark purple in my collection of distress inks. After cutting out the strips in various colours I matched them up to make the background. I embossed the frame for the A Little set and also the birthday sentiment, substituting a little candle for the "i". The "happy" sentiment was also stamped with distress inks and they are popped up on foam pads.
I'm not sure which Hero Arts set the little star came from as it has become separated from the original packaging, but the stars were embossed too and I added some star dust stickles to them and the candle flame.
Stamps (Hero Arts) - Tiny Flags Background & A Little
The second card was made in the same way except this time I used the complete image from the A Little set. I hope you're enjoying your weekend. We had another storm blow through last night but thankfully no damage here!
Tuesday, February 18, 2014
Happy Happy Birthday Owls
Do you ever make a card were you like the original idea but aren't too sure about the end result? Well this is one of those cards for me!
We're (well hubby is!) putting up some new blinds and we have lots of corrugated cardboard left over to go into our recycling bin, so I decided to grab a little bit to go onto a card, thinking that the card could double as a portion of a tree trunk.

Stamps (Hero Arts) - Lil Hoot & Fantastic Birthday
I started by die cutting the windows in the corrugated card which of course flattened it completely. As I wanted lots of texture, I poked a paint brush into each of the flattened pieces to pop them back up again. I put the corrugated card on foam pads and embossed the "happy happy" sentiment on a backing card. Then I stamped and cut out lots of little owls from the Lil Hoot set, coloured them in with ProMarkers and put them peeking out of the windows. The birthday sentiment was stamped using a mix of distress inks.
I'm submitting this card into the Birthday Challenge at Hero Arts (kids or rainbow section) as well as the Simon Says Stamp Get Krafty Challenge.
We're (well hubby is!) putting up some new blinds and we have lots of corrugated cardboard left over to go into our recycling bin, so I decided to grab a little bit to go onto a card, thinking that the card could double as a portion of a tree trunk.
Stamps (Hero Arts) - Lil Hoot & Fantastic Birthday
I started by die cutting the windows in the corrugated card which of course flattened it completely. As I wanted lots of texture, I poked a paint brush into each of the flattened pieces to pop them back up again. I put the corrugated card on foam pads and embossed the "happy happy" sentiment on a backing card. Then I stamped and cut out lots of little owls from the Lil Hoot set, coloured them in with ProMarkers and put them peeking out of the windows. The birthday sentiment was stamped using a mix of distress inks.
I'm submitting this card into the Birthday Challenge at Hero Arts (kids or rainbow section) as well as the Simon Says Stamp Get Krafty Challenge.
Labels:
birthday cards,
distress inks,
Fantastic Birthday,
Hero Arts,
Lil Hoot,
Promarkers
Sunday, October 6, 2013
Happy Happy Birthday
Given the day that was in it, I was delighted to have a chance to join in on Jennifer's fun scramble yesterday afternoon. The theme of the scramble was to make a birthday card for someone aged between one and eighteen years old.
One of my favourite stamps for birthday cards for boys is a cute rocket from the BAM! set by Hero Arts. So I inked it up yet again for this card.

Stamps (Hero Arts) - BAM!, Tiny Star Background and Fantastic Birthday
To make the stars for the background, I embossed the Tiny Star Background in white, applied faded jeans distress ink and die cut into stars. I wanted a few more stars in the background so added tiny star gems, again from Hero Arts.
Initially I paper pieced a rocket, but it looked too dull so I just layered it with another rocket that I coloured with ProMarkers and a silver gel pen.

The sentiment was also stamped with faded jeans distress ink. I'm submitting this card into the Color Media Challenge in the Moxie Fab World. Hope you had a wonderful World Card Making Day yesterday too!
One of my favourite stamps for birthday cards for boys is a cute rocket from the BAM! set by Hero Arts. So I inked it up yet again for this card.
Stamps (Hero Arts) - BAM!, Tiny Star Background and Fantastic Birthday
To make the stars for the background, I embossed the Tiny Star Background in white, applied faded jeans distress ink and die cut into stars. I wanted a few more stars in the background so added tiny star gems, again from Hero Arts.
Initially I paper pieced a rocket, but it looked too dull so I just layered it with another rocket that I coloured with ProMarkers and a silver gel pen.
The sentiment was also stamped with faded jeans distress ink. I'm submitting this card into the Color Media Challenge in the Moxie Fab World. Hope you had a wonderful World Card Making Day yesterday too!
Sunday, August 4, 2013
Rainbow String Star
With Cath's Trendy Triangles Challenge over at Moxie Fab World, I seem to have triangles on the brain at the moment! So this morning I made another card using triangles.
I love string quilts and the added bonus is that they are great for using up scraps. So I thought I'd use up some scraps by making a star with string points for my card.

Stamp (Hero Arts) - Fantastic Birthday
Die (Hero Arts) - Geometric Shapes (used diamond shaped die)
To start with I cut strips of card in various colours and adhered to a piece of backing card. Then I die cut triangles using half of the diamond shaped die out of Hero Arts' Geometric Shapes set. In the same way I die cut the central triangles for the card. To finish I just stamped the sentiment and added a rhinestone.
I've only a few more days of holidays left so we've been making the most of our days off and headed off to Cahir Castle and the Rock of Cashel last week. Here are some photos from our trip.
Cahir Castle
A cannon ball from a siege in 1599 can been seen lodged in the wall to the left of the lower arrow slit.
Thick walls with arrow slits.
Another defensive area inside the main walls with working portcullis and holes above the gate for dropping boiling water, rocks etc on any attackers.
A Tudor fireplace.
Rock of Cashel
12th century round tower and 13th century cathedral
View of nearby abbey
A carving in the cathedral. It reminds me of St Patrick but I'm not sure if it is of him.
Ceiling of 11th century Cormac's Chapel. Only fragments of the original frescoes remain. The frescoes were covered by whitewash during the Reformation.
A cheeky lad in Cormac's Chapel!
Sorry for all the photos but I love spending hours exploring places like these! Enjoy your weekend!
I love string quilts and the added bonus is that they are great for using up scraps. So I thought I'd use up some scraps by making a star with string points for my card.
Stamp (Hero Arts) - Fantastic Birthday
Die (Hero Arts) - Geometric Shapes (used diamond shaped die)
To start with I cut strips of card in various colours and adhered to a piece of backing card. Then I die cut triangles using half of the diamond shaped die out of Hero Arts' Geometric Shapes set. In the same way I die cut the central triangles for the card. To finish I just stamped the sentiment and added a rhinestone.
I've only a few more days of holidays left so we've been making the most of our days off and headed off to Cahir Castle and the Rock of Cashel last week. Here are some photos from our trip.
Cahir Castle
A cannon ball from a siege in 1599 can been seen lodged in the wall to the left of the lower arrow slit.
Thick walls with arrow slits.
Another defensive area inside the main walls with working portcullis and holes above the gate for dropping boiling water, rocks etc on any attackers.
A Tudor fireplace.
Rock of Cashel
12th century round tower and 13th century cathedral
View of nearby abbey
A carving in the cathedral. It reminds me of St Patrick but I'm not sure if it is of him.
Ceiling of 11th century Cormac's Chapel. Only fragments of the original frescoes remain. The frescoes were covered by whitewash during the Reformation.
A cheeky lad in Cormac's Chapel!
Sorry for all the photos but I love spending hours exploring places like these! Enjoy your weekend!
Friday, January 18, 2013
Hero Arts Hostess Blog Hop
Hello and welcome to your next stop on the Hero Arts Hostess Hop, featuring fabulous stamps from the new 2013 release!
If you’ve been following along, you should have just arrived from the blog of the ultra talented Lisa Carroll. In case you come across a broken link, you’ll find a master list of the hop links at the Hero Club Blog. Also please report broken links to Tami at blog@heroarts.com.
Hero Arts will be awarding prizes from randomly drawn comments. For a chance to win, simply comment on ANY of the stops along the hop on ANY day, including each day’s starting post at the Hero Club Blog. The more comments you leave, the better your chance of winning - best of luck! I have comment moderator switched on, so don’t worry if your comment doesn’t appear immediately.
The Hero Arts 2013 catalogue is packed with the most wonderful stamps! I can tell you after browsing through the catalogue many times, my shopping list is very, very long! Thanks to the ever generous Hero Arts, I’ve had a chance to play with some of the new stamps, before my shopping order arrives. When the stamps arrived from Hero Arts I was like a kid on Christmas morning and have had so much fun playing with my new “toys”!

The New Baby set is one of the most adorable baby sets I’ve ever seen! The images are so cute and I love the stitching details on the stamps. Not only is the set brilliant for making baby cards but I know I’ll be using some of the images on cards for kids and also for cute cards for adults. Anyway above is the first card I made using this set and the gorgeous new Looped Circle Pattern stamp – oh I love all the possibilities for this stamp!
Hero Arts Stamps – New Baby & Looped Circle Pattern
Other Supplies - Card (white & blue), broken china distress ink, VersaMark, white embossing powder, baker's twine, tag punch, gems, glitter, paintbrush and water.

On this card I again used the Looped Circle Pattern but in a different way to my first card, by using an embossed strip and cutting out pieces from the pattern. Along with this stamp, I used the Fantastic Birthday set which contains beautiful sentiments and lots of yummy, calorie free images – I can’t resist sweet things and I certainly couldn’t resist this sweet set!
Hero Arts Stamps - Fantastic Birthday, It’s Your Day and Looped Circle Pattern
Other Supplies – Card (cream woodgrain, white & brown), white embossing powder, VersaMark, patterned paper, shabby shutters and tumbled glass distress ink, markers, pearls, label die, glossy accents and diamond stickles.

I’ve always loved patchwork and my first attempt at patchwork involved cutting out lots of hexagons from card and fabric and piecing the hexagons together, using the card as backing for the fabric. So when I saw the Hexagon Background, I knew I had to have that stamp! I just love it and can again imagine using it in so many different ways – love when a stamp does that for you! My good friend Linda included the fab It’s Your Day set in a wonderful bundle of goodies she sent me at Christmas – thanks again, Linda:) Talk about being spoiled for choice for birthday greeting with this set! Anyway to make this card I did a lot of embossing, a lot of paper piecing and a lot of stitching too. I had great fun making my mini paper quilt!
Hero Arts Stamps - Hexagon Background and It’s Your Day
Other Supplies - patterned paper, VersaMark, white embossing powder, pink card, thread, sewing machine and gems.
Thanks to Hero Arts for another fab release of new stamps, to Deborah and Tami for all the work they put into organising the Hop and of course, the Hero Hostesses for all the inspiration they provide me with on a daily basis. Also thanks a million to you for visiting and best of luck in the draw – I know Hero Arts prizes are always fantastic!
Now it’s time for you to leave Ireland and take a big, big hop across the Atlantic to Canada and your next stop on the Hero Arts Hostess Blog Hop where you’ll meet the super talented Tracey Kuzniak. Brrr snow is forecast here, I wonder if Tracey has any in her neck of the woods! Enjoy the rest of the Hop and I’m off to join you hopping with my hot chocolate in hand!
Edited for questions I've been asked in the comment section or by email
1. Quite a few people have asked me what tool I use for cutting. I just use a curved nail scissors that I bought in Boots Chemists when I first started card making a few years ago. I've never tried any other type of scissors as these work well for me.
2. A few people asked me if I really did emboss, cut and stitch all those hexagons. The answer is yes! I embossed a mix of patterned papers and also a backing piece of card stock, cut out the patterned paper hexagons and adhered them to the backing card. Then I just used a tiny zig zag stitch setting on my machine and stitched away. It did take a while to do but I really enjoying cutting and sewing when making cards:)
Thanks so much to you for all for your lovely comments, I really appreciate each and every one of them:):)
If you’ve been following along, you should have just arrived from the blog of the ultra talented Lisa Carroll. In case you come across a broken link, you’ll find a master list of the hop links at the Hero Club Blog. Also please report broken links to Tami at blog@heroarts.com.
Hero Arts will be awarding prizes from randomly drawn comments. For a chance to win, simply comment on ANY of the stops along the hop on ANY day, including each day’s starting post at the Hero Club Blog. The more comments you leave, the better your chance of winning - best of luck! I have comment moderator switched on, so don’t worry if your comment doesn’t appear immediately.
The Hero Arts 2013 catalogue is packed with the most wonderful stamps! I can tell you after browsing through the catalogue many times, my shopping list is very, very long! Thanks to the ever generous Hero Arts, I’ve had a chance to play with some of the new stamps, before my shopping order arrives. When the stamps arrived from Hero Arts I was like a kid on Christmas morning and have had so much fun playing with my new “toys”!
The New Baby set is one of the most adorable baby sets I’ve ever seen! The images are so cute and I love the stitching details on the stamps. Not only is the set brilliant for making baby cards but I know I’ll be using some of the images on cards for kids and also for cute cards for adults. Anyway above is the first card I made using this set and the gorgeous new Looped Circle Pattern stamp – oh I love all the possibilities for this stamp!
Hero Arts Stamps – New Baby & Looped Circle Pattern
Other Supplies - Card (white & blue), broken china distress ink, VersaMark, white embossing powder, baker's twine, tag punch, gems, glitter, paintbrush and water.
On this card I again used the Looped Circle Pattern but in a different way to my first card, by using an embossed strip and cutting out pieces from the pattern. Along with this stamp, I used the Fantastic Birthday set which contains beautiful sentiments and lots of yummy, calorie free images – I can’t resist sweet things and I certainly couldn’t resist this sweet set!
Hero Arts Stamps - Fantastic Birthday, It’s Your Day and Looped Circle Pattern
Other Supplies – Card (cream woodgrain, white & brown), white embossing powder, VersaMark, patterned paper, shabby shutters and tumbled glass distress ink, markers, pearls, label die, glossy accents and diamond stickles.
I’ve always loved patchwork and my first attempt at patchwork involved cutting out lots of hexagons from card and fabric and piecing the hexagons together, using the card as backing for the fabric. So when I saw the Hexagon Background, I knew I had to have that stamp! I just love it and can again imagine using it in so many different ways – love when a stamp does that for you! My good friend Linda included the fab It’s Your Day set in a wonderful bundle of goodies she sent me at Christmas – thanks again, Linda:) Talk about being spoiled for choice for birthday greeting with this set! Anyway to make this card I did a lot of embossing, a lot of paper piecing and a lot of stitching too. I had great fun making my mini paper quilt!
Hero Arts Stamps - Hexagon Background and It’s Your Day
Other Supplies - patterned paper, VersaMark, white embossing powder, pink card, thread, sewing machine and gems.
Thanks to Hero Arts for another fab release of new stamps, to Deborah and Tami for all the work they put into organising the Hop and of course, the Hero Hostesses for all the inspiration they provide me with on a daily basis. Also thanks a million to you for visiting and best of luck in the draw – I know Hero Arts prizes are always fantastic!
Now it’s time for you to leave Ireland and take a big, big hop across the Atlantic to Canada and your next stop on the Hero Arts Hostess Blog Hop where you’ll meet the super talented Tracey Kuzniak. Brrr snow is forecast here, I wonder if Tracey has any in her neck of the woods! Enjoy the rest of the Hop and I’m off to join you hopping with my hot chocolate in hand!
Edited for questions I've been asked in the comment section or by email
1. Quite a few people have asked me what tool I use for cutting. I just use a curved nail scissors that I bought in Boots Chemists when I first started card making a few years ago. I've never tried any other type of scissors as these work well for me.
2. A few people asked me if I really did emboss, cut and stitch all those hexagons. The answer is yes! I embossed a mix of patterned papers and also a backing piece of card stock, cut out the patterned paper hexagons and adhered them to the backing card. Then I just used a tiny zig zag stitch setting on my machine and stitched away. It did take a while to do but I really enjoying cutting and sewing when making cards:)
Thanks so much to you for all for your lovely comments, I really appreciate each and every one of them:):)
Subscribe to:
Posts (Atom)