For the past number of weeks a few things have completely taken up my time and kept me away from card making but I'm happy to be finally back in the swing of things again to make a Valentine for my hubby. I ended up making two Valentine cards as I thought the first one might be too girly for him. The little glimpse below probably says it all really:)
I had some pretty wedding table sprinkles in my stash and thought they, along with some beads and pearls, would make a nice background for a couple of lovely die cuts my friend Linda sent me - thanks again Linda:) So the card came together fairly quickly once the glue I used for the sprinkles and beads had dried. This month's challenge over at Hero Arts is Fabulous Flowers so since there are flowers on the heart die and flowers in the sprinkles I'm submitting this card into the challenge.
Dies (Hero Arts) - Floral Heart Stamp & Cut by Lia and My Monthy Hero January Kit Add On
After making the card above I thought I'd try to make a more masculine looking Valentine using a favourite Hero Arts die and the inlaid die cutting technique.
Dies - Renaissance Heart (Hero Arts), Bundle of Stitched Shapes (Simon Says Stamp) & Alphabet (Docrafts)
Even though I was going for a masculine look I couldn't resist using glitter card in the heart to represent the sparkle hubby brings to my life - sorry for the soppiness but I think I can get away with it this week:)
I'm submitting the cards into A Blog Named Hero's is A Bit of Sparkle Challenge and the Die Cut Diva's Love, Marriage and Anniversaries Challenge.
Thursday, February 11, 2016
Sunday, January 17, 2016
Ruffled Flowers
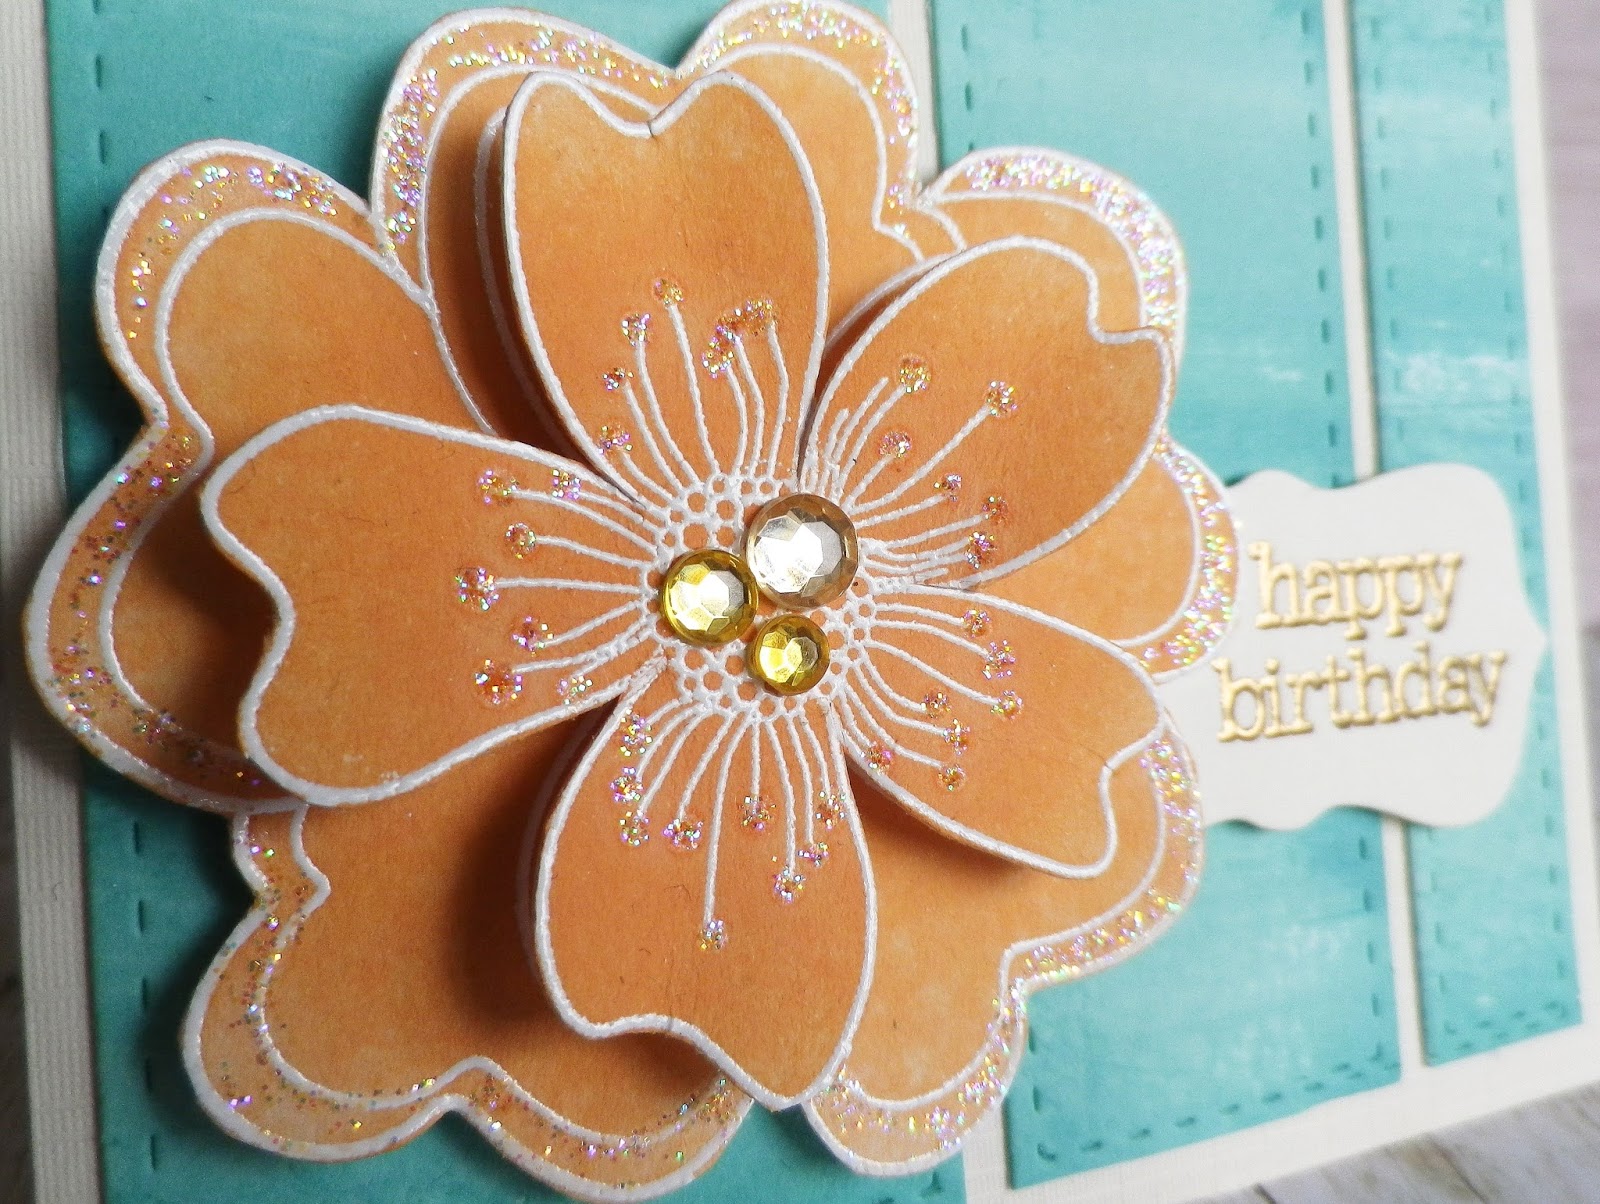
I was sorting out my woodblock stamps and came across a flower I love but haven't used in a while. Since I needed to make a couple of cards I embossed the flowers four times, trimmed them to the sizes I wanted and applied distress inks (dried marigold for the first card and a mix of shabby shutters, salty ocean and tumbled glass for the second one).
Stamps - Ruffled Flower (Hero Arts) & It's Your Day (Hero Arts)
Dies - Bundle of Stitched Shapes (Simon Says Stamp) & Tags and Bookplates (Docrafts)
The background for this card was made by dragging a Hero Arts mint to green ombre ink pad across white card a few times. After cutting the background into panels I used a die from Simon Says Stamp's Bundle of Stitched Shapes to add the stitch lines. The sentiment was embossed in gold on a die cut from Docrafts Tags and Bookplates die set. A little sparkle was added to the flower with diamond stickles and some gems. I'm submitting this card into Simon Says Stamp's Ombre Challenge.
For the next card I used up scraps of silver glitter card I had left over from making Christmas cards. I just cut strips of the card to go behind the flower and used it for the die cut sentiment too.
Stamp - Ruffled Flower (Hero Arts)
Die - Thanks Stamp & Cut (Hero Arts)
A sprinkling of sequins and gems were added for a little sparkle.
Stamps - Ruffled Flower (Hero Arts) & It's Your Day (Hero Arts)
Dies - Bundle of Stitched Shapes (Simon Says Stamp) & Tags and Bookplates (Docrafts)
The background for this card was made by dragging a Hero Arts mint to green ombre ink pad across white card a few times. After cutting the background into panels I used a die from Simon Says Stamp's Bundle of Stitched Shapes to add the stitch lines. The sentiment was embossed in gold on a die cut from Docrafts Tags and Bookplates die set. A little sparkle was added to the flower with diamond stickles and some gems. I'm submitting this card into Simon Says Stamp's Ombre Challenge.
For the next card I used up scraps of silver glitter card I had left over from making Christmas cards. I just cut strips of the card to go behind the flower and used it for the die cut sentiment too.
Stamp - Ruffled Flower (Hero Arts)
Die - Thanks Stamp & Cut (Hero Arts)
A sprinkling of sequins and gems were added for a little sparkle.
Playing with Plaid
It was such a scramble before Christmas trying to make all my Christmas cards so I've decided to join in on the Merry Monday Christmas Card Challenges as much as possible this year.
Since I had a bit of time to make a card I decided to join in on the challenge this week. The challenge is Plaid.
Well I searched high and low to see if I had any plaid items like paper, ribbon or even stamps that could be used to make a plaid pattern, and I came up with nothing! Then I remembered this rag quilt I made last year
and after a little hunt for scraps of leftover fabric, I came up with some bits and pieces for my card. Now what to do with them! In the end I decided to make a cosy hat a scarf for a cute Hero Arts snowman and also use the fabric for borders. Thanks again to my friend Linda for giving me the the snowman stamp and die sets:) She's another big fan of the Merry Monday Challenges and first introduced me to the Merry Monday Challenges.
Stamps - Frosty Wishes (Hero Arts) and Polar Set by Lia (Hero Arts)
Die set - Snowman Die Cuts (Hero Arts)
Embossing Folder - Snowflakes (Cuttlebug)
I started by heat embossing the sentiment on a panel of card and added an embossed snowbank which has touches of diamond stickles on the snowflakes. Sorry the photo isn't great - it's a really dull day here today. Then I stamped and cut out the snowman, did a little colouring with Promarkers and added the die cut plaid hat and scarf. To finish I frayed a couple of strips of fabric and used them as borders.
As I had a variety of plaid strips left over from the quilt I also die cut hats and scarves in a couple of other colours. I hope to make another couple of snowmen cards during the week to get a good start on my Christmas card stash.
Since I had a bit of time to make a card I decided to join in on the challenge this week. The challenge is Plaid.
Well I searched high and low to see if I had any plaid items like paper, ribbon or even stamps that could be used to make a plaid pattern, and I came up with nothing! Then I remembered this rag quilt I made last year
and after a little hunt for scraps of leftover fabric, I came up with some bits and pieces for my card. Now what to do with them! In the end I decided to make a cosy hat a scarf for a cute Hero Arts snowman and also use the fabric for borders. Thanks again to my friend Linda for giving me the the snowman stamp and die sets:) She's another big fan of the Merry Monday Challenges and first introduced me to the Merry Monday Challenges.
Stamps - Frosty Wishes (Hero Arts) and Polar Set by Lia (Hero Arts)
Die set - Snowman Die Cuts (Hero Arts)
Embossing Folder - Snowflakes (Cuttlebug)
I started by heat embossing the sentiment on a panel of card and added an embossed snowbank which has touches of diamond stickles on the snowflakes. Sorry the photo isn't great - it's a really dull day here today. Then I stamped and cut out the snowman, did a little colouring with Promarkers and added the die cut plaid hat and scarf. To finish I frayed a couple of strips of fabric and used them as borders.
As I had a variety of plaid strips left over from the quilt I also die cut hats and scarves in a couple of other colours. I hope to make another couple of snowmen cards during the week to get a good start on my Christmas card stash.
Saturday, January 16, 2016
Ombre Butterflies
I love the ombre look on cards, clothes, hair etc. so I wanted to join in on Simon Says Stamp's Ombre Challenge. Anyway I thought I'd use some distress inks to make an ombre background. As I seem to have a lot of blues in my stash (no surprise there!) I used tumbled glass, broken china, faded jeans and salty ocean for this card.
Supplies - It's Your Day (Hero Arts), M-Bossabilities Bricks and Bark (Spellbinders), Isabella & Pippi butterfly dies (Memory Box) and distress inks (Tim Holtz/Ranger)
To start with I die cut a circle from a panel of white card and embossed the panel with the aperture. Then I inked a panel of white card with the distress inks and after stamping the sentiment adhered it to my cardbase. The embossed panel was then adhered to the card. I die cut the butterflies from scraps of white card and pieces leftover from the inked background. To finish I added a gems to the butterflies' bodies.
Making the card was the enjoyable part of the day and now I'm off to do the not so enjoyable bit - washing machine shopping as our current machine has given up the ghost. Exciting shopping here I come!?!
Supplies - It's Your Day (Hero Arts), M-Bossabilities Bricks and Bark (Spellbinders), Isabella & Pippi butterfly dies (Memory Box) and distress inks (Tim Holtz/Ranger)
To start with I die cut a circle from a panel of white card and embossed the panel with the aperture. Then I inked a panel of white card with the distress inks and after stamping the sentiment adhered it to my cardbase. The embossed panel was then adhered to the card. I die cut the butterflies from scraps of white card and pieces leftover from the inked background. To finish I added a gems to the butterflies' bodies.
Making the card was the enjoyable part of the day and now I'm off to do the not so enjoyable bit - washing machine shopping as our current machine has given up the ghost. Exciting shopping here I come!?!
Labels:
birthday cards,
distress inks,
embossing,
Hero Arts,
Memory Box,
Spellbinders
Thursday, December 24, 2015
Merry Elves and Furry Christmas
Over in the Hero Arts Flickr group we had a Secret Santa and I was delighted to find out recently that Arlene was my Secret Santa. She sent me these absolutely adorable tags and card and lots of wonderful goodies including Santa's Elves Stamp & Cut set by Hero Arts. I had regretted not including this cute set in an order I placed with Hero Arts a while ago so I couldn't believe it when I saw that Arlene my Secret Santa had set it to me. Thanks again so much, Arlene:)
I love the three different elf images and the fact that the die can be used for all three images. So here is a set of tags I made using the set.
Stamp & Dies - Santa's Elves Stamp & Cut (Hero Arts), Fancy Cut Christmas (Hero Arts) & Nesting Gift Tags Set (Docrafts)
Next up is a Christmas card I made for my sister. She dearly loves her two dogs and cat so I thought Simon Says Stamp's Furry Christmas would be perfect for her card this year.
Stamps - Furry Christmas (Simon Says Stamp) & assorted snowflakes (can't remember which sets I took them from!)
As there is a lot of sparkle on this card from the glitter card and stickles, I'm submitting it into Simon Says Stamp's Make It Sparkle Challenge.
Now I'm off to do some more preparations for tomorrow. Hope you all have a wonderful Christmas full of laughter and fun:) Happy Christmas!
I love the three different elf images and the fact that the die can be used for all three images. So here is a set of tags I made using the set.
Stamp & Dies - Santa's Elves Stamp & Cut (Hero Arts), Fancy Cut Christmas (Hero Arts) & Nesting Gift Tags Set (Docrafts)
Next up is a Christmas card I made for my sister. She dearly loves her two dogs and cat so I thought Simon Says Stamp's Furry Christmas would be perfect for her card this year.
Stamps - Furry Christmas (Simon Says Stamp) & assorted snowflakes (can't remember which sets I took them from!)
As there is a lot of sparkle on this card from the glitter card and stickles, I'm submitting it into Simon Says Stamp's Make It Sparkle Challenge.
Now I'm off to do some more preparations for tomorrow. Hope you all have a wonderful Christmas full of laughter and fun:) Happy Christmas!
Sunday, November 15, 2015
Peace, Love, Joy and Mistletoe
I like trying to find different uses for my crafty supplies and when my good friend Linda sent me some lovely die cuts of Spring Branch by Hero Arts, I thought they would be perfect for making a little bunch of mistletoe. Unfortunately it's another dull and cloudy day here today so the photo isn't great.
Stamp (Hero Arts) - Very Merry Christmas
Dies (Hero Arts) - Ribbon Cutting Set by Lia & Spring Branch
Embossing Folder (Darice) - Snowflake Trim
Yet again I fell back on my old reliable Snowflake Trim embossing folder for the background panel. Once the panel was dry embossed, I embossed the sentiment in silver and adhered the panel to the cardbase with foam pads. Then I added some pearls to the branches and again used foam pads to adhere the mistletoe to the card. To finish I die cut a bow from silver glitter paper.
I'm submitting this card into Simon Says Stamps Create Something Beginning With The Letter ‘N’ Challenge. The letter "n" on this card is for the new Hero Arts Ribbon Cutting set by Lia and also nearby kisses with the sprigs of mistletoe:)
Stamp (Hero Arts) - Very Merry Christmas
Dies (Hero Arts) - Ribbon Cutting Set by Lia & Spring Branch
Embossing Folder (Darice) - Snowflake Trim
Yet again I fell back on my old reliable Snowflake Trim embossing folder for the background panel. Once the panel was dry embossed, I embossed the sentiment in silver and adhered the panel to the cardbase with foam pads. Then I added some pearls to the branches and again used foam pads to adhere the mistletoe to the card. To finish I die cut a bow from silver glitter paper.
I'm submitting this card into Simon Says Stamps Create Something Beginning With The Letter ‘N’ Challenge. The letter "n" on this card is for the new Hero Arts Ribbon Cutting set by Lia and also nearby kisses with the sprigs of mistletoe:)
Thursday, November 12, 2015
Winter Cheer
Only 42 more days till Christmas so I'm going to have to speed up my Christmas card making! Today I used Hero Arts' pretty Winter Cheer tag set by Lia to make three cards like the one below.
Die & stamp set - Winter Cheer tag set by Lia (Hero Arts)
Embossing folder - Snowflake Trim (Darice)
I die cut the ornament from silver card and added gold sequins and stars as my shaker elements. The gold thread I used for the bauble has been in my wool stash well over twenty years, so long in fact I can't even remember what I originally used it for!
The sentiment panel was embossed in gold and added to the bauble with foam pads. One of my favourite Christmas embossing folders was used for the background.
Recently I also used the tag set to make a set of Christmas gift tags for a Scramble I hosted over in the Hero Arts Flickr group. The theme was to use recycled bits and pieces on Christmas tags. In this instance the ribbon on the gift tags came from a box of chocolates. The chocolates are all long gone at this stage and I'm glad to have finally used up all the ribbon too:)
Supplies (Hero Arts) - Winter Cheer Tag Set by Lia & Fancy Cut Christmas
I'm submitting the card into Hero Arts Holiday Cardmaking Challenge.
Die & stamp set - Winter Cheer tag set by Lia (Hero Arts)
Embossing folder - Snowflake Trim (Darice)
I die cut the ornament from silver card and added gold sequins and stars as my shaker elements. The gold thread I used for the bauble has been in my wool stash well over twenty years, so long in fact I can't even remember what I originally used it for!
The sentiment panel was embossed in gold and added to the bauble with foam pads. One of my favourite Christmas embossing folders was used for the background.
Recently I also used the tag set to make a set of Christmas gift tags for a Scramble I hosted over in the Hero Arts Flickr group. The theme was to use recycled bits and pieces on Christmas tags. In this instance the ribbon on the gift tags came from a box of chocolates. The chocolates are all long gone at this stage and I'm glad to have finally used up all the ribbon too:)
Supplies (Hero Arts) - Winter Cheer Tag Set by Lia & Fancy Cut Christmas
I'm submitting the card into Hero Arts Holiday Cardmaking Challenge.
Subscribe to:
Posts (Atom)