Wednesday, March 30, 2011

Birthday Owl

Birthday Owl
Stamps (Hero Arts)- Clouds, Tree Trunk, Heart Owls, Be Happy, Birthday Messages, Envelope Pattern & Adorable Baby Girl

For a while I’ve been intending to quilt a cloudy sky using the Clouds background stamp and finally got around to it. I stamped white fabric (which has a white pattern) with faded jeans distress ink, placed it on 2 layers of wadding & 1 layer of backing fabric and machine stitched around the clouds. A piece of green paper was stamped with the Envelope Pattern and the grass from the Be Happy set. I paper pieced the leaves and owl, who has a slightly startled expression due to my lack of smaller googly eyes!


I have a couple of busy days ahead and hopefully after that my computer problems will be finally sorted out and I’ll be able to go visiting blogs again - I'm having withdrawal symptoms:(

Sunday, March 27, 2011

Wild Flowers with Flower Brooches

After watching Kelly Rasmussen make fabulous fabric flowers and use them in brilliant ways in a video on the Hero Arts blog, I just had to give it a go. So I made quite a few the other day using different colours and fabrics. I'll add them to cards, bags, tops and like Kelly did use them for hair accessories.


I love the gorgeous colour combination for the Play Date Cafe Challenge this week and made a couple of the flowers using these colours. The flowers have pins on the backs so can be used as brooches.

Wild Flowers with Flower Brooches
Stamps (Hero Arts) - Wild Flowers and Birthday Messages

I applied broken china distress ink to the Wild Flowers stamp, spritzed with water and stamped on watercolour paper. Then I lightly distressed the edges to go with the slightly frayed flowers and added some gems. When I have very small scraps left over from projects, I often punch butterflies from them and keep them in a jar for another time. The butterfly here is one of these and had been from a project where I used dusty concord distress ink. I just added the little heart pearl to the body.

Below are some of the flowers I made – I won’t bore you with them all! All the stamps mentioned are by Hero Arts.

Denim from an old pair of jeans stamped with the Magical Background (the pattern is more obvious in real life) using faded jeans distress ink.


Gingham with the button stamped with the Envelope Pattern using worn lipstick distress in
k

Hand dyed fabric stamped with the Envelope Pattern


Another hand dyed fabric


Cotton on the bottom layer (stamped with Old Letter Writing)......


.... with a layer of organza petals on top


When I folded each petal in half, I didn’t fold them perfectly but offset them a bit to get a more ruffled look.


If you'd like to make these kind of fabric flowers you should watch Kelly's brilliant video.

Friday, March 25, 2011

Fresh Inspiration Friday Challenge - Inspiration Off the Wall

Today on the Hero Arts blog there is a Fresh Inspiration Friday Challenge. Inspired by gorgeous pictures in her house, Anita picked the colour combination for the challenge.


Tami from Hero Arts and Hero Hostesses Anita, Linda, Sharon, Sally and I made cards using this yummy colour combination. Links to all of our cards can be found at this post here on the Hero Arts website. The post also includes full details of the challenge - I hope you’ll join in on the fun!

DSCN7468
Stamps (Hero Arts) - Classic Fabric Design, Envelope Pattern, Exotic Bloom & It’s a Day for a Cupcake

To start with I applied broken china and faded jeans distress inks to the Classic Fabric Background, spritzed well with water and stamped on watercolour paper. Then I used broken china distress ink and the Envelope Pattern to stamp another layer. On the main panel I used the same inks on the Exotic Bloom stamp and this time lightly spritzed with water. The sentiment which was stamped using a chalk ink is from a cute set that Linda sent me last year – thanks again Linda! I just added some twine and a gem to finish.

Hope you all have a wonderful weekend! It looks like we're going to have another beautiful sunny weekend here so I'm really looking forward to that:)

Friday, March 18, 2011

Hero Hostess Takeover!

It’s Hero Hostess week on the Hero Arts blog this week and we’ve had such a fun time making birthday cards and projects for the blog!

Linda and Sharon were first up on Monday with wonderful cards for a friend and a guy. On Tuesday Sally shared a stunning gift box which she had created and is sure to make a present extra special. Wednesday saw Anita with her very first video tutorial and she created a gorgeous card with wonderful instructions on how to make twisted ribbon flowers. So Friday is finally here and I’m sharing some 
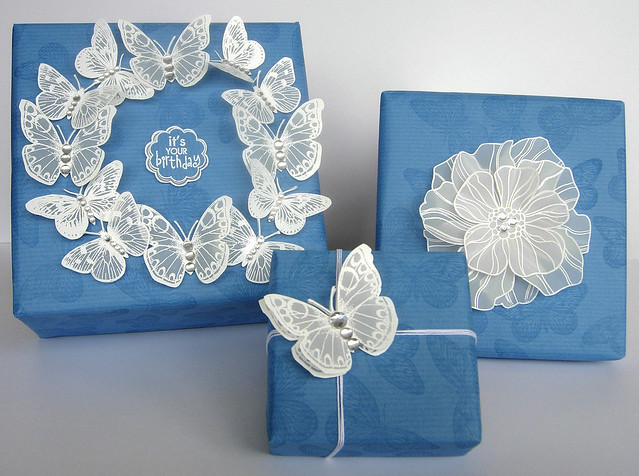
gift wrapping ideas.

Gift Wrapping Presents
Stamps (Hero Arts) Antique Engravings, Blossom Art, Large Flower & Birthday Messages

I often make my own wrapping paper and embellishments for gifts. I love choosing the stamps and colours to make these and had great fun going through my Hero Arts stamps to wrap these particular gifts. Full instructions on how I wrapped the gifts are here on the Hero Arts website so I’ll just give the short version now. I stamped a butterfly randomly over pieces of some blue craft paper using VersaMark.


To decorate the parcels I white embossed the butterflies and flowers on vellum and added a selection of gems – thanks again Joy for some of these! The bottom layer of the sentiment was also white embossed on vellum with the top layer white embossed on a scrap of the blue paper.


The blue paper I used was from a roll which is 70m long and cost the same as a single sheet of wrapping paper. So I’ll be able to wrap lots of presents from this roll and will be able to customise them to suit the recipient’s tastes. The other day I wrapped a present for a friend using different paper and stamped embellishments. She told me that she has saved the embellishments so that she can make her first cards using them – hopefully she’ll get hooked on card making too!


I'm submitting this project into The Shabby Tea Room "Party Time" Challenge and the Simon Says Stamp Happy Birthday Challenge.

Hope you all have a wonderful weekend!

Thursday, March 17, 2011

Happy St Patrick's Day!

Happy St Patrick's Day everyone! I just thought I'd share some photos from our little ramble in County Wicklow yesterday. As you'll see from the photos it was a beautiful sunny day but a bit hazy at the same time.

Blessington Lakes


Mark and Adam heading away from Turlough Hill


One we want to climb in the summer! All the dark brown vegetation on the mountain is heather so this area is full of purple during the summer.


Time for a break and a little peek in the Hero Arts catalogue!


Toby decides to have a little break too!


View of the valley on the way to Glendalough


The lower lake at Turlough Hill. During non-peak hours the ESB (Electricity Supply Board) uses excess electricity to pump water from this lake to the lake at the top of the hill and releases it downwards through huge turbines inside the mountain to create electricity in times of maximum demand.


Time for another break along the way!


Blessington Lakes again...


...wish I could sandwich these two photos together and that the photos looked as good as real life - the view is just gorgeous!


Hope you've enjoyed your little trip to Wicklow!

Happy St Patrick's Day!

Happy St Patrick's Day

Saturday, March 12, 2011

Dotty Butterflies

This is another card I made for the Moxie Fab World Paper Piecing Challenge, this month’s Hero Arts challenge and Simon Says Stamp Anything Goes Challenge and . It's great that because of these challenges I’m getting lots of birthday cards ready in advance for family and friends rather than rushing at the last minute as often happens with me!

DSCN7378
Stamps (Hero Arts) – Antique Engravings, Magical Background, Envelope Pattern and Birthday Wishes.

For the top part of the background I applied broken china distress ink to white card, spritzed with water, stamped the Envelope Pattern using the same ink and white embossed with the Magical Background.


I white embossed the butterflies on vellum, added beads and paper pieced some scraps of vellum which had alcohol inks applied. I had been messing around with vellum and alcohol inks after seeing Sue’s wonderful video here. The sentiment was stamped using broken china distress ink (can you tell that’s my favourite one?!) and I just added some machine stitching and string to finish.

Hope you are all having a wonderful weekend:)

Thursday, March 10, 2011

A Little Layering

This week on the Hero Art Blog, Shari shared some amazing cards and a brilliant video showing her technique for making layered stamped backgrounds. I don’t usually do a lot of layering of stamps on my cards so I thought I’d give her technique a try.

Layering with no walking or wiggling!
Stamps (Hero Arts) - Exotic Bloom, Earth Flowers and Envelope Pattern

To start with I dabbed faded jeans and broken china distress inks here and there on a large acrylic block, spritzed with lots of water and stamped on watercolour paper. Then I stamped this background with the Envelope Pattern using antique linen distress ink and white embossed the Earth Flowers. Unlike Shari, I didn't walk and wiggle (you'll have to watch Shari's video to see what I'm talking about!) but applied dusty concord distress ink on the Exotic Bloom image, spritzed with water, stamped once on scrap paper and then stamped on the panel. I applied dusty concord distress ink to a scrap of white card, spritzed with water and once dry punched out a butterfly, added Crackle Accents and some gems. Unfortunately my photo of the card isn't great, in real life it doesn’t look so dull and the Envelope Pattern looks more subtle because of the texture of the watercolour paper which isn’t being picked up in the photo.

I'm submitting this card into the Simon Says Stamp Challenge - Anything Goes.


Over the past couple of weeks I’ve been fairly busy with a few things so have become the worst in the world for visiting blogs. Hopefully from today on that will change and I can’t wait to catch up on what I’ve missed out on:)

Sunday, March 6, 2011

Crazy in two ways for paper piecing!

Below is a birthday card I made for a quilting friend. I was going to put the birthday sentiment on the outside but with so much going on there as it was, I decided to put it inside instead. I’m submitting the card into the Play Date Cafe Challenge Colour Splash Week and the Moxie Fab World Paper Piecing Challenge. This month’s challenge at Hero Arts includes the theme of birthdays.


To start with I stamped the Envelope Pattern in white on red card. Then I stamped this and two pieces of white card with the sewing machine and paper pieced it – yikes those pieces were tiny but I love paper piecing anyway! On a piece of white patterned fabric I stamped the sentiment and hand stitched it with red thread. Then I just threaded up the pieced machine, added a gem and some machine stitching on the black background.

Crazy for Piecing - and you can take that title both ways!

Stamps (Hero Arts) - Sew Artsy, Classic Fabric Design, Large Canvas Stripes, Flourish Background, Magical Background & Envelope Pattern.

For the patterned background I white embossed pieces of black card with the Magical and Flourish Backgrounds and stamped the Classic Fabric Design and Large Canvas Stripe in black on white card. These were then cut into strips. I cut a square of white card into four triangles applied the strips, trimmed and put the square back together again. I think I can safely say this card takes the record for the most time I’ve ever spent making a card but I had great fun making it!

Crazy for Piecing! Close up

Hope you’re all having a wonderful weekend!
Related Posts with Thumbnails