Showing posts with label embossing. Show all posts

Monday, March 22, 2021

Jar of Roses Slimline Card

This month's challenge over at the Die Cut Divas is to make a slimline card. I haven't made many slimline cards so thought I'd challenge myself and give it a go.

Stamps - Everything's Rosy (Sunny Studio Stamps), Bouquet For You (Stampendous), It's Your Birthday (Hero Arts), Embossing Folder - Happy Birthday (Cuttlebug), Dies - Everything's Rosy (Sunny Studio Stamps), Christmas Florals (Precious Marieke)

One of my favourite layering stamp sets is Sunny Studio Stamps' Everything's Rosy set. I love how dimensional and realistic the flowers and leaves images look and it's fun coming up with different ink mixes for them.

I made a cardbase and added an embossed background layered on silver glitter card. Next up I had some fun getting inky to make the flowers and leaves.
I arranged the stamped images and die cut foliage filler pieces on a jar I had coloured with distress inks (tumbled glass, broken china and faded jeans). The stems were coloured using watercolour pencils. To finish I stamped a sentiment from a Hero Arts set on a strip of card and fishtailed one end.

Wednesday, March 17, 2021

Three Cards for St Patrick's Day

Happy St Patrick's Day! Again this year it's a very different St Patrick's Day here without the usual parades and celebrations. But we'll certainly enjoy the day off work and school anyway and have our own fun at home.

Today I just have a few more St Patrick's Day cards that I made this year.

The first card came together really quickly using the flip it die. The shamrock, made from hearts, was my way of using up a background that I made using acrylic paints. I didn't like the background I had created with the paints but it looked better cut into smaller pieces. The same background was also used for the shamrock on my third card.
Dies - Scallop Edge Circle Die Flip It (The Stamps of Life) & Heart Die, Embossing Folder - Shamrocks (Darice)

For the second card I made a background of patterned scraps and layered the squares on foam pads for some dimension. The little shamrock was again make using a heart die.
Dies - Scallop Squares (M&C Boutique The Works), heart die, Sentiment Stamp - Celebrate Everyday (Hero Arts)

For the third card I have the shamrock, cut out from the acrylic paint background I mentioned previously, as my focal point on the embossed background. I added the cross cut out of gold mirror card to celebrate St Patrick.
Dies - Framelits Hearts (Sizzix), Crosses Two (Spellbinders), Labels 10 (Spellbinders), Embossing Folder - Shamrocks (Darice), Stamp - Celebrate Everyday (Hero Arts)

It's such a beautiful, sunny day here today so I'm finally going to get a chance to enjoy pottering around and tidying up and getting things ready in the garden. Hope you enjoy your day whatever you do!

Tuesday, March 16, 2021

Scrappy Shamrock

Recently I've been sorting out my paper scraps and what a job it's been! I don't know how I've managed to accumulate so many scraps but I'm going to try to use more and more of them in my cards before the scrap containers burst at the seams.

With so many scraps of green patterned paper on hand, I decided to use some of them on a card I sent to my aunt for St Patrick's Day.
Stamp - Celebrate Everyday (Hero Arts), Embossing Folder - Shamrocks (Darice), Dies - Fancy Tags (Spellbinders) & Framelits Hearts (Sizzix)

I stuck strips of patterned paper onto pieces of light cardstock and die cut three scrappy hearts. The hearts were put together to form a shamrock and I used some of the card left over after die cutting the hearts to make a stem.
The background was dry embossed and the sentiment stamped on a die cut tag.

Here we don't send each other St Patrick's Day cards, so I usually only make one every year for a friend who lives further afield. But because of visiting restrictions this year due to Covid, I made a few more to send, so I'll post those tomorrow given the day that's in it.

Sunday, February 14, 2021

Happy Valentine's Day

It's been quite a while since I've blogged, but my good friend Linda told me about a fun challenge at the Die Cut Divas Challenge Blog. So I decided to join in.

This month's challenge is to make a fun fold card. I have to admit I think I've only ever made a couple of fun fold cards before, but after making one for the challenge, I think I'll be making lots of different kinds of fun fold cards from now on. So the card I 
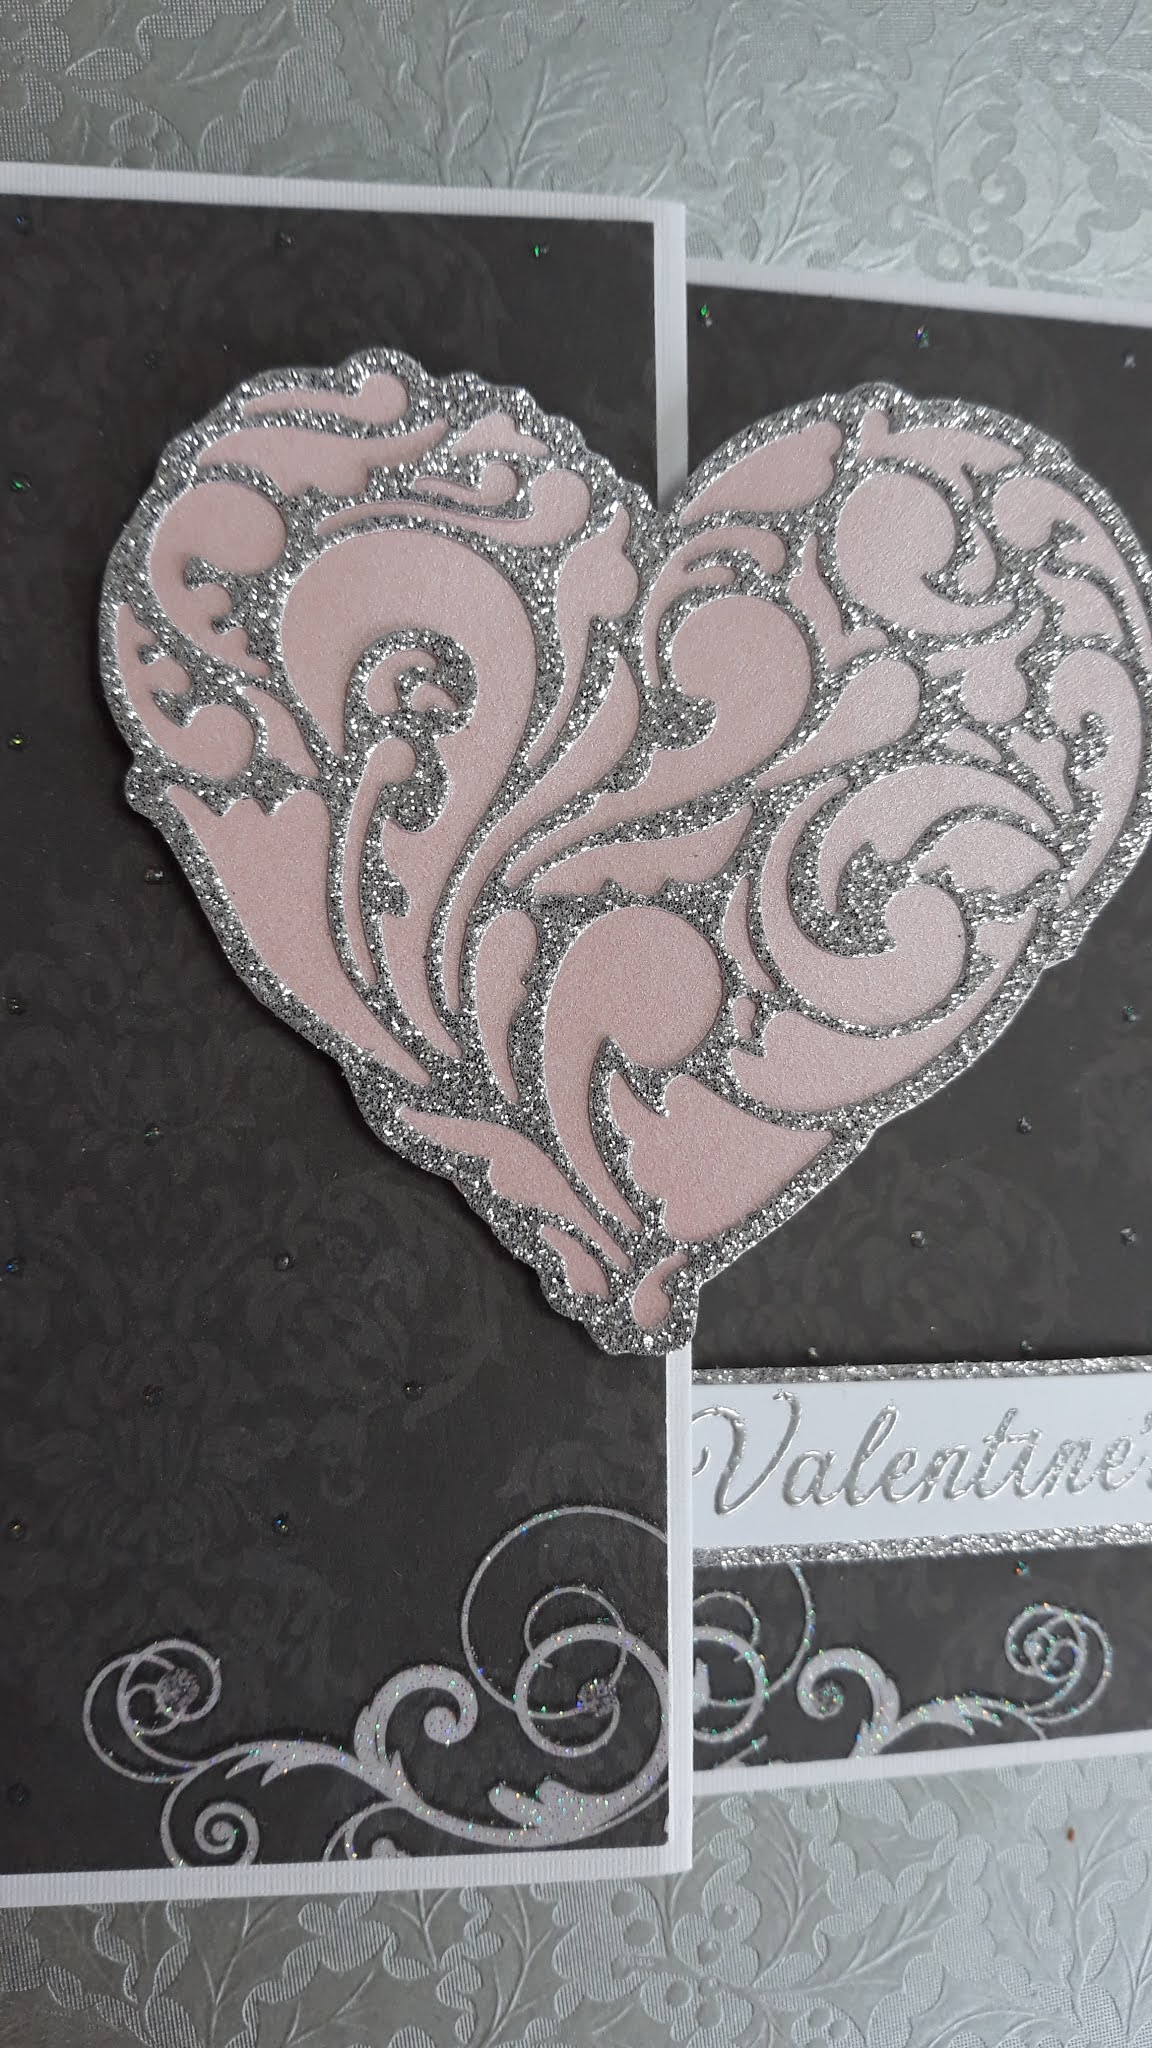
made, using a z fold design, is a Valentine for my hubby.

Die - Renaissance Heart Fancy Die (Hero Arts), Stamp - Celebrate Everyday (Hero Arts) and Paper - Romantic Patterned Scrapbook Paper (Crelando)

I have a few different heart dies in my stash but one of my favourites is a Hero Arts die called Renaissance Heart Fancy Die. For this card I die cut the heart from silver glitter card and backed it with a light pink pearlescent card.

The z fold base was so quick and easy to make by just scoring the front of the card down the centre and folding it back on itself.
I used paper from a paper pad I found in Lidl over a year ago to cover the card front and inside. I left the centre panel blank so I could write my message on it. The sentiment was heat embossed using Versamark and silver embossing powder.
I thought the sweet little sparkly birds were so cute. There's lots more sparkle on the card but we've had cloudy day after cloudy day here since I've made the card, so I didn't capture it very well in the photos.

Saturday, November 17, 2018

Sparkly Gift Tags

I really enjoyed joining in on Simon Says All That Glitters is Gold Challenge so when I woke early this morning gathered together some supplies to get a start on Christmas gift tags for bottles.


Dies - Eliza & Kate Snowflakes (Simon Says Stamp), Fancy Cut Christmas (Hero Arts), Circle Nestabilites (Spellbinders) and Stitched Circles (Pink & Main)


I think shaker cards are so fun so made a shaker to go on my first tag. I adhered five glittery gold stars to the plain black background of the shaker element, added a mix of sequins and stars and used a gold frame over the acetate to trap all the shaker pieces inside. A pretty bow, not made by me but recycled from a box of chocolates, finished off the look I wanted.


I love the way my friend Linda used a die to emboss the background on her bicycle card here. So I did the same with the Eliza Snowflake die on this tag, added the Kate Snowflake cut from glittery card and a little gold gem to the centre of the snowflake.


When I was taking photos of the tags on the bottles who should come along with his own bottle of Buck's Fizz looking for a chase - Toby! I don't know if it was coincidental or if he recognised the similarities between what I had and one of his toys, but I had a good laugh when I saw him and managed to get him to pose for a few seconds after I chased him down the corridor.


Thursday, November 15, 2018

Glittering Gold

Today I was making a card for a friend who has a heart of gold and thought it would be fun to go with the theme set for Simon Says Stamp's Wednesday Challenge - All That Glitters is Gold.


These are the main supplies I gathered together for the card.


Stamps - Lavender Stamp Set (Power Poppy) & Maple Leaf (Hero Arts)
Embossing folder - Foliage (Darice)
Dies - Circles Nestabilities (Spellbinders) & Stitched Circle Dies (Pink & Main)
Distress Inks - spiced marmalade, mustard seed, barn door & rusty hinge (Tim Holtz Ranger)


I enjoyed getting inky with distress inks to make the leaves.


Originally I bought the Power Poppy set for the pretty lavender images but love the lovely sentiments in the set including this one that I embossed in gold.


On the background I used a Darice embossing folder with some autumnal coloured Core'dinations paper. After the panel was embossed I lightly sanded it and distress the edges slightly.


Friday, January 13, 2017

January Noel

I don't usually make New Year's resolutions (as I inevitably break them!) but I do hope this year to make more Christmas cards than usual throughout the year. So if you don't like seeing Christmas cards in January it might be an idea to look away now:)

The Merry Monday Challenge Blog is always a great place to find a theme and inspiration for Christmas cards. This week's challenge is to have the word "Noel" and/or a Scandinavian feel to the card. I decided to go with a red and white colour combination and add texture with an embossing folder that has a cosy knitted look.


Die - Christmas Tree (Docrafts)
Embossing Folder - Cable Knit Pattern (Docrafts)


I started by embossing a card panel and added it to the card base using foam pads. Next I die cut the Christmas tree three times. The top layer was cut from white card and the other layers from red card. I applied barn door distress ink to the white die cut and adhered the trees together. To finish I added a small bow to the tree. An added little bonus is a panel I have from when I applied the distress ink to the die cut and the die cut acted as a mask. I'll make another card from that over the weekend.


Sunday, October 30, 2016

Mistletoe Merry Kisses

Hope you enjoyed the extra hour in bed this morning, if you're in a part of the world where the clocks went back during the night. Instead of spending the extra time in bed, I used it to make a card.

I wanted to use the mistletoe image and fun sentiment from Hero Arts Happy Holly Days set on my card.


Stamps (Hero Arts) - Happy Holly Days
Embossing Folder (Darice) - Snowflake Scroll


I started by embossing a panel of kraft card and attached it to the card base with foam pads. Then I cut out and coloured two sprigs of mistletoe and added them to the card. To finish I added a gingham bow and added a coating of star dust stickles to the berries.


I'm submitting the card into Hero Arts Holiday Card Making Challenge and Simon Says Stamps Anything Goes Challenge.

I just want to say a great big thanks for all the lovely comments left on my last post, I really appreciate every one of them:) Now it's time to announce the winner of the free crochet pattern - it's Debra Rumpza! Debra can you please send me your email address so I can arrange to have the pattern you picked sent to you. My email address is stampingandstitching@gmail.com.

Monday, August 15, 2016

Inked Embossing Folder Challenge

It's time to set another Christmas card challenge for my friend Linda. This time the challenge is to ink an embossing folder.

This week I needed to make a quick card so inked up the snowflake embossing folder (thanks again, Linda!) with dusty concord and milled lavender distress inks. After spritzing some water on the ink I embossed a panel of white card. Once the ink had dried I added it to the card base with foam pads and added some gems. The sentiment was stamped in dusty concord distress ink.


Embossing folder - Snowflake Set (Hero Arts)
Stamp - Very Merry Christmas (Hero Arts)


There are little splodges of ink on the snowflake which I kind of like as it give the snowflake a bit of a distressed look. On my first attempt at making the panel I definitely went way overboard spritzing water on the ink on the embossing folder which meant the ink ran everywhere, including on the snowflake, when I passed the folder through the Big Shot. Anyway I ended up with a panel I can use on another card.


You should pop over to Linda's blog where you'll find a fun Christmas card challenge again this week.

Sunday, July 31, 2016

It's Purple Really

This week my friend Linda challenged me to make a card using the emboss resist technique. It's been a bit of a hectic week so I only got around to making my card today.

I just love this technique - nothing like doing a bit of embossing and then getting inky!


Unfortunately my camera seems to be having a problem distinguishing purple from blue today so even though my card is very purple having used shaded lilac and dusty concord distress inks, my card and tag look more blue in the photos.


I started by clear embossing snowflakes from a number of Hero Arts sets (will add names tomorrow) on white card. After applying the distress inks I sprinkled water on the panel using Tim Holtz's Splatter Brush which Linda recently gave me - thanks again, Linda:) Once the panel was panel was dry I adhered it to a card base, added the embossed sentiment and finished it off with some gems.

I repeated the process on a tag I had die cut.


Another two items ready to go into my stash for Christmas.

Monday, July 25, 2016

Critter Christmas

Oh where did that weekend go?! Just before I head to work I want to set another Christmas card challenge for my friend Linda. This week I’m going with Critter\s Christmas so the card should have any type of animal\s on it.

For my card and tag I inked up a funny reindeer image from Art Impressions. As soon as I spotted the reindeer with the wobbly bottom I had to get it – I know some of my family and friends will get a laugh out of that fella when they see him on their Christmas cards.


Stamp – Jingle Set (Art Impressions)
Embossing Folder – Snowflake Scroll (Darice)


After stamping, colouring and cutting out the reindeer I adhered him to a card panel that had been embossed and stamped with the sentiment. Then I cut out and coloured an extra bottom which shakes as it’s been adhered to the larger image with an action wobble.


I had to add a little sparkle so out came diamond stickles to go on the bells.

Next up I made a matching tag. Even reindeer are taking selfies now:)


Stamp – Jingle Set (Art Impressions)
Dies - Film & Polaroid – (Greeting Farm) and Romantic Rectangles 2 (Spellbinders)


Linda has already set her challenge here - it's a good one and one of my favourite techniques!

Sunday, July 24, 2016

Linda's One Layer Challenge

Earlier in the week my friend Linda set a challenge to make a one layer Christmas card. I rarely make one layer cards but it was fun, and I have to admit a little challenging, to give it a go. Midweek I was in the process of making a card and as there was a lot of colouring left to do on it I brought it into work on Friday to finish it at lunchtime. Then what did I do - left it in work by mistake! So this morning I started again from scratch using the same images but made a less "busy" card which I think I prefer to the one that's still sitting in my drawer in work.

I started by heat embossing the sentiment in gold and then stamped a mix of images on part of the card. After that I used Promarkers to colour the flowers and pine cones. I wish I was brave enough to try a bit of splattering but after dropping an inky block and messing up what was my first attempt at this morning's card, I left the card as it was.


Stamps (Hero Arts) - Color Layering Dimensional Bird, Very Merry Christmas and Build a Wreath by Lia

To finish I just added diamond stickles to the flower centres - hopefully it's okay to do that on one layer cards!


Next up was the matching tag which I think I'll redo as I wrinkled it a bit when trying to flatten it after it got a little warped from heat embossing. Lol it has been a day for stampy mishaps so I think I'll try my hand at something else today!


Stamps (Hero Arts) - Color Layering Dimensional Bird, Very Merry Christmas and Build a Wreath by Lia


Wednesday, July 13, 2016

Linda's Snowflakes and Dry Embossing Challenge

As I'm off work for a few days I was able to get straight into making a Christmas card for the challenge set yesterday by my friend Linda - a card with snowflakes and dry embossing.

I started by applying distress inks (faded jeans, broken china & tumbled glass) to a piece of white card, spritzed it with water and then embossed it using a gorgeous folder that Linda gave me when we met on holidays recently - thanks again, Linda! The pretty snowflake dies Kristina Werner designed for Simon Says Stamp are my favourites so I just had to add one of them to my card too.


Embossing folder - Snowflake Scroll (Darice)
Die - Kate Snowflake (Simon Says Stamp)
Stamp - Very Merry Christmas (Hero Arts)


The snowflake was die cut from white card and a layer of diamond stickles and a gem applied for some sparkle.


Next up I made a matching gift tag with pretty much the same supplies.


Dies - Kate Snowflake (Simon Says Stamp) & Lacey Squares (Spellbinders)

It's great to have another card and tag to put into my bundle for Christmas. Linda, thanks again for the fun challenge and helping me be better prepared for Christmas this year!

Tuesday, July 12, 2016

CAS Christmas

It's time again to set a Christmas card challenge for my friend Linda and this week it's going to be a CAS Christmas card. I have to say CAS cards are definitely a challenge for me but I thought I'd give it a go anyway this week. I see Linda has already posted a challenge for me here on her blog - can't wait to make a start on something!

After die cutting a window and stamping a sentiment on a panel of white card, I added a little elf peeking out of the window. I adhered an embossed circle to the card base before attaching the panel with foam pads. To finish I applied stickles to the trim and bobble on the elf's hat. It was such a quick and easy card to make especially as I had the elf image already coloured with Promarkers and ready to go on a card.


Stamps - Santa's Elves Stamp & Cut (Hero Arts) & Woodland Wreaths (WPlus9)
Die - Nestabilities Circles (Spellbinders)
Embossing folder - Cuttlebug Lace Tree (Provo Craft)


For my matching tag I used another elf image from the same Hero Arts set and sandwiched baker's twine between the embossed circle and a backing circle.


Stamp - Santa's Elves Stamp & Cut (Hero Arts)
Die - Nestabilities Circles (Spellbinders)
Embossing folder - Cuttlebug Lace Tree (Provo Craft)


If you'd like to join in on Linda's challenge and/or mine we'd love you to add a link to your card on either of our blogs.
Related Posts with Thumbnails