Showing posts with label felt. Show all posts

Friday, July 15, 2016

Lavender Sachets

Now that lavender is in full bloom here, except in my garden where it seems to be a bit behind this year, my sister gave me two big bunches from her garden which I am currently drying out on trays covered with tissue paper.


I still have some dried lavender in a jar which came from both of our gardens last year so I decided to make lavender sachets using some pretty felt die cuts my friend Linda gave me recently. You can see gorgeous sachets that Linda made here and pick up some great tips from her too.


These Simon Says Stamp dies have gone straight to the top of my shopping list - thanks for enabling me, yet again, Linda;) The first sachet was made for my sister so she could enjoy the glorious scent of lavender from her garden year round.

Dies - Plush Blooming Heart & Plush Charmed Heart (Simon Says Stamp)

I popped the heart in a little cellophane bag and die cut and folded over the larger oval die to use as a topper.
Dies - Plush Blooming Heart & Plush Charmed Heart (Simon Says Stamp) and Elegant Ovals Nestabilities (Spellbinders
Stamp - Sew Artsy (Hero Arts)


The other sachet is for my Mam. Next up I think I'll make one for myself and get an order in with Simon Says Stamp:)
Dies - Plush Blooming Heart & Plush Charmed Heart (Simon Says Stamp)

Wednesday, June 24, 2015

Felt Flower Card and Tag

I had a birthday card and gift tag to make for an upcoming birthday so thought I'd join in on a couple of challenges while I was making them - Hero Arts Tic Tac Toe Challenge and Simon Says Stamp Use Your Favourite Technique and/or Product.

In the Hero Arts Tic Tac Toe Challenge I picked the line with circles, birthday theme and your favourite colour. My favourite colour would be a toss up between blue and green and I love combining both colours with white. For the Simon Says Stamp Challenge I used a favourite technique, stitching, and favourite product is Hero Arts Stamp & Cut sets.


Stamp & Cuts sets (Hero Arts) - Butterfly and Flowers and Happy

I stamped the flowers and leaves on felt and, after the ink had dried, hand stitched the images and cut out. To finish I added buttons and sequins to the flower centres. The die cut sentiment on the card was cut from a scrapped watercolour background that I made ages ago and the "birthday" sentiment was stamped using faded jeans distress ink. To finish I added a sprinkling of sequins.

After die cutting the gift tag, I stamped the sentiment with faded jeans distress ink, added a flower and some sequins.


Butterfly and Flowers Stamp & Cuts set (Hero Arts), Birthday Messages (Hero Arts) and Pierced Circles Dies (Spellbinders)

Wednesday, May 29, 2013

Make a Wish Card with Hair Clip

Isn't the Tuesday Trigger over at Moxie Fab World just gorgeous? Love the adorable birds, mix of images and beautiful colour combination.


Every day I enjoy looking at the birds that come to our bird feeders - it makes working at the kitchen sink much more pleasurable! Our visitors are mainly sparrows, starlings, chaffinches, coal tits and pigeons. But occasionally little blue tits decide to dine in our garden and I love to see the flash of their beautiful colours as they fly in to feed. So on my card I wanted to use the colours of the blue tits, the greenery in the garden and the grey from the background of the napkin. Because of the softness of the feathers I included some soft felt.

Make a Wish

Stamps (Hero Arts) - Leafy Vines & It's Your Day

Dawn and Arlene from The Die Cut Divas kindly invited me to do a tutorial over at the The Die Cut Divas blog and as the May Challenge is Anything But a Card I made a fabric brooch. You can find the tutorial here showing how to make a fabric flower brooch. I used the same method to make the flower on my card.

IMGP0997

This time the flower is a hair clip - it's fun putting a little extra surprise on cards.

IMGP1000

I'm also submitting this card into the current Hero Arts challenge.

Yesterday I was teaching a class and one of the ladies who was at it showed us a beautiful scarf that she had knit. I had never seen anything like it, it looked like ripples of ribbon so of course when the class was finished I had to pay a visit to our local wool shop.

IMGP1014

It turns out that the ribbon yarn (Woolcrraft Desire) has little holes all along the upper edge and each hole is knit into. So I picked up some to knit a scarf for my sister. I did a little bit of knitting this morning and my goodness the scarf really flies up with only five stitches all in knit stitch. I'll definitely have to go shopping again for some more patterns in this ribbon yarn!

Sunday, May 12, 2013

Happy Mother's Day Gift Box with Brooch

This year in Ireland we celebrated Mother's Day on 10th March, but to all those who are celebrating the day today - Happy Mother's Day!

I was delighted to have had a project picked up for the May/June issue of Paper Crafts Magazine. I haven't seen the digital version of the magazine yet, but I think it must be in there somewhere.


As you can see from the cover, part of the magazine is dedicated to ideas for Mother's Day. So to wrap up a gift for mom, I made a gift box with a detachable brooch.


Stamp (Hero Arts) - Celebrate Everyday

The box was made in no time using my Silhouette Cameo and this design. Then I added some ribbon to attach a brooch onto and a sentiment from Hero Arts' Celebrate Everyday set, a set which covers so many special occasions during the year.


The brooch was made using some felt and dahlia Nestabilities. My good friend Linda sent me a fabulous set of rhinestones, one of which I used for the centre of the brooch - thanks again Linda:)

Hope you are having a great weekend!


Thursday, April 4, 2013

Scrappy Birthday Card

I just love the Tuesday Trigger over at Moxie Fab World this week.


I made a card inspired by just about everything in the photo - all the gorgeous felt, the yummy colours, the pretty buttons and beautiful stitching. To start with I dug into my heap of fabric scraps and button jars.

IMGP0706
Stamp (Hero Arts) - It's Your Day

Then I die cut away to my hearts content using Hero Arts Geometric Shapes dies and circle and star Nestabilities. As there is a little touch of red in the Trigger photo, I just added a splash of red too on the stitched sentiment piece, by stamping and hand stitching the sentiment, and having the tips of the red star peeking out from behind the sentiment circle.


Sorry for the blurry photo but my camera doesn't seem to like doing close ups! I am also submitting this card into the Simon Says Stamp Happy Birthday Challenge which is in celebration of Simon Says Stamp's 4th birthday.

Monday, November 5, 2012

Merry Christmas Ornament

I was so excited when my dear friend Linda sent me (among many other yummy goodies!) a new Hero Arts Stamp & Cut Set which is exclusive to Archiver's - thanks again, Linda:) The Christmas Ornaments set has three gorgeous ornaments and a die for cutting them out - yay I'll have some Christmas cards made in no time!

Merry Christmas Bauble
Stamps (Hero Arts) - Christmas Ornaments, Aspen Happy Holidays & Very Merry Christmas

To start with I clear embossed and cut out the branch to hold the ornament. I've been using red felt on some other project I've been making so decided to die cut the felt as a backer to the embossed ornament. The ornament and sentiment were embossed and I added lots of bling to finish. Hero Arts' November Challenge includes using bling and dry embossing so I'm submitting this card into the challenge.

I had a great time yesterday with a couple of my friends at the Knitting and Stitching Show and was hoping to show lots of photos here. But a lot of the exhibitions and stands had a no photography policy, so I hardly took my camera out at all. I did get a photo of this gorgeous little box which I fell in love with. Unfortunately the box was out of stock, but hopefully I'll be able to pick one up again - I just need to track down the pamphlet I picked up for that particular shop! It would be a great project for using up paper scraps and stamped images from my stash.


Hope you all had a great weekend!


Thursday, August 25, 2011

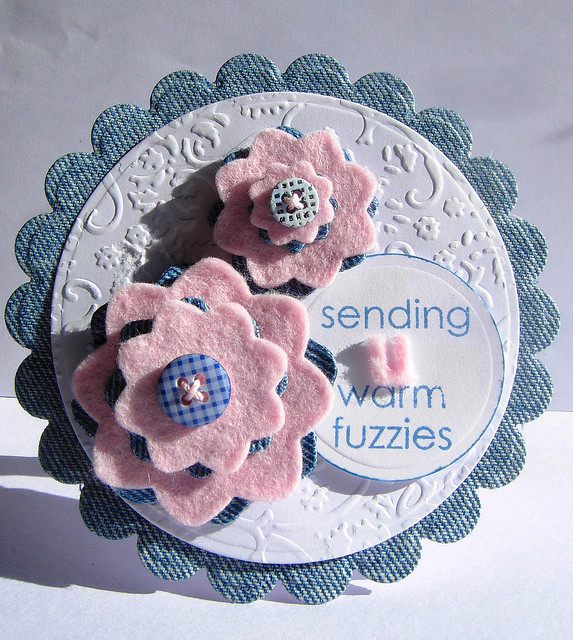
Sending U Warm Fuzzies

Today I wanted to make a card with a mix of textures and materials. It started out because I was doing a sort out of my kids’ clothes and saved pieces of worn out jeans. Bits and pieces of these will probably end up on a patchwork bag but I took a little bit of denim for the card below.

Sending You Warm Fuzzies
Stamps (Hero Arts) - Everyday Sayings & Envelope Pattern

For the denim card base I adhered a piece of denim to a piece of card and die cut a scallop circle. The flowers were die cut from the denim and some pink felt. A “u” was also die cut from a little scrap of the felt. I had only one button with a check pattern on it, so for the smaller button I used a plain blue button and white embossed the envelope pattern on it. Appropriately enough, the sentiment was stamped using faded jeans distress ink.

I'm submitting the card into the following challenges:

Moxie Fab World - Fabulous Felt Challenge
Lily Pad Cards – Felt\Fabric Challenge
Creative Card Crew - Hand Made Flowers
Paper Creations Ink - Show Us Your Flowers


Thursday, June 30, 2011

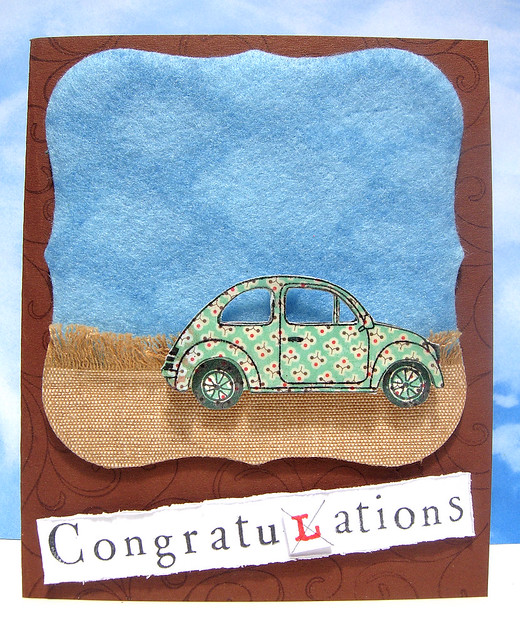
Congrats on Passing Driving Test

This is a card to congratulate someone on passing their driving test. Here in Ireland learner drivers must have L plates (a red “L” on a square white background) on their cars until they pass their driving test. I’ll never forget how delighted I was years ago when I passed my test and could tear up my L plates! So I wanted to incorporate something about getting rid of L plates on the sentiment.

Congrats on passing driving test
Stamps (Hero Arts) - Going, Clouds, Flourish Background, Type and Small Variety Alphabet.

Using VersaMark, I stamped the Background Flourish on the brown card base. I wanted a bit of texture behind the car so stamped the Clouds Background on a scrap of felt using faded jeans distress ink. A scrap of frayed upholstery fabric was used for the ground.

Congrats on Passing Driving Test
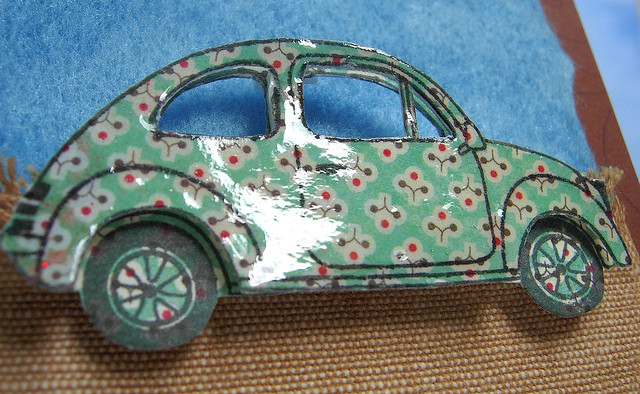
The car was stamped twice on paper from the Hello Luscious Paper Pad (thanks again, Sharon). The body of the car is layered and covered with a layer of glossy accents.

Monday, June 20, 2011

Fuzzy Quilt Card

When I saw Cath's I'm Sew Excited! Challenge in the Moxie Fab World, I just had to make something! The challenge is to use sewing icons on a project. I love quilts so I wanted to incorporate something to do with quilts on my card and used this sentiment because I thought it would go with the idea of being snuggled up in a quilt.

Fuzzy quilt card
Stamps (Hero Arts) - Everyday Sayings & Sew Artsy

I had patterned paper (Tulip by Andrea Jayne) left over from some baby cards and cut these into squares and circles for the scallop edged “quilt”. The pieces were randomly put together and machine stitched with a small zigzag stitch. The base of the pin cushion was coloured with watercolour pencils. I cut the top of the pincushion out of a scrap of felt and added the Hero Arts heart gems (thanks again, Anita) to the tops of ordinary pins. The “fuzzies” letters were also cut out of felt scraps using an X-cut alphabet die.

Fuzzy Quilt Card

I love Lisa Spangler’s Make-It+mail-It Challenge so I’m also submitting the card to her challenge as it will be on the way to a friend very soon.
Related Posts with Thumbnails