I really enjoyed joining in on Simon Says All That Glitters is Gold Challenge so when I woke early this morning gathered together some supplies to get a start on Christmas gift tags for bottles.
Dies - Eliza & Kate Snowflakes (Simon Says Stamp), Fancy Cut Christmas (Hero Arts), Circle Nestabilites (Spellbinders) and Stitched Circles (Pink & Main)
I think shaker cards are so fun so made a shaker to go on my first tag. I adhered five glittery gold stars to the plain black background of the shaker element, added a mix of sequins and stars and used a gold frame over the acetate to trap all the shaker pieces inside. A pretty bow, not made by me but recycled from a box of chocolates, finished off the look I wanted.
I love the way my friend Linda used a die to emboss the background on her bicycle card here. So I did the same with the Eliza Snowflake die on this tag, added the Kate Snowflake cut from glittery card and a little gold gem to the centre of the snowflake.
When I was taking photos of the tags on the bottles who should come along with his own bottle of Buck's Fizz looking for a chase - Toby! I don't know if it was coincidental or if he recognised the similarities between what I had and one of his toys, but I had a good laugh when I saw him and managed to get him to pose for a few seconds after I chased him down the corridor.
Showing posts with label Nestabilities. Show all posts
Saturday, November 17, 2018
Thursday, November 15, 2018
Glittering Gold
Today I was making a card for a friend who has a heart of gold and thought it would be fun to go with the theme set for Simon Says Stamp's Wednesday Challenge - All That Glitters is Gold.

These are the main supplies I gathered together for the card.

Stamps - Lavender Stamp Set (Power Poppy) & Maple Leaf (Hero Arts)
Embossing folder - Foliage (Darice)
Dies - Circles Nestabilities (Spellbinders) & Stitched Circle Dies (Pink & Main)
Distress Inks - spiced marmalade, mustard seed, barn door & rusty hinge (Tim Holtz Ranger)
I enjoyed getting inky with distress inks to make the leaves.

Originally I bought the Power Poppy set for the pretty lavender images but love the lovely sentiments in the set including this one that I embossed in gold.

On the background I used a Darice embossing folder with some autumnal coloured Core'dinations paper. After the panel was embossed I lightly sanded it and distress the edges slightly.


These are the main supplies I gathered together for the card.

Stamps - Lavender Stamp Set (Power Poppy) & Maple Leaf (Hero Arts)
Embossing folder - Foliage (Darice)
Dies - Circles Nestabilities (Spellbinders) & Stitched Circle Dies (Pink & Main)
Distress Inks - spiced marmalade, mustard seed, barn door & rusty hinge (Tim Holtz Ranger)
I enjoyed getting inky with distress inks to make the leaves.

Originally I bought the Power Poppy set for the pretty lavender images but love the lovely sentiments in the set including this one that I embossed in gold.

On the background I used a Darice embossing folder with some autumnal coloured Core'dinations paper. After the panel was embossed I lightly sanded it and distress the edges slightly.

Friday, July 15, 2016
Lavender Sachets
Now that lavender is in full bloom here, except in my garden where it seems to be a bit behind this year, my sister gave me two big bunches from her garden which I am currently drying out on trays covered with tissue paper.
I still have some dried lavender in a jar which came from both of our gardens last year so I decided to make lavender sachets using some pretty felt die cuts my friend Linda gave me recently. You can see gorgeous sachets that Linda made here and pick up some great tips from her too.
These Simon Says Stamp dies have gone straight to the top of my shopping list - thanks for enabling me, yet again, Linda;) The first sachet was made for my sister so she could enjoy the glorious scent of lavender from her garden year round.
Dies - Plush Blooming Heart & Plush Charmed Heart (Simon Says Stamp)
I popped the heart in a little cellophane bag and die cut and folded over the larger oval die to use as a topper.
Dies - Plush Blooming Heart & Plush Charmed Heart (Simon Says Stamp) and Elegant Ovals Nestabilities (Spellbinders
Stamp - Sew Artsy (Hero Arts)
The other sachet is for my Mam. Next up I think I'll make one for myself and get an order in with Simon Says Stamp:)
Dies - Plush Blooming Heart & Plush Charmed Heart (Simon Says Stamp)
I still have some dried lavender in a jar which came from both of our gardens last year so I decided to make lavender sachets using some pretty felt die cuts my friend Linda gave me recently. You can see gorgeous sachets that Linda made here and pick up some great tips from her too.
These Simon Says Stamp dies have gone straight to the top of my shopping list - thanks for enabling me, yet again, Linda;) The first sachet was made for my sister so she could enjoy the glorious scent of lavender from her garden year round.
Dies - Plush Blooming Heart & Plush Charmed Heart (Simon Says Stamp)
I popped the heart in a little cellophane bag and die cut and folded over the larger oval die to use as a topper.
Dies - Plush Blooming Heart & Plush Charmed Heart (Simon Says Stamp) and Elegant Ovals Nestabilities (Spellbinders
Stamp - Sew Artsy (Hero Arts)
The other sachet is for my Mam. Next up I think I'll make one for myself and get an order in with Simon Says Stamp:)
Dies - Plush Blooming Heart & Plush Charmed Heart (Simon Says Stamp)
Saturday, February 13, 2016
Love Quilt Block
My piles of scraps, both card and fabric, are getting out of hand so I'm going to make a few sets of quilt cards to try to make at least a little dent in these scrap piles. It will be fun sorting through the scraps and picking out the card/fabric that will go together.
For this card I die cut the quilt block from some scraps of patterned and black card. Then using a piece of label as an adhesive backer I inlaid the die cut pieces to make the mini quilt block.
Dies - Quilt Cuts 2 (WPlus9) and Bundle of Stitched Shapes (Simon Says Stamp)
Embossing folder - Quilted (Tim Holtz)
The block was framed with a die cut scalloped square and I added a wood button to finish the block. The block was mounted on an embossed background which my friend Linda sent me - thanks again, Linda:)
This in turn was layered on kraft card which had been die cut using a die from Simon Says Stamp's Bundle of Stitched Shapes.
I'm submitting this card into the Die Cut Diva's Love Marriage and Anniversaries Challenge.
For this card I die cut the quilt block from some scraps of patterned and black card. Then using a piece of label as an adhesive backer I inlaid the die cut pieces to make the mini quilt block.
Dies - Quilt Cuts 2 (WPlus9) and Bundle of Stitched Shapes (Simon Says Stamp)
Embossing folder - Quilted (Tim Holtz)
The block was framed with a die cut scalloped square and I added a wood button to finish the block. The block was mounted on an embossed background which my friend Linda sent me - thanks again, Linda:)
This in turn was layered on kraft card which had been die cut using a die from Simon Says Stamp's Bundle of Stitched Shapes.
I'm submitting this card into the Die Cut Diva's Love Marriage and Anniversaries Challenge.
Sunday, September 6, 2015
Scramble Shaker Card
Over in the Hero Arts Flickr Group last night LaVon hosted a fun Scramble in which we had to make a card based on one of these three sketches.
It turned out to be a real scramble for me as I started the Scramble a bit late because I was yapping on the phone. Then after scrapping the first card I started, I decided to make a shaker card. I don't know what or if I was thinking as I'm slow at making shaker cards even at the best of times not to mind when there is a time limit!
Stamps (Hero Arts) - Playful Animals & Birthday Messages
Anyway I started by embossing the mini card base I made and then set to work on the shaker element. I used scraps of blue and green card for the sky and grass. My Mam gave me a bag with a lovely mix of sequins a while ago and I used some of these as they are pearlescent white with hints of pink. After stamping the pig twice, cutting and colouring, I popped one of the heads on foam pads for dimension. The sentiment was embossed badly and in a last minute hurry as you can no doubt see from the stray flecks of powder!
I'm submitting this card into a2z Scrapbooking's September Challenge.
It turned out to be a real scramble for me as I started the Scramble a bit late because I was yapping on the phone. Then after scrapping the first card I started, I decided to make a shaker card. I don't know what or if I was thinking as I'm slow at making shaker cards even at the best of times not to mind when there is a time limit!
Stamps (Hero Arts) - Playful Animals & Birthday Messages
Anyway I started by embossing the mini card base I made and then set to work on the shaker element. I used scraps of blue and green card for the sky and grass. My Mam gave me a bag with a lovely mix of sequins a while ago and I used some of these as they are pearlescent white with hints of pink. After stamping the pig twice, cutting and colouring, I popped one of the heads on foam pads for dimension. The sentiment was embossed badly and in a last minute hurry as you can no doubt see from the stray flecks of powder!
I'm submitting this card into a2z Scrapbooking's September Challenge.
Tuesday, June 9, 2015
Cow Wrangler
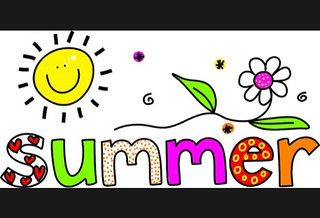
I wanted to join in on a couple of Simon Says Stamp Challenges - the Make it Masculine Challenge and Flickr Challenge #20 with this cute and summery inspiration photo:

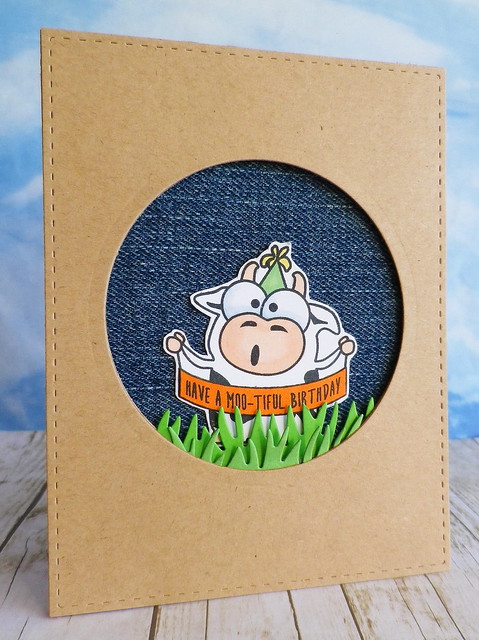
The greens in the inspiration photo made me think of the cows here out on the lush green pastures during the summer and the smiley sun in the photo inspired the cartoon cow and circular window. For masculine cards I usually try to keep things fairly plain and simple but like to throw in some humour and texture at the same time.

Stamp - Birthday Farm Animals (Simon Says Stamp)
Dies - Bundle of Stitched Shapes (Simon Says Stamp), Grassy Border (Lawn Fawn) & Circles Nestabilities (Spellbinders)
I die cut the card face using the rectangle die from Simon Says Stamp's Bundle of Stitched Shapes and then die cut the circular window. The die cut grass was layered behind the window and I used a piece from an old pair of jeans for the background. After stamping and colouring the cow I paper pieced the sentiment in orange because it's so often used for stitching and tabs on jeans. Once the cow was complete I nestled him in the grass and adhered the card front to a kraft card base.

The greens in the inspiration photo made me think of the cows here out on the lush green pastures during the summer and the smiley sun in the photo inspired the cartoon cow and circular window. For masculine cards I usually try to keep things fairly plain and simple but like to throw in some humour and texture at the same time.

Stamp - Birthday Farm Animals (Simon Says Stamp)
Dies - Bundle of Stitched Shapes (Simon Says Stamp), Grassy Border (Lawn Fawn) & Circles Nestabilities (Spellbinders)
I die cut the card face using the rectangle die from Simon Says Stamp's Bundle of Stitched Shapes and then die cut the circular window. The die cut grass was layered behind the window and I used a piece from an old pair of jeans for the background. After stamping and colouring the cow I paper pieced the sentiment in orange because it's so often used for stitching and tabs on jeans. Once the cow was complete I nestled him in the grass and adhered the card front to a kraft card base.
Wednesday, November 12, 2014
Snowman Shaker Tag
I want to make some more gift tags for Christmas and this time used the cute snowman from the Snowman and Snowflakes stamp by Hero Arts on my shaker tag. To start with I made the little shaker part by embossing snowflakes on white card, applying salty ocean distress ink and spritzing on some water. As I wanted my snowman to be on the outer part of the shaker I then trapped tiny beads and sequins between the background and acetate\die cut frame layer.
Stamps (Hero Arts) - Snowman and Snowflakes, Christmas Reindeer (snowflakes) & Stamp and Cut Ornament (sentiment)
Then I stamped the snowman a number of times, cut him out and did my colouring with ProMarkers. After layering his hat and scarf I added some diamond stickes to the white parts of the scarf. Then the shaker part of the tag was added to the die cut backing piece and thread added to finish. I'm submitting this tag into Hero Arts' Holiday Challenge (Tag It category) and The Die Cut Diva's Any Holiday Challenge.
Stamps (Hero Arts) - Snowman and Snowflakes, Christmas Reindeer (snowflakes) & Stamp and Cut Ornament (sentiment)
Then I stamped the snowman a number of times, cut him out and did my colouring with ProMarkers. After layering his hat and scarf I added some diamond stickes to the white parts of the scarf. Then the shaker part of the tag was added to the die cut backing piece and thread added to finish. I'm submitting this tag into Hero Arts' Holiday Challenge (Tag It category) and The Die Cut Diva's Any Holiday Challenge.
Thursday, October 30, 2014
Poinsettia Tag Card
I had a bit of time today to make another Christmas card and, thanks to my friend Linda W, used a lovely poinsettia image from Hero Arts' new Peace Poinsettias set.
Hero Arts Stamps - Peace Poinsettias, Lattice Background, Stamp and Cuts Ornament & Merry Merry Decorate It set
I started by embossing a white piece of card with the holly ribbons folder from Cuttlebug. Then I die cut a tag, stamped the lattice background in gold ink from the Merry Merry Decorate It set and added ribbon. After cutting out the poinsettia flower and leaves, I added beads to the flower centre and a layer of crackle accents.
The sentiment was embossed in gold. I'm submitting this card into the Mad About Metallics and Tag It categories in Hero Arts' Holiday Challenge and Simon Says Stamp's Anything Goes Challenge.
Hero Arts Stamps - Peace Poinsettias, Lattice Background, Stamp and Cuts Ornament & Merry Merry Decorate It set
I started by embossing a white piece of card with the holly ribbons folder from Cuttlebug. Then I die cut a tag, stamped the lattice background in gold ink from the Merry Merry Decorate It set and added ribbon. After cutting out the poinsettia flower and leaves, I added beads to the flower centre and a layer of crackle accents.
The sentiment was embossed in gold. I'm submitting this card into the Mad About Metallics and Tag It categories in Hero Arts' Holiday Challenge and Simon Says Stamp's Anything Goes Challenge.
Tuesday, October 28, 2014
Scrappy Snowflake Tags
The other day when I was making this card my first attempt at a watercolour background looked really hideous. When this happens I usually set the piece aside and see if I can come up with another use for it. Often the not so nice pieces are die cut into butterflies or flowers but in this case I die cut some snowflakes to make gift tags for Christmas. Sorry for the gloomy photos but it's a really dull day here today.
Dies - Simon Says Stamp (Eliza and Kate snowflake dies) & Spellbinders (Picot Edge Circles)
I used the inlaid die cutting technique, and between using the scrapped watercolour panel and scraps of white card left over from other projects, I was happy with the amount of scraps I used up.
To finish the tags I added some gems and baker's twine.
I'm not quite ready to wrap my Christmas pressies yet (in fact I haven't even bought one Christmas present yet!) but just wanted to see how the tags would work on a present simply wrapped with tissue paper and baker's twine.
I'm submitting these tags in Simon Says Stamp's Watercolour Challenge over on Flickr.
Dies - Simon Says Stamp (Eliza and Kate snowflake dies) & Spellbinders (Picot Edge Circles)
I used the inlaid die cutting technique, and between using the scrapped watercolour panel and scraps of white card left over from other projects, I was happy with the amount of scraps I used up.
To finish the tags I added some gems and baker's twine.
I'm not quite ready to wrap my Christmas pressies yet (in fact I haven't even bought one Christmas present yet!) but just wanted to see how the tags would work on a present simply wrapped with tissue paper and baker's twine.
I'm submitting these tags in Simon Says Stamp's Watercolour Challenge over on Flickr.
Thursday, September 4, 2014
Trick or Treat
I know it might be a bit early to be making Halloween bits and pieces but when I was out shopping earlier I noticed that some Christmas items are already creeping onto the shelves, so maybe I'm not too early for Halloween after all!
Anyway there are a couple of challenges I wanted to play along with - Teri's Fabulous Friday Challenge over at Moxie Fab World and Simon Says Stamp's Stamp It Challenge
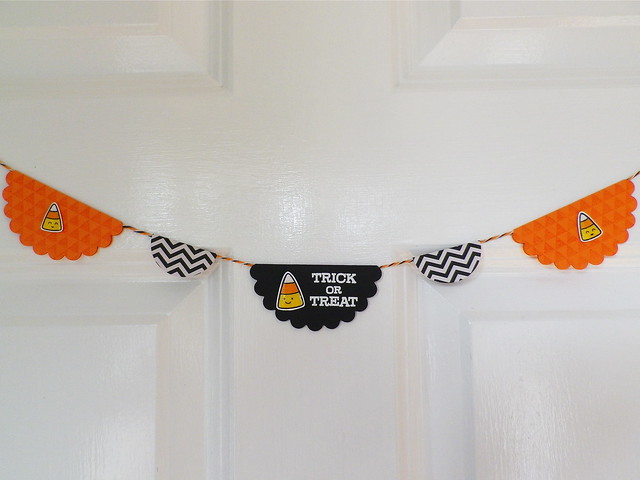
The photo above is the one to be used for inspiration for the Moxie Fab World Challenge. It inspired me to make a garland, use yellow, orange and black, and also to use chevrons and triangles. For the Simon Says Stamp Challenge you have to stamp - lol I love nothing better:)
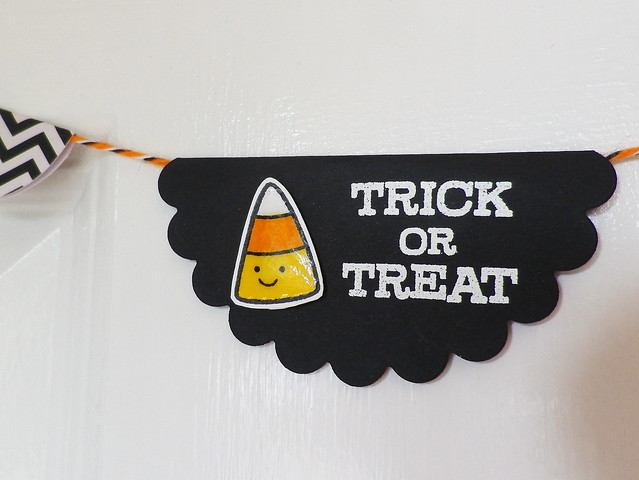
So first up is the little garland. I die cut circles from plain paper and patterned paper. On the orange ones I stamped Hero Arts' Tiny Flags using spiced marmalade distress ink and on the black circle I embossed the Lawn Fawn sentiment from the Trick or Treat set.

Stamps - Trick or Treat (Lawn Fawn) & Tiny Flags (Hero Arts)
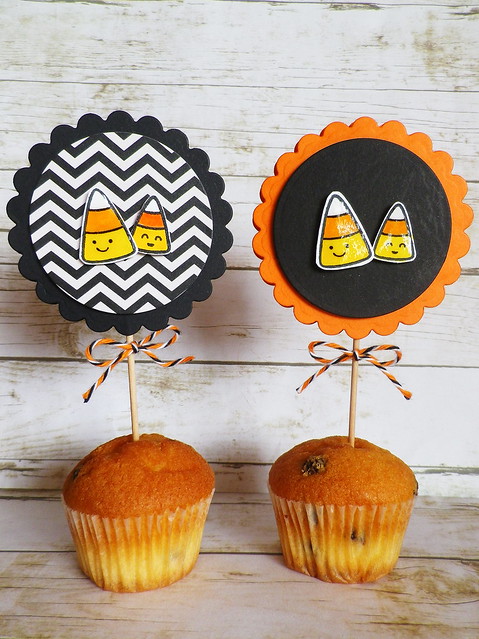
The cute candy corns which are from the same set were stamped, coloured with ProMarkers and covered with glossy accents.

Next up are a couple of cupcake toppers, again using the same dies and stamps. At Halloween they will be stuck in cupcakes that are spookier than the mini chocolate chip ones I have here:)

Stamp set - Trick or Treat (Lawn Fawn)
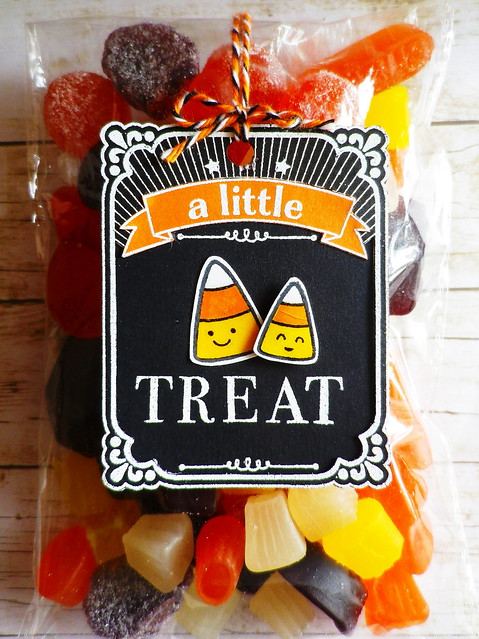
Well since Halloween wouldn't be Halloween without treats, I had to make up a little bag of treats and a tag.

Stamps - A Little (Hero Arts) & Trick or Treat (Lawn Fawn)
The tag was embossed and pieced and I again added candy corns that had been coloured and glossed. I used baker's twine from a Halloween assortment pack from Doodlebug Design. Only a little over eight weeks to Halloween now but I think these treats might be eaten a little before then;)
Anyway there are a couple of challenges I wanted to play along with - Teri's Fabulous Friday Challenge over at Moxie Fab World and Simon Says Stamp's Stamp It Challenge
The photo above is the one to be used for inspiration for the Moxie Fab World Challenge. It inspired me to make a garland, use yellow, orange and black, and also to use chevrons and triangles. For the Simon Says Stamp Challenge you have to stamp - lol I love nothing better:)
So first up is the little garland. I die cut circles from plain paper and patterned paper. On the orange ones I stamped Hero Arts' Tiny Flags using spiced marmalade distress ink and on the black circle I embossed the Lawn Fawn sentiment from the Trick or Treat set.

Stamps - Trick or Treat (Lawn Fawn) & Tiny Flags (Hero Arts)
The cute candy corns which are from the same set were stamped, coloured with ProMarkers and covered with glossy accents.

Next up are a couple of cupcake toppers, again using the same dies and stamps. At Halloween they will be stuck in cupcakes that are spookier than the mini chocolate chip ones I have here:)

Stamp set - Trick or Treat (Lawn Fawn)
Well since Halloween wouldn't be Halloween without treats, I had to make up a little bag of treats and a tag.

Stamps - A Little (Hero Arts) & Trick or Treat (Lawn Fawn)
The tag was embossed and pieced and I again added candy corns that had been coloured and glossed. I used baker's twine from a Halloween assortment pack from Doodlebug Design. Only a little over eight weeks to Halloween now but I think these treats might be eaten a little before then;)
Labels:
A Little,
baker’s twine,
Big Shot,
die cutting,
embossing,
Halloween,
Hero Arts,
Lawn Fawn,
Nestabilities,
party set,
Trick or Treat
Sunday, July 6, 2014
I Ruff You Shaker Card
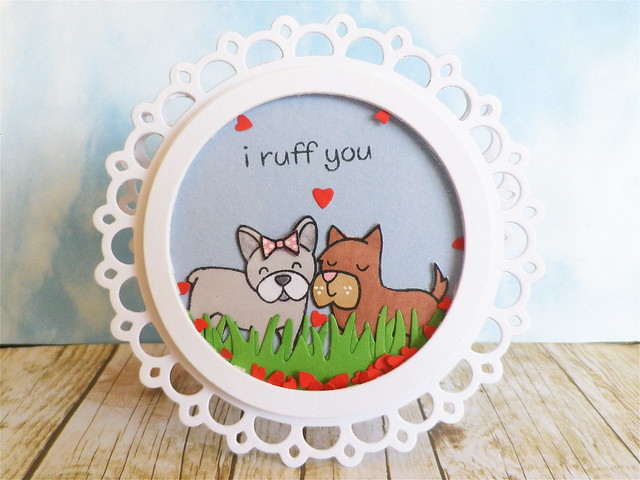
I haven't made a shaker card in a long time but wanted to make one using two cuties from the super cute Critters at the Dog Park set by Lawn Fawn.

Stamp - Lawn Fawn Critters at the Dog Park
Dies - Lawn Fawn grassy border and Spellbinders picot edge circles
To start with I die cut a circle of blue card, stamped the sentiment and die cut the grass piece using Lawn Fawn's grassy border die. After stamping and cutting out the dogs, I coloured them with ProMarkers and added a few dotty highlights with a white pen before tucking them in behind the grass. Then I punched out lots of hearts and added the top layer of acetate and a ring of card to contain the hearts.
I die cut two Nestabilities picot edge circles to make the card base, scored a line across the the back circle about 1/4 inch down from the top of the solid base. Adhesive was added above the scoreline before sticking it to the card front. I'm submitting this card into Simon Says Stamp Shake It! Challenge and Virginia's View Die Cut Challenge.
I wish I could say this is a photo from my own garden, but it's a photo from the 18th century walled garden in Russborough House which I visited with my Mum yesterday.
The house isn't far from us and I've visited it many, many times over the years but this was the first time I've ever seen the walled garden open. Seemingly it's open every Wednesday and Saturday between April and September - it's well work a visit. We had a lovely time strolling around the garden looking at the various trees, shrubs, flowers and fruits. The walled garden is being brought back to its former glory by a group of volunteers who are doing an amazing job. I'm half thinking of volunteering as I couldn't think of a nicer spot to while away some hours gardening.
.
Hope you are having a wonderful weekend too!

Stamp - Lawn Fawn Critters at the Dog Park
Dies - Lawn Fawn grassy border and Spellbinders picot edge circles
To start with I die cut a circle of blue card, stamped the sentiment and die cut the grass piece using Lawn Fawn's grassy border die. After stamping and cutting out the dogs, I coloured them with ProMarkers and added a few dotty highlights with a white pen before tucking them in behind the grass. Then I punched out lots of hearts and added the top layer of acetate and a ring of card to contain the hearts.
I die cut two Nestabilities picot edge circles to make the card base, scored a line across the the back circle about 1/4 inch down from the top of the solid base. Adhesive was added above the scoreline before sticking it to the card front. I'm submitting this card into Simon Says Stamp Shake It! Challenge and Virginia's View Die Cut Challenge.
I wish I could say this is a photo from my own garden, but it's a photo from the 18th century walled garden in Russborough House which I visited with my Mum yesterday.
The house isn't far from us and I've visited it many, many times over the years but this was the first time I've ever seen the walled garden open. Seemingly it's open every Wednesday and Saturday between April and September - it's well work a visit. We had a lovely time strolling around the garden looking at the various trees, shrubs, flowers and fruits. The walled garden is being brought back to its former glory by a group of volunteers who are doing an amazing job. I'm half thinking of volunteering as I couldn't think of a nicer spot to while away some hours gardening.
.
Hope you are having a wonderful weekend too!
Saturday, June 28, 2014
Quilted Thanks and Bookmark
I knew it wouldn't be long before I'd want to play again with the Quilt Cuts 2 dies from WPlus9 and this morning used them to make a card and matching bookmark.
Die - Quilt Cuts 2 (WPlus9), Stamp - Making the World a Better Place (Hero Arts), Papers - Snippets (Studio Calico) & Basics (Pebbles)
After die cutting and assembling the quilt blocks, I layered them on a strip of paper which I had punched with Fiskars threading water punch. The sentiment was stamped with faded denim distress ink. To finish I added a wooden button threaded with twine.
Then I made a little bookmark with another block. I layered the block on a scallop square die cut and sandwiched a large paper clip between this and another scallop square die cut.
I'm submitting these into Simon Says Stamp Anything Goes Challenge. Hope you're enjoying the weekend:)
Die - Quilt Cuts 2 (WPlus9), Stamp - Making the World a Better Place (Hero Arts), Papers - Snippets (Studio Calico) & Basics (Pebbles)
After die cutting and assembling the quilt blocks, I layered them on a strip of paper which I had punched with Fiskars threading water punch. The sentiment was stamped with faded denim distress ink. To finish I added a wooden button threaded with twine.
Then I made a little bookmark with another block. I layered the block on a scallop square die cut and sandwiched a large paper clip between this and another scallop square die cut.
I'm submitting these into Simon Says Stamp Anything Goes Challenge. Hope you're enjoying the weekend:)
Wednesday, June 25, 2014
Quilt Block Card Set
I wanted to make a set of cards to include with my Mum's birthday present so pulled out one of the dies from WPlus9's Quilt Cuts 2 set.
Die (WPlus9) - Quilt Cuts 2, Stamps (Hero Arts) - Dolls, Everyday Sayings and It's Your Day, Paper (Studio Calico) - Snippets
Having dabbled in quilting in the past, I just LOVE this set and am looking forward to making lots more blocks in the future, using fabrics as well as paper. It will be a perfect way of using up some of my mountain of scraps.
Die (WPlus9) - Quilt Cuts 2, Stamp (Hero Arts) - Dolls & Paper (Studio Calico) - Snippets
Anyway I still had Studio Calico's Snippets paper out on my desk from making this card the other day so decided to use the same papers again.
Die (WPlus9) - Quilt Cuts 2, Stamp (Hero Arts)- Everyday Sayings & Paper (Studio Calico) - Snippets
After die cutting and putting together the quilt blocks I added little heart gems to the centres. Then using Nestabilities, I die cut scallop squares to use as a border around the blocks. The sentiments were stamped using Hero Arts Cup O' Joe shadow ink.
Die (WPlus9) - Quilt Cuts 2, Stamp (Hero Arts)- Everyday Sayings & Paper (Studio Calico) - Snippets
I'm submitting this card set into Simon Says Stamp Anything Goes Challenge.
Die (WPlus9) - Quilt Cuts 2, Stamp (Hero Arts) - It's Your Day & Paper (Studio Calico) - Snippets
The birthday girl should be here any minute so I'm off to get the cake ready!
Die (WPlus9) - Quilt Cuts 2, Stamps (Hero Arts) - Dolls, Everyday Sayings and It's Your Day, Paper (Studio Calico) - Snippets
Having dabbled in quilting in the past, I just LOVE this set and am looking forward to making lots more blocks in the future, using fabrics as well as paper. It will be a perfect way of using up some of my mountain of scraps.
Die (WPlus9) - Quilt Cuts 2, Stamp (Hero Arts) - Dolls & Paper (Studio Calico) - Snippets
Anyway I still had Studio Calico's Snippets paper out on my desk from making this card the other day so decided to use the same papers again.
Die (WPlus9) - Quilt Cuts 2, Stamp (Hero Arts)- Everyday Sayings & Paper (Studio Calico) - Snippets
After die cutting and putting together the quilt blocks I added little heart gems to the centres. Then using Nestabilities, I die cut scallop squares to use as a border around the blocks. The sentiments were stamped using Hero Arts Cup O' Joe shadow ink.
Die (WPlus9) - Quilt Cuts 2, Stamp (Hero Arts)- Everyday Sayings & Paper (Studio Calico) - Snippets
I'm submitting this card set into Simon Says Stamp Anything Goes Challenge.
Die (WPlus9) - Quilt Cuts 2, Stamp (Hero Arts) - It's Your Day & Paper (Studio Calico) - Snippets
The birthday girl should be here any minute so I'm off to get the cake ready!
Labels:
Big Shot,
Dolls,
Everyday Sayings,
Hero Arts,
It's Your Day,
Nestabilities,
Quilt Cuts 2,
Studio Calico,
WPlus9
Monday, June 23, 2014
Turning Snowflakes into Flowers and a Bit of Blarney
In this post I used the pretty Simon Says Stamp Kate Snowflake die to make a border and today pulled out another very pretty snowflake die from Simon Says Stamp called the Eliza Snowflake, to see what non Christmassy thing I could make with it.
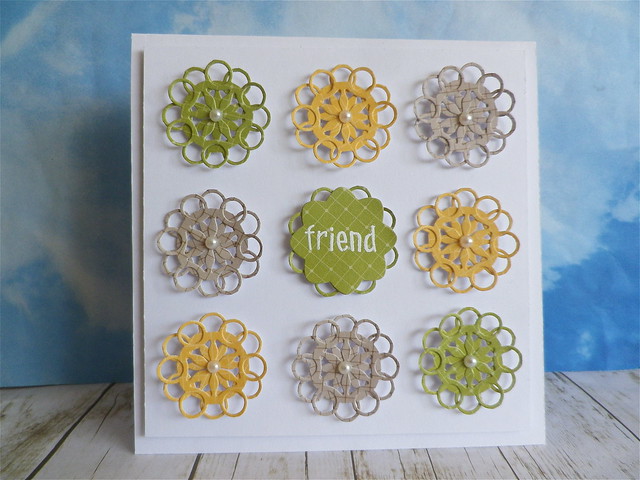
Die (Simon Says Stamp) - Eliza Snowflake, Stamp (Hero Arts) - Be Happy
I thought I'd try to make some flowers this time and cut out the bits and pieces I needed from Studio Calico (Snippets) patterned papers.
After die cutting, I trimmed away the pieces I didn't need and layered two pieces to form a flower.
To finish the flowers I added a little pearl to the centres. The sentiment was embossed on another die cut (Dahlia Nestabilities) and I stuck little pieces, from the snowflake die cut, to the back so that rings peek out between each petal.
I'm submitting this card into Simon Says Stamp Work It Wednesday Challenge and Simon Says Stamp You Gotta Have Friends Challenge
The past few weeks have been busy, busy here so I'm only getting around to posting some more photos of the little trip Linda and I did around the place. Next stop is Blarney Castle.
A beautiful walk, by a little stream, leads to the castle. It was lovely to hear the babbling sounds of the stream and all the birdsong as we made our way to the castle. We were blessed with the weather that morning, it was absolutely glorious.
Both of us skipped kissing the Blarney Stone. I have to say with my head for heights, dangling backwards out over a castle wall doesn't really appeal to me! But in this photo you can see a lady (beside the man in the red jacket) who is just about lean out and go for it - better her than me:)
I enjoyed the views instead and will just have to do without the gift of eloquence!
After visiting the castle we had a lovely stroll around the grounds. There was a fascinating poison garden beside the castle, but I must have been so intrigued with it I forgot to take any photos! I loved the fern garden which has some of the biggest ferns I've ever seen.
Winding through the walks we could tell the wild garlic was in full bloom - the faint smell of garlic wafting in the breeze was lovely.
Blarney House wasn't open when we visited but I enjoyed seeing it again and....
...spotting the wonderful features like this water spout.
We couldn't have picked a better time of the year for our visit with the bluebells and rhododendron in full bloom.
Hope you enjoyed the little bit of Blarney:)

Die (Simon Says Stamp) - Eliza Snowflake, Stamp (Hero Arts) - Be Happy
I thought I'd try to make some flowers this time and cut out the bits and pieces I needed from Studio Calico (Snippets) patterned papers.
After die cutting, I trimmed away the pieces I didn't need and layered two pieces to form a flower.
To finish the flowers I added a little pearl to the centres. The sentiment was embossed on another die cut (Dahlia Nestabilities) and I stuck little pieces, from the snowflake die cut, to the back so that rings peek out between each petal.
I'm submitting this card into Simon Says Stamp Work It Wednesday Challenge and Simon Says Stamp You Gotta Have Friends Challenge
The past few weeks have been busy, busy here so I'm only getting around to posting some more photos of the little trip Linda and I did around the place. Next stop is Blarney Castle.
A beautiful walk, by a little stream, leads to the castle. It was lovely to hear the babbling sounds of the stream and all the birdsong as we made our way to the castle. We were blessed with the weather that morning, it was absolutely glorious.
Both of us skipped kissing the Blarney Stone. I have to say with my head for heights, dangling backwards out over a castle wall doesn't really appeal to me! But in this photo you can see a lady (beside the man in the red jacket) who is just about lean out and go for it - better her than me:)
I enjoyed the views instead and will just have to do without the gift of eloquence!
After visiting the castle we had a lovely stroll around the grounds. There was a fascinating poison garden beside the castle, but I must have been so intrigued with it I forgot to take any photos! I loved the fern garden which has some of the biggest ferns I've ever seen.
Winding through the walks we could tell the wild garlic was in full bloom - the faint smell of garlic wafting in the breeze was lovely.
Blarney House wasn't open when we visited but I enjoyed seeing it again and....
...spotting the wonderful features like this water spout.
We couldn't have picked a better time of the year for our visit with the bluebells and rhododendron in full bloom.
Hope you enjoyed the little bit of Blarney:)
Labels:
Be Happy,
Big Shot,
die cutting,
Eliza Snowflake,
embossing,
Hero Arts,
Ireland,
Nestabilities,
pearls,
Simon Says Stamp
Subscribe to:
Posts (Atom)