Thursday, December 24, 2015

Merry Elves and Furry Christmas

Over in the Hero Arts Flickr group we had a Secret Santa and I was delighted to find out recently that Arlene was my Secret Santa. She sent me these absolutely adorable tags and card and lots of wonderful goodies including Santa's Elves Stamp & Cut set by Hero Arts. I had regretted not including this cute set in an order I placed with Hero Arts a while ago so I couldn't believe it when I saw that Arlene my Secret Santa had set it to me. Thanks again so much, Arlene:)

I love the three different elf images and the fact that the die can be used for all three images. So here is a set of tags I made using the set.


Stamp & Dies - Santa's Elves Stamp & Cut (Hero Arts), Fancy Cut Christmas (Hero Arts) & Nesting Gift Tags Set (Docrafts)

Next up is a Christmas card I made for my sister. She dearly loves her two dogs and cat so I thought Simon Says Stamp's Furry Christmas would be perfect for her card this year.


Stamps - Furry Christmas (Simon Says Stamp) & assorted snowflakes (can't remember which sets I took them from!)

As there is a lot of sparkle on this card from the glitter card and stickles, I'm submitting it into Simon Says Stamp's Make It Sparkle Challenge.


Now I'm off to do some more preparations for tomorrow. Hope you all have a wonderful Christmas full of laughter and fun:) Happy Christmas!

Sunday, November 15, 2015

Peace, Love, Joy and Mistletoe

I like trying to find different uses for my crafty supplies and when my good friend Linda sent me some lovely die cuts of Spring Branch by Hero Arts, I thought they would be perfect for making a little bunch of mistletoe. Unfortunately it's another dull and cloudy day here today so the photo isn't great.


Stamp (Hero Arts) - Very Merry Christmas
Dies (Hero Arts) - Ribbon Cutting Set by Lia & Spring Branch
Embossing Folder (Darice) - Snowflake Trim


Yet again I fell back on my old reliable Snowflake Trim embossing folder for the background panel. Once the panel was dry embossed, I embossed the sentiment in silver and adhered the panel to the cardbase with foam pads. Then I added some pearls to the branches and again used foam pads to adhere the mistletoe to the card. To finish I die cut a bow from silver glitter paper.

I'm submitting this card into Simon Says Stamps Create Something Beginning With The Letter ‘N’ Challenge. The letter "n" on this card is for the new Hero Arts Ribbon Cutting set by Lia and also nearby kisses with the sprigs of mistletoe:)


Thursday, November 12, 2015

Winter Cheer

Only 42 more days till Christmas so I'm going to have to speed up my Christmas card making! Today I used Hero Arts' pretty Winter Cheer tag set by Lia to make three cards like the one below.


Die & stamp set - Winter Cheer tag set by Lia (Hero Arts)
Embossing folder - Snowflake Trim (Darice
)


I die cut the ornament from silver card and added gold sequins and stars as my shaker elements. The gold thread I used for the bauble has been in my wool stash well over twenty years, so long in fact I can't even remember what I originally used it for!


The sentiment panel was embossed in gold and added to the bauble with foam pads. One of my favourite Christmas embossing folders was used for the background.

Recently I also used the tag set to make a set of Christmas gift tags for a Scramble I hosted over in the Hero Arts Flickr group. The theme was to use recycled bits and pieces on Christmas tags. In this instance the ribbon on the gift tags came from a box of chocolates. The chocolates are all long gone at this stage and I'm glad to have finally used up all the ribbon too:)


Supplies (Hero Arts) - Winter Cheer Tag Set by Lia & Fancy Cut Christmas

I'm submitting the card into Hero Arts Holiday Cardmaking Challenge.

Thursday, October 29, 2015

Merry Christmoose

Yesterday I received some very happy mail thanks to the generosity of my favourite company - Hero Arts. Thanks a million Hero Arts:) I’m so glad I’m off work for most of this week so I can dive in and get inky! I started by making some items for a Scramble I’m hosting in the Hero Arts Flickr group on Saturday, but since the theme is a surprise I can’t post them just yet.

Anyway next up I wanted to use Christmas lights from the new Sparkle Borders set. I always like to make some cute Christmas cards and this time decided to have the funny moose from the Missing You set decorated or decorating for Christmas.


Stamps (Hero Arts) – Sparkle Borders, Missing You, Very Merry Christmas, Christmas Reindeer (snowflake), Polar Set by Lia (snowflake) and Fancy Cut Christmas (snowflake)


After die cutting a circle from a panel of kraft card, I embossed the panel and left it aside. For the background I inked a piece of white card with tumbled glass and salty ocean distress inks. After spritzing it with water and allowing time to dry, I stamped a mix of snowflakes in faded jeans distress ink . I adhered some snow banks onto the panel. These were made by tearing white card and distressing the edges with a scissors. I stamped the moose on white card and drew a line of string for my lights. The smallest light image from the Sparkle Borders set was stamped along the string. After cutting out the moose and lights image I coloured it with Promarkers and added diamond stickles and glossy accents to the lights.


The sentiment was made by combining sentiments from the Very Merry Christmas and Missing You sets.

I’m submitting this card into Merry Monday’s Christmas Lights and Glitter Challenge, Simon Says Stamps’ Anything Goes Challenge and Hero Arts’ Holiday Card Making Challenge.

Monday, October 26, 2015

Poinsettia Wreath

Today we’re going to decorate the house for Halloween and here I am thinking about Christmas again. I still have quite a few Christmas cards to make so hopefully you won’t get sick of my Christmas card posts between now and Christmas!

I wanted to make a wreath for a card and thought the pretty little flower in Hero Arts Color Layering Dimensional Bird set would be perfect for making a poinsettia wreath.


To make the background I embossed a panel of kraft card with the Snowflake Trim embossing folder from Darice and distressed the edges. The sentiment from Hero Arts Polar set by Lia was white embossed. I stuck the tail end of a piece of string to the back of the embossed panel before adhering the panel to the card base with foam pads.


Stamps (Hero Arts) - Color Layering Dimensional Bird and Polar Set by Lia
Embossing Folder (Darice) - Snowflake Trim

Next it was time to make flowers and leaves for the wreath. I stamped the flowers in barn door distress ink and the leaves in mowed lawn distress ink. After cutting out the flowers and leaves I layered the flowers and added gold sequins to the centres. Then I adhered the flowers in a circular shape and added the leaves and string bow to finish.


I’m submitting this card into Hero Arts Holiday Card Making Challenge and Simon Says Stamp Wrap it Up Challenge. Now I'm off to spookify the house:)

Saturday, October 24, 2015

Snowflake Card and Bag

I love using kraft, white and red on Christmas projects and as I still had Hero Arts Hand Drawn Snowflakes and Fancy Cut Christmas out on my table, I thought I'd make another Christmas card and a matching gift bag.


To make the card I white embossed the snowflakes on a panel of kraft card and applied white ink around the edges. After die cutting the sentiment out of the panel I die cut the sentiment again from glitter card and inlaid it into the panel. For some extra sparkle I added a sprinkling of gems.


Hero Arts - Hand Drawn Snowflakes and Fancy Cut Christmas

Next it was on to my gift bag. After die cutting the bag, I embossed snowflakes on the back and front panel. Again I used the inlaid technique and added some gems and baker's twine once the bag was assembled.


Hero Arts - Hand Drawn Snowflakes and Fancy Cut Christmas
Lawn Fawn - Goodie Bag Die

I'm submitting the card into Hero Arts Holiday Card Making Challenge and the gift bag into Simon Says Stamp Wrap It Up Challenge.

Friday, October 23, 2015

Snowflakes Christmas Card Set

This year I seem to be far behind on making Christmas cards compared to other years so I think it's time to start making sets of quick cards to help speed up the process.


Stamp (Hero Arts) - Hand Drawn Snowflakes Bold Prints
Die (Hero Arts) - Fancy Cut Christmas


I can't seem to resist pretty snowflake stamps or dies and this year I'm delighted to have added Hero Arts Hand Drawn Snowflakes Bold Prints to my stash.

Distress inks - shaded lilac, dusty concord & faded jeans

The snowflakes on this stamp are so delicate and gorgeous looking and I also love that the stamp is large (6"x 6") so it's the perfect size for anything I want to make.

Distress inks - tumbled glass, broken china, faded jeans & salty ocean

To make the cards I started by white embossing the snowflakes onto squares of white card. Then I applied distress inks and spritzed with water. As I wanted the snowflakes to be the main feature on the cards, I just added the Christmas sentiments I had die cut using one of the dies from Hero Arts Fancy Cut Christmas .

Distress inks - barn door & spiced marmalade

The sentiments have four layers, the upper layer die cut from either glitter card or plain card which had a coat of diamond stickles applied and the three other layers are die cut from matching plain card. After adhering the embossed panels to card bases, using foam pads, I added some gems to finish.

Distress inks - shabby shutters & mowed lawn

I'm submitting these cards into Hero Arts Holiday Card Making Challenge . This weekend is a bank holiday weekend here so no work or school on Monday. Also the clocks change this weekend, so an extra hour in bed on Sunday or maybe that will be an extra hour of crafting instead! There's lots to look forward to this weekend. Hope you have a great weekend too:)

Thursday, October 1, 2015

Happy Birthday Rocket

I wanted to make a birthday card with a space theme for a two year old boy so pulled out a cute freebie stamp set (Rocket Thanks) that Hero Arts recently gave out with orders.

After stamping and cutting out the rocket, I coloured it with Promarkers and added stardust stickles to the flame. The star background was made by applying distress inks (salty ocean, peacock feathers & faded jeans) to white card and stamping the stars in faded jeans distress ink.


Stamps (Hero Arts) - Rocket Thanks, Fantastic Birthday & Tiny Star Background
Die (Tonic) - Advent Drawer Deco Die


I die cut numbers out of the side of the card base and added a panel of acetate behind the number two so that I could inlay the birthday boy's age. As I wanted it to appear that the rocket flame had ignited the number, I coloured it in the same colour as the flame and applied stardust stickles.


I'm submitting this card into Allsorts' Numbers Challenge and Simon Says Stamp's Anything Goes Challenge.

Wednesday, September 30, 2015

Beauty Spot Bee

Over at the Hero Arts group on Flickr, Martha is hosting a fun 90 minute scramble over a 24 hour period. Her theme is to make a project in grey, black, white and use a small pop of one colour.

With this theme I decided to use a cute little bee image from Hero Arts, have yellow as my pop of colour and use hexagons wherever I could. To start with I clear embossed the hexagon background on a panel of grey pearlescent card. Then I die cut a hexagon from white card and die cut a black hexagon frame. After stamping the sentiment, I adhered the frame onto the white hexagon with foam pads and also use foam pads to attach the piece to the background.


Stamps (Hero Arts) - Hexagon Background, Be Happy & Everyday Sayings

Then it was time to make the little bee. I black embossed the bee twice and coloured the images. After cutting out the bee and the bee's head from the second image, I used foam pads to layer the head for some extra dimension. In my haste to meet the scramble deadline, a stray speck of embossing powder ended up on the bee's face, so she's ended up with a beauty spot;) To finish I added some diamond stickles to the wings. I'm submitting this card into Simon Says Stamp's Anything Goes Challenge.


I'm happy to say we're having an Indian summer here this week and it's great to get out on walks and enjoy the pretty autumn colours that are starting to appear on the trees. Hope you're enjoying beautiful weather too wherever you are.


Monday, September 28, 2015

Halloween Treasure Hunt

I remember when I was a kid it seemed to take forever for darkness to fall on Halloween. Here at that time kids called from house to house asking people to "help the Halloween party". The phrase "trick or treat" hadn't made its way across the Atlantic at that stage - yikes I feel old! We'd usually get fruit and nuts for treats and my goodness if we received sweets or coins we'd be absolutely delighted with ourselves!

When our kids were younger we used to have some of their friends over a few hours before it was due to get dark and would have a party with spooky food and, of course, play lots of Halloween games. A favourite with the kids was running around the house finding clues on creepy treasure hunts.

When I ordered Hero Arts 3-D House Die and co-ordinating stamp set, I had in mind ideas for Christmas. When they arrived I couldn't help but think what a fun set it also is for making Halloween decorations and even concealing clues for a treasure hunt.


Die(Hero Arts) - 3-D House Fancy Die
Stamp set (Hero Arts) - 3-D House Essentials


After die cutting the houses I stamped them and then stamped doors, windows and pumpkins in Halloween colours. After cutting these out I adhered them to the houses. The die cuts and scores a house in one pass so it makes it really easy to quickly put together a set of houses.


Die(Hero Arts) - 3-D House Fancy Die
Stamp set (Hero Arts) - 3-D House Essentials


In a treasure hunt it's nice to get a little treat along with a clue (just to keep energy levels up;), so I used the little houses containing the clues as decorations on these cupcakes.


Die - 3-D House Fancy Die (Hero Arts) & Lace Hearts Cupcake Wrapper (Die'sire)
Stamp set (Hero Arts) - 3-D House Essentials


I'm submitting this project into A Blog Named Hero's Die Cutting Challenge and Simon Says Stamp's No Designer Paper Challenge.


Wednesday, September 16, 2015

You Make Me So Happy

I wanted to join in a few challenges - the Makeover Challenge over at Hero Arts, the Happy Challenge over at A Blog Named Hero and the Die Crazy Challenge over at Simon Says Stamp.

This is the card I picked for a makeover


I wanted to stick with the same colours, sentiment stamp & die set, distress ink and sprinkling of sequins. The distress ink background was one I had originally made for the butterfly card but didn't like at the time, so left it in my bundle of scraps until today. It was made by applying distress inks (peacock feathers and tumbled glass) to an acrylic block, spritzing with water and stamping on white card.


Stamp & Die (Hero Arts) - Happy Stamp & Cut set


Another rummage through my scrap pile produced a piece of spiced marmalade card which had been left over from another project. I die cut the "happy" and applied some some diamond stickles to the piece.


Once this was dry I inlaid it into the background panel, stamped the other part of the sentiment and added a sprinkling of sequins to finish.

Monday, September 14, 2015

Polar Thanks

I couldn't wait to get my hands on Hero Arts' adorable Polar Set from the Lia Griffith collection. How could I resist a set that includes lots of cute polar creatures along with accessories and other fun images?

To start with I made the background for the penguin by dragging a Hero Arts ombré (mint to emerald green) ink pad across a panel of white card. Once this was dry I added it to my card base and die cut and stamped the sentiments.


Stamps & Die (Hero Arts) - Polar set by Lia & Thanks Stamp & Cut

After stamping and cutting out the penguin and ice floe, I coloured the images with Promarkers. Then to add some sparkle to the floe, I added a coat of diamond stickles to the upper part and covered the whole piece with a layer of glossy accents.


I'm submitting this card into the Happy Challenge over at A Blog Named Hero as this cute little penguin stamp makes me smile and Simon Says Stamp's Use a Stamp Challenge.

Sunday, September 13, 2015

Bird Crazy Challenge with Linda

Recently my friend Linda and I ordered some Hero Arts goodies and as it turned out we both bought a lot of the same items. Linda came up with the great idea of challenging each other to use the same product on our next cards. To start with we both used the Color Layering Dimensional Bird from this set. I haven't seen what Linda has made yet but can't wait to see her creations on her blog.

I love the way this set works with stamping the bird outline initially and then stamping the patterns using separate stamps. It would be fun to use the outline for paper pieced birds too or even for straightforward colouring. Well let me tell you I went a bit bird crazy trying out different colour combinations and here are just some of the birds I stamped on a soggy Saturday afternoon.


Stamp (Hero Arts) - Color Layering Dimensional Bird

I saved these birds for times when I need to make cards in a hurry but made three cards using other birds I had stamped. As I wanted to makeover this card

for the current Hero Arts challenge I went with neutrals and added white to the stamped image using a white watercolour pencil.


Stamps (Hero Arts) - Color Layering Dimensional Bird, Everyday Sayings & Let the Angels

Next up I stamped the bird using Hero Arts mint to emerald ombré ink. The branch was stamped with Hero Arts cup o' joe shadow ink.

Stamps (Hero Arts) - Color Layering Dimensional Bird, Everyday Sayings & Let the Angels

As I had used neutral and monochromatic birds on the first two cards, I thought for my last card I'd go with a blast of colour and used a mix of quiet morning and summer splash inks.


Stamps (Hero Arts) - Color Layering Dimensional Bird & Everyday Messages

The little nest was made from scraps I had left over from making the first two cards.

I'm submitting these cards into Simon Says Stamp's Use a Stamp Challenge.

Sunday, September 6, 2015

Another Makeover

I wanted to do another makeover on a card and picked this CAS card I made a little while ago.


Stamp set (Hero Arts) - Missing You


This time I wanted to stick with the same basic design but decided to add a blast of colour and include some hand stitching. After cutting a card front from kraft card, I stamped the sentiment and funny bird. Once the stamping was completed, I hand stitched a frame using embroidery thread. As I wanted some dimension on the card, I stamped the bird again on white card, coloured with Promarkers and added it to the card with foam pads.


Next it was time to add some sparkle and sheen to the bird with stickles on the crest, glossy accents on the eyes and wink of stella on the body.


I'm submitting this card into Hero Arts Makeover Challenge.

Scramble Shaker Card

Over in the Hero Arts Flickr Group last night LaVon hosted a fun Scramble in which we had to make a card based on one of these three sketches.

It turned out to be a real scramble for me as I started the Scramble a bit late because I was yapping on the phone. Then after scrapping the first card I started, I decided to make a shaker card. I don't know what or if I was thinking as I'm slow at making shaker cards even at the best of times not to mind when there is a time limit!


Stamps (Hero Arts) - Playful Animals & Birthday Messages


Anyway I started by embossing the mini card base I made and then set to work on the shaker element. I used scraps of blue and green card for the sky and grass. My Mam gave me a bag with a lovely mix of sequins a while ago and I used some of these as they are pearlescent white with hints of pink. After stamping the pig twice, cutting and colouring, I popped one of the heads on foam pads for dimension. The sentiment was embossed badly and in a last minute hurry as you can no doubt see from the stray flecks of powder!

I'm submitting this card into a2z Scrapbooking's September Challenge.

Thursday, September 3, 2015

Two Card Makeovers and a Little Recycling

Hero Arts' fun Makeover Challenge gives us a chance to makeover old projects. I definitely have plenty that could do with changes but picked two butterfly cards for makeovers today.

The first card I picked is this one.


I wanted to make a butterfly in the same colours using the same inlay technique but changed the background and used less enamel hexagons. For the background I light applied distress inks (broken china, tumbled glass & shabby shutters) onto white card. Then I inked the background stamp with shabby shutters distress ink, spritzed with water and stamped on the panel. After stamping the sentiment I added one little enamel hexagon to finish.


Stamps (Hero Arts) - Tropical Background & Fantastic Birthday
Dies - Butterfly (Hero Arts) & Bundle of Stitched Shapes (Simon Says Stamp)


Next in line for a makeover was this card.


With this one I wanted to reverse the colours and add even more sparkle to the butterfly. I inked up the background stamp by dragging Hero Arts' mint julep to emerald green ombré ink pad across and down it. Then I stamped the image on a panel of white card and applied peacock feathers distress ink. Once the panel was dry, I embossed the sentiment.


Stamps (Hero Arts) - Tropical Background & Celebrate Everyday
Dies - Butterfly (Hero Arts)
& Bundle of Stitched Shapes (Simon Says Stamp)

Next it was time to do a bit of recycling to make the sparkly butterfly. I die cut the butterfly from a piece of white glitter card I had saved from a Christmas card. The butterfly was backed with glittered tulle taken from a mini bag I had received a pressie in. After adding a few gems to the butterfly's body, it was adhered to the card with foam pads and I added some sequins to finish.


Have you seen Hero Arts' new website? It looks wonderful, has a fantastic ideas area filled with inspiration and of course there are so many tempting goodies in the shop. I couldn't resist ordering lots of new stamps and dies the other day and thanks to Hero Arts' super speedy service they are already winging their way to me - can't wait!

Tuesday, July 28, 2015

Just a Note

I haven't made a card in quite a while (lots of holiday gallivanting going on this month) but wanted to join in on the personal scramble that Linda organised over in the Hero Arts Flickr group.

As Scramble themes are only revealed at the start of the allotted 90 minute time frame, I decided to make the theme as much of a surprise for me as possible by jotting down various options on pieces of paper and drawing three of these out of a bag. I ended up with use a die, use only one colour as well as black, white or kraft, and add sparkle.

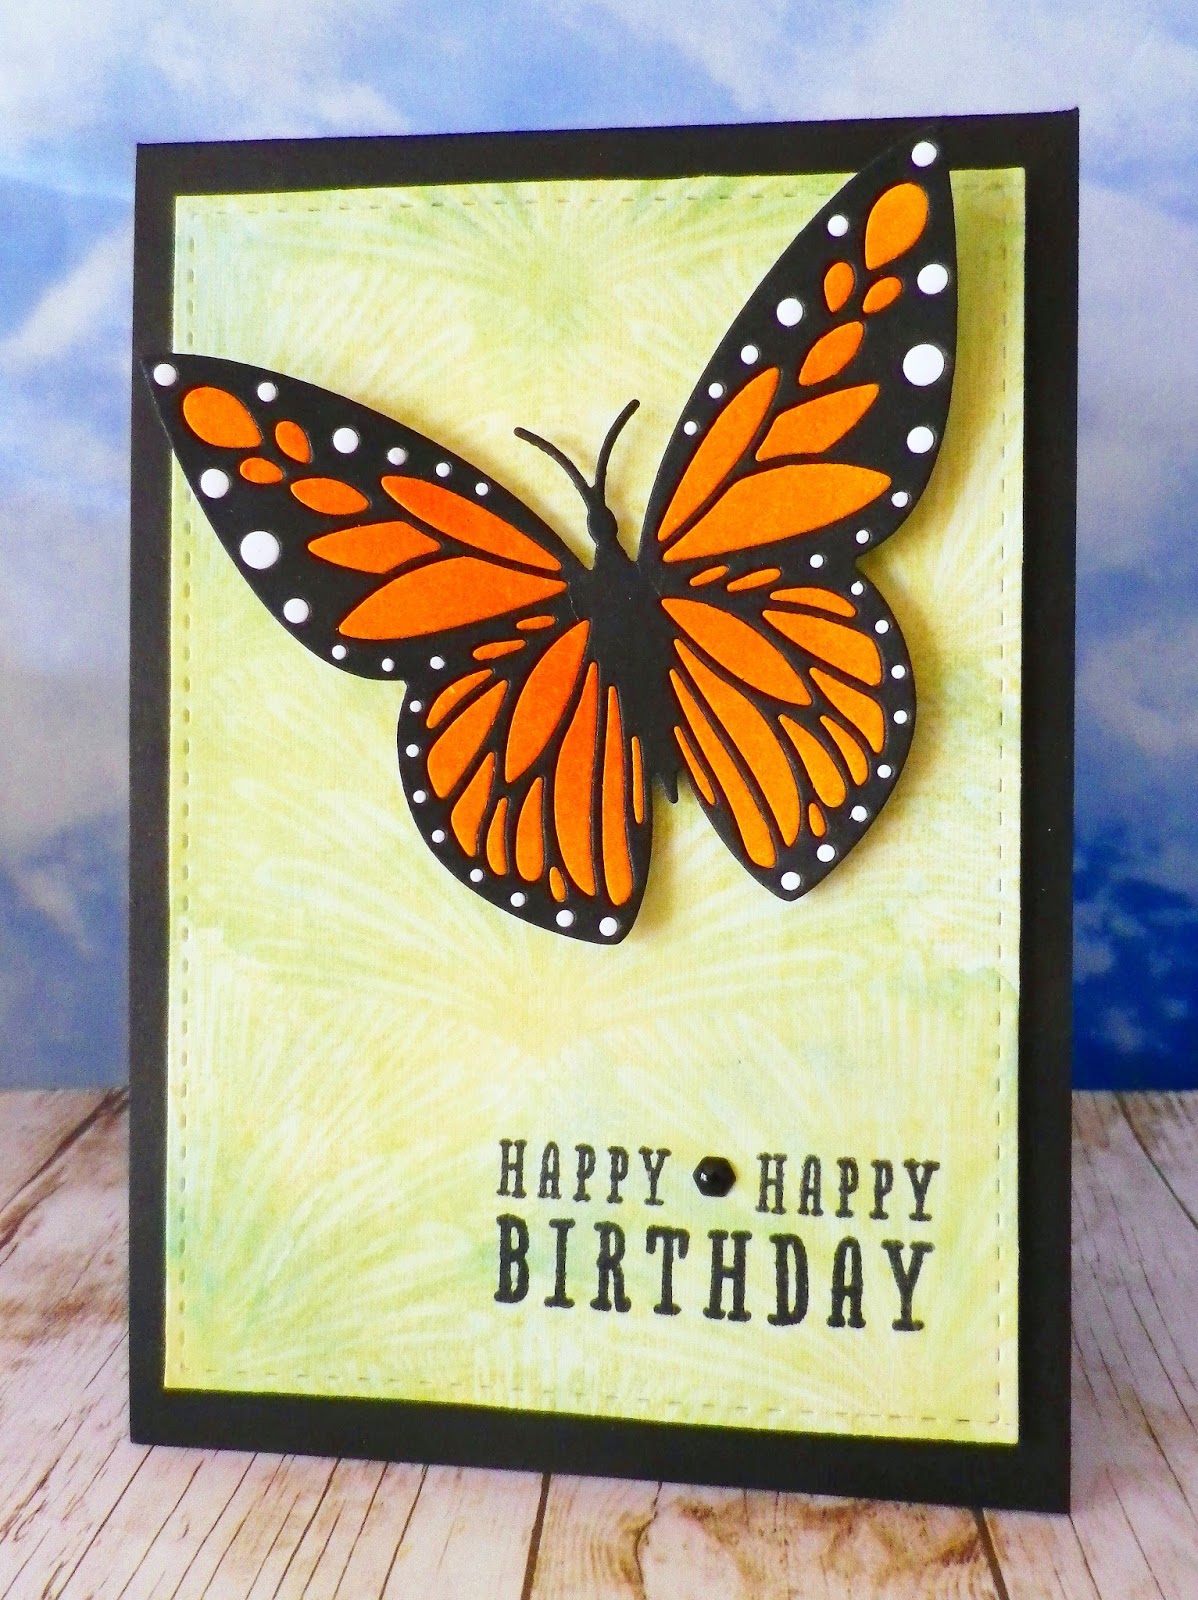
I started by stamping a Hero Arts mint to green ombré ink pad on white card. The pad was stamped twice with the second stamping a little lower than the original one. Oh I love this yummy ink - thanks again, Linda for sending to to me:)


After die cutting the butterfly I added some gems and diamond stickles. The butterfly is so sparkly in real life but I found it impossible to capture all the sparkle in a photo.


I embossed a panel of white card and stamped the sentiment. The panel was added to the card base with foam pads.


Die - Butterfly (Hero Arts), Stamp - Everyday Sayings (Hero Arts), Ink - mint to green ombré ink (Hero Arts) and Embossing Folder - Floral Cuts (Docrafts)

Needless to say the stickles on the butterfly hadn't dried by the time it came to adding it to the card so I ended up with sparkly fingers and thumbs. Of course I should have added the stickles after I had stuck the butterfly on the card rather than when it was first die cut - oh well I can often be afflicted by brain scramble when I take part in a Scramble:) Thanks again for the fun Scramble, Linda!

I'm also submitting this card in Simon Says Stamps Sparkle and Shine Challenge.
Related Posts with Thumbnails