Saturday, February 23, 2013

Confetti Love

Yesterday I received the March/April issue of Paper Crafts magazine and I've already spent so much time looking through it and drooling over the fantastic projects in it. I was lucky to have had this card selected for the Pretty Pastels section and was thrilled to see it in print.


I really don't have a lot of pastels in my stash so when the call went out for submissions, I had a bit of a rummage around and came up with some pastel copy paper. So I decided to make a confetti background and team it with a simple sentiment. A lot of punching and a lot of sticking was involved in making the background, but the panel travelled with me and I did little bits during lunch breaks in work, while cooking, watching tv and waiting for the kids to come out of school. The sentiment was the quickest part of the card as it whizzed out of my Silhouette Cameo. Lol I think this is the shortest supply list I've ever had for a card!

Here's my card in the magazine


and here's the front cover of the issue - love how fresh and springlike it looks.


The daffodils are starting to bloom here but the weather is turning to winter again here with snow falling outside now - brrr! Hope you are having a great weekend!

Thursday, February 14, 2013

Happy Valentine's Day Honey

When I got the Hexagon Background stamp I thought it could make a great honeycomb and had an idea for cutting out a window in it for one of the cute bees from the Be Happy set. So this is the card my Valentine (aka my hubby who has been my Valentine for 21 years - those years have just whizzed by!) ended up with.

Happy Valentine's Day Honey

Stamps (Hero Arts) - Hexagon Background, Be Happy & Celebrate Everyday

To start with I embossed the hexagons and cut out the piece I wanted to use as well as the little window for the bee. After stamping and colouring the bee I added little punched hearts to the antennae and stickles to the wings. Then I just added a scattering of hearts to the honeycomb and card base. I'm submitting this card into the current Hero Arts Challenge and The Cutie Pie Challenge Blog's Valentine Card Challenge.

Hope you are all having a lovely Valentine's Day! I've enjoyed a wonderful day with the four special men in my life (yay for midterm holidays falling on this week). We had a brilliant time in one of my favourite fairly nearby places, Glendalough and enjoyed a beautiful walk and some yummy food.

The Round Tower at Glendalough


A closer view of the Round Tower


A view back at the Upper Lake


On the Miner's Road on the way to the ruined miner's village


Some ducks battling the waves on the Upper Lake


The furry guy in my life enjoying his trip to Glendalough


Blogger seems to have a new way of uploading photos so I'm not sure why the photos from Glendalough are so small! If anyone knows how to change the size, I'd love to know:) Edited Thanks a million to Arlene for the tip on sorting out the size of my photos:)


Saturday, February 9, 2013

ATC Swap

Recently I organised an ATC swap over in the Hero Arts Group on Flickr. It's wonderful to see all the gorgeous ATCs that have been whizzing their way around the world. You'll find photos of the ones that have been received so far in this discussion thread in the group.

One of the swaps I'm doing is with the very talented Linda. Linda came up with the fun idea of us sending each other one ATC plus an ATC background for the other to complete.

I'm delighted that we have now both received our ATCs so I can post here. This is the completed ATC I sent to Linda.

Dreaming of Summer Sunsets - ATC sent to Linda
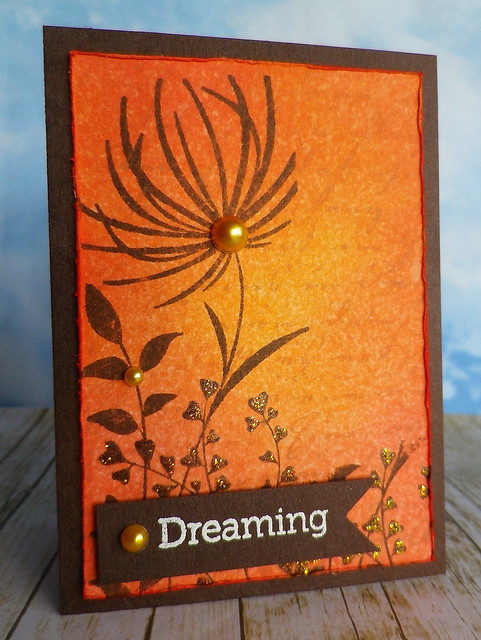
Stamps (Hero Arts) - Old Letter Writing, Exotic Bloom & Right at Home

I called it Dreaming of Summer Sunsets as I was certainly dreaming of Summer on the day I made it - we had a mixed bag of weather that day, including rain, wild winds, hailstones and a teeny tiny bit of sunshine. To start with I applied lots of distress inks (spiced marmalade, barn door, dried marigold, mustard seed & worn lipstick) to white card and spritzed liberally with water. Once the background was dry I stamped the Old Letter Writing on it, after firstly stamping on some scrap paper to lighten the ink load on the stamp. After stamping the Exotic Bloom I added some stickles here and there. The sentiment was embossed and I just added some pearls to finish.

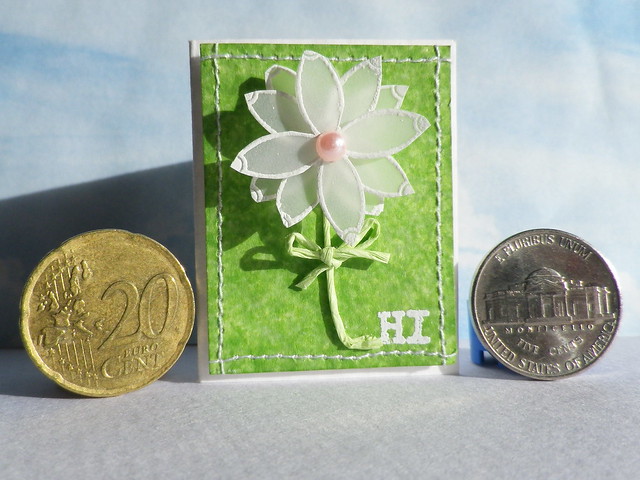
This is the background I sent to Linda for her to complete

ATC swap with Linda - background I sent to Linda
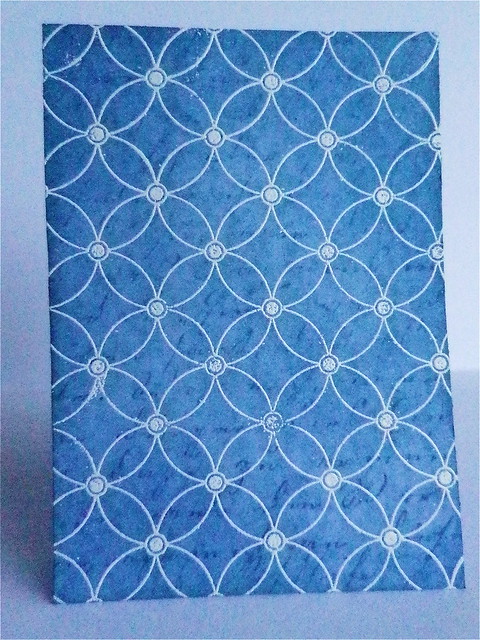
Stamps (Hero Arts) - Looped Circle Pattern & Old Letter Writing

Here you'll find what Linda created with it.

Next is the ATC I made using the fabulous ATC background that Linda had sent me. As you can see here the background looks fantastic but it looks even more amazing in real life with a wonderful overall shimmer.

ATC swap with Linda (ld photography12)
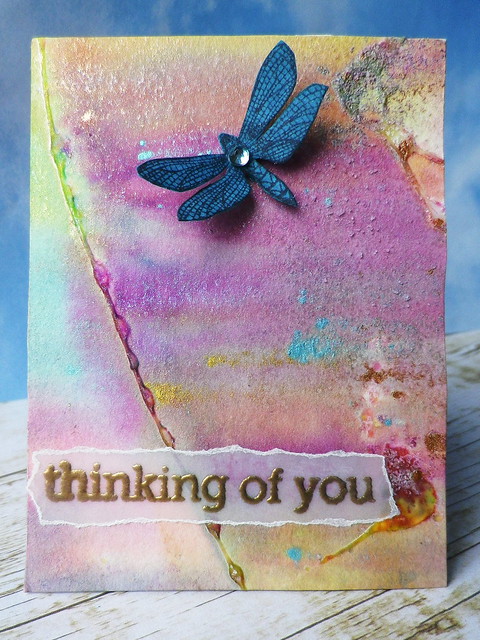
Stamps (Hero Arts) - Antique Engravings & Right at Home

As I was afraid of ruining the background by stamping on it and wanted to keep as much of the background visible as possible, I just stamped and coloured the dragonfly and added the embossed sentiment on vellum.

Finally, here is the gorgeous ATC that Linda sent me. Lucky me to have received this absolute beauty! Linda, thanks again for the fun swap, I really enjoyed it!


Hope you are all having a brilliant weekend!

Wednesday, February 6, 2013

Owl Love You

I wanted to try to make a masculine Valentine, so instead of the usual pinks and reds, went with kraft, black and white with some touches of red.

Owl Love

To make the base, I embossed the Looped Circle Pattern (I'm officially addicted to that stamp!!) on the back and front of the card and cut out some of the stamped areas to make a scalloped outline. Then keeping it fairly plain and simple I just embossed the branch and owls. I coloured the leaves with a gel pen and added little dots of white to the flower centres. The hearts were also embossed and covered in a layer of Glossy Accents for some extra sheen.

I'm submitting this card into the current Hero Arts Challenge and Simon Says Stamp Have a Heart Challenge

Monday, February 4, 2013

Itty Bitty Hi

Cath over at Moxie Fab World has lots for fun challenges for the 75 Creative Card Challenges Week. Unfortunately, I haven't had a chance to play along until today, which also happens to be the last day for submitting entries! So when I had some spare time this morning I decided I'd join in on the Make an Itty Bitty Card Challenge in the Moxie Fab World. Lol little did I realise that making a tiny card would take nearly as long as making a normal sized card. Of course having butter fingers this morning and dropping all of the fiddly bits didn't exactly help!

Itty Bitty Card

Card size 1 1/2 inches x 2 inches

Stamps (Hero Arts) - Looped Circle Pattern & Ghostly Greetings

As you can probably tell from the photo it's a lovely sunny day here today and after all the rain we've had recently everywhere is looking very green. So as I'm thinking of Spring I decided to make a green background by applying mowed lawn distress ink to white card and spritzed it with water. When the panel was dry I embossed the sentiment and added some machine stitching.

To make the flower I embossed the Looped Circle Pattern on vellum and cut out three of the flowers to layer.


I just added a raffia string stem and bow and a little pearl to finish.


I won't get a chance to play along in the other challenges Cath has set but will definitely give them all a go in the future.

Related Posts with Thumbnails