I love making bookmarks so when I recently came across Clearly Besotted's Book Worm set, I had to snap it up.
Stamp set - Book Worm (Clearly Besotted)
So this morning I had a little inky time and decided to start making bookmarks to give along with book presents at Christmas. These bookmark have already been taken by my hubby and younger son so I'll have to get cracking on making more to go with pressies!
To start with I cut panels from kraft card and added stitched edges with Simon Says Stamp's Bundle of Stitched Shapes dies. After stamping and cutting out the images, I used Promarkers to colour them. Then I embossed the sentiments, adhered the images and added yarn to finish.
I'm submitting these bookmarks into Simon Says Stamp's Anything Goes Challenge. Hope you are having a great weekend. At the moment I have a cold that I can't seem to shake and as my older son said sound like I've sucked on twenty helium balloons! Hopefully I won't sound too much like Minnie Mouse when I go into work tomorrow:)
Showing posts with label bookmarks. Show all posts
Sunday, November 30, 2014
Saturday, June 28, 2014
Quilted Thanks and Bookmark
I knew it wouldn't be long before I'd want to play again with the Quilt Cuts 2 dies from WPlus9 and this morning used them to make a card and matching bookmark.
Die - Quilt Cuts 2 (WPlus9), Stamp - Making the World a Better Place (Hero Arts), Papers - Snippets (Studio Calico) & Basics (Pebbles)
After die cutting and assembling the quilt blocks, I layered them on a strip of paper which I had punched with Fiskars threading water punch. The sentiment was stamped with faded denim distress ink. To finish I added a wooden button threaded with twine.
Then I made a little bookmark with another block. I layered the block on a scallop square die cut and sandwiched a large paper clip between this and another scallop square die cut.
I'm submitting these into Simon Says Stamp Anything Goes Challenge. Hope you're enjoying the weekend:)
Die - Quilt Cuts 2 (WPlus9), Stamp - Making the World a Better Place (Hero Arts), Papers - Snippets (Studio Calico) & Basics (Pebbles)
After die cutting and assembling the quilt blocks, I layered them on a strip of paper which I had punched with Fiskars threading water punch. The sentiment was stamped with faded denim distress ink. To finish I added a wooden button threaded with twine.
Then I made a little bookmark with another block. I layered the block on a scallop square die cut and sandwiched a large paper clip between this and another scallop square die cut.
I'm submitting these into Simon Says Stamp Anything Goes Challenge. Hope you're enjoying the weekend:)
Thursday, May 30, 2013
Magnetic Bookmark and a Ramble
I'm off work this week and as luck would have it the weather is fabulous - warm, lots of sunshine and light breezes.
After lunch I couldn't help but play along again with the Tuesday Trigger over at Moxie Fab World.

My good friend Trinh recently sent me the gorgeous magnetic bookmark below. She has a great tutorial here on making these type of bookmarks with some more fab examples.

I loved the idea so much that I had to have a go at making one.

Stamp (Hero Arts) - Let the Angels Sing
I found a cute little bird and the musical notes in a Hero Arts Christmas set and added a little twig from the garden so it would all tie in with the Trigger photo. The patterned paper is from Pebbles and the base of the bookmark is a lump of heavy card from a box which would have ended up being recycled.

I'm also submitting this project into the Die Cut Divas Anything But A Card Challenge.
I'm making the most of my week off so at the start of the day I went walking with Toby. We followed one of the Slí na Sláinte walks, it's about three miles long and takes a circular route out by our local canal. It's so peaceful there and most of the time all you can hear is the sound of birds chirping and chattering. I took some photos as we went along so if you'd like to ramble virtually with us here they are:
This is the first bridge we cross on the walk. There must be some wild garlic growing near here as there was quite a strong smell of garlic wafting around in the air at this point.

I haven't a clue what this wildflower is called but it looks so pretty all along by the banks of the canal. It reminds me a little bit of baby's breath, well whatever it is I love the delicate look of it.

There were lots of other pretty wildflowers along the way like these beauties


Finally a wildflower I know! I remember when we were kids holding buttercups under each others chins about an inch away from the skin to do the "butter test". Seemingly if you could see a tinge of yellow on the skin that meant you liked butter!

The hawthorn trees are in full bloom too.

There will be lots of berries this year!

With his black coat, Toby really feels the heat when we're walking on sunny days so a bottle of water and cup always ends up in the rucksack for this walk.

Then we came across these cuties who couldn't quite reach the long grass outside their paddock, so of course I had to stop and hand them bunches of grass to munch on.


Thanks for joining me on my little ramble:)
After lunch I couldn't help but play along again with the Tuesday Trigger over at Moxie Fab World.

My good friend Trinh recently sent me the gorgeous magnetic bookmark below. She has a great tutorial here on making these type of bookmarks with some more fab examples.
I loved the idea so much that I had to have a go at making one.

Stamp (Hero Arts) - Let the Angels Sing
I found a cute little bird and the musical notes in a Hero Arts Christmas set and added a little twig from the garden so it would all tie in with the Trigger photo. The patterned paper is from Pebbles and the base of the bookmark is a lump of heavy card from a box which would have ended up being recycled.

I'm also submitting this project into the Die Cut Divas Anything But A Card Challenge.
I'm making the most of my week off so at the start of the day I went walking with Toby. We followed one of the Slí na Sláinte walks, it's about three miles long and takes a circular route out by our local canal. It's so peaceful there and most of the time all you can hear is the sound of birds chirping and chattering. I took some photos as we went along so if you'd like to ramble virtually with us here they are:
This is the first bridge we cross on the walk. There must be some wild garlic growing near here as there was quite a strong smell of garlic wafting around in the air at this point.
I haven't a clue what this wildflower is called but it looks so pretty all along by the banks of the canal. It reminds me a little bit of baby's breath, well whatever it is I love the delicate look of it.
There were lots of other pretty wildflowers along the way like these beauties
Finally a wildflower I know! I remember when we were kids holding buttercups under each others chins about an inch away from the skin to do the "butter test". Seemingly if you could see a tinge of yellow on the skin that meant you liked butter!
The hawthorn trees are in full bloom too.
There will be lots of berries this year!
With his black coat, Toby really feels the heat when we're walking on sunny days so a bottle of water and cup always ends up in the rucksack for this walk.
Then we came across these cuties who couldn't quite reach the long grass outside their paddock, so of course I had to stop and hand them bunches of grass to munch on.
Thanks for joining me on my little ramble:)
Labels:
bookmarks,
Cuttlebug,
Hero Arts,
Labels 1,
Let the Angels Sing,
Moxie Fab World
Sunday, December 9, 2012
Spelling Bee Party set in Die Cutting for Paper Crafters
I was over the moon to have had a couple of projects published recently in Paper Crafts' Die Cutting for Paper Crafters magazine. The call for submissions couldn't have come at a better time, when I was about to start playing with my new Silhouette Cameo (thanks again P xoxo).
The first cut I made with the Cameo can be seen in a card on page 39 of the magazine, which involves some sprinkles and unusually for me is CAS! The second project I made using the machine is this one, a Spelling Bee Party Ensemble.

Stamps (Hero Arts) - Picnic set & Be Happy set
The set took a little while to make but oh did I have fun putting it together using my Cameo and Cuttlebug! The photography and styling in any Paper Crafts magazine are always fab so I thought I'd show a photo of the set in the magazine.
I was delighted to spot my friend Trinh on page 42 of the magazine with what I think is the perfect retirement card! Die Cutting for Paper Crafters is a wonderful magazine packed full of brilliant projects and tips using a variety of die cutting machines. It also has a machine comparison chart and sandwich recipes which are invaluable.
Hope you are all having a great weekend!
The first cut I made with the Cameo can be seen in a card on page 39 of the magazine, which involves some sprinkles and unusually for me is CAS! The second project I made using the machine is this one, a Spelling Bee Party Ensemble.

Stamps (Hero Arts) - Picnic set & Be Happy set
The set took a little while to make but oh did I have fun putting it together using my Cameo and Cuttlebug! The photography and styling in any Paper Crafts magazine are always fab so I thought I'd show a photo of the set in the magazine.
I was delighted to spot my friend Trinh on page 42 of the magazine with what I think is the perfect retirement card! Die Cutting for Paper Crafters is a wonderful magazine packed full of brilliant projects and tips using a variety of die cutting machines. It also has a machine comparison chart and sandwich recipes which are invaluable.
Hope you are all having a great weekend!
Sunday, August 19, 2012
Bookmarks in Paper Crafts Magazine
Well it has been quite a while since I've posted anything, as somehow I ended up with sore hands and decided to take a little break from making and typing. Thank goodness the break seems to be doing the trick as I've been itching to make things for the past few weeks!
Stamp (Hero Arts) - Heart Owls
Since I haven't posted anything in August I thought I'd clear the cobwebs away from the blog and show photos of bookmarks which were published in the July/August digital issue of Paper Crafts Magazine.
Part of that particular issue of Paper Crafts Magazine included a back to school section, so I made bookmarks to cover various school subjects using the cute little owls stamp which I ink up over and over again.
Hope you are all having a wonderful weekend!
Stamp (Hero Arts) - Heart Owls
Since I haven't posted anything in August I thought I'd clear the cobwebs away from the blog and show photos of bookmarks which were published in the July/August digital issue of Paper Crafts Magazine.
Part of that particular issue of Paper Crafts Magazine included a back to school section, so I made bookmarks to cover various school subjects using the cute little owls stamp which I ink up over and over again.
Hope you are all having a wonderful weekend!
Labels:
bookmarks,
Cuttlebug,
Heart Owls,
Hero Arts,
Paper Crafts Magazine
Thursday, September 8, 2011
Owl book gift card holder and bookmark
Something my friends and I do more often in the autumn is read. So I made this little gift card holder which has a pocket inside for a book gift card and bookmark.
To start with, I white embossed some white card with the Friend Definition stamp and applied spiced marmalade distress ink. For the woodgrain pieces I applied walnut stain distress ink to white card and stamped the Woodgrain Background using the same ink.

Stamps (Hero Arts ) - Friend Definition, Heart Owls, Designer Woodgrain and Flourish Background
The green background started as white card and this was white embossed with the Flourish Background and some shabby shutters distress ink applied. The little owls were coloured with colouring pencils. I just added some googly eyes, leaves (May Arts ribbon) and glossy hearts to finish.
I'm submitting these into this month's Hero Arts Challenge and the Resist Challenge at Lily Pad Cards. Now I'm off to tackle a mountain of ironing which I should have been doing this morning instead of getting inky!
To start with, I white embossed some white card with the Friend Definition stamp and applied spiced marmalade distress ink. For the woodgrain pieces I applied walnut stain distress ink to white card and stamped the Woodgrain Background using the same ink.

Stamps (Hero Arts ) - Friend Definition, Heart Owls, Designer Woodgrain and Flourish Background
The green background started as white card and this was white embossed with the Flourish Background and some shabby shutters distress ink applied. The little owls were coloured with colouring pencils. I just added some googly eyes, leaves (May Arts ribbon) and glossy hearts to finish.
I'm submitting these into this month's Hero Arts Challenge and the Resist Challenge at Lily Pad Cards. Now I'm off to tackle a mountain of ironing which I should have been doing this morning instead of getting inky!
Friday, February 25, 2011
Hero Hostess Cooking Up Challenge
The Hero Hostesses in the Hero Arts Flickr group are hosting a Cooking Up Challenge. Each of us has cooked one of our favourite recipes and is sharing a project inspired by our cooking. I baked a carrot cake and gluten free carrot cake buns. Both recipes are at the bottom of the post.
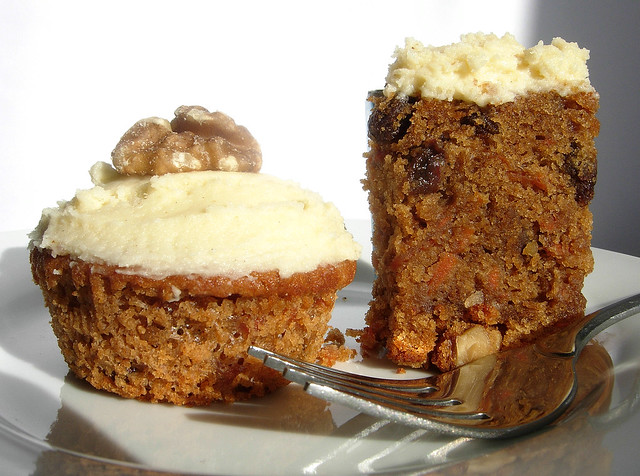
I love carrot cake and my hubby loves it too but since he was diagnosed as a coeliac a few years ago I usually make the gluten free version. Sometimes gf baked goods like scones and pastry can taste quite dry, but because carrot cake is moist the gf version is as nice as the one using ordinary flour. Normally I’d never put both of these on the same plate in case some gluten got on the gf version but just did so for the photo – it meant an extra bun for me too! If you’d like to take part in the challenge the details are here. I’ll be sending a prize out to a winner picked by a random drawing. The prize will include the cookbook in the photo, "101 Cupcakes and Small Bakes", plus some other small goodies that I'll get when I’m shopping over the weekend.
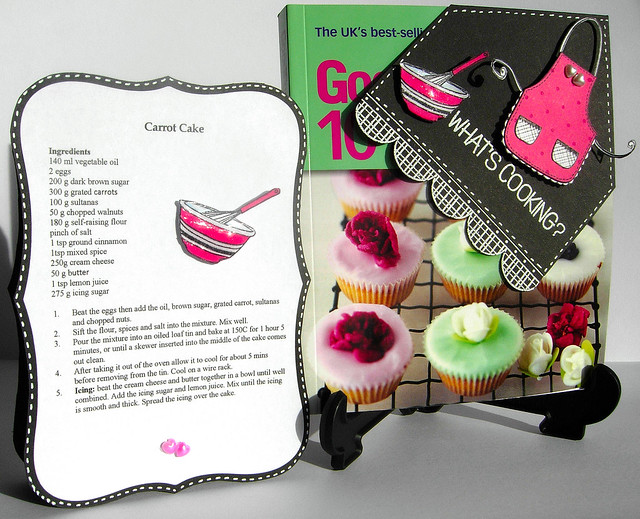
Stamps (Hero Arts) – What’s Cooking, Envelope Pattern, Scallop Borders and Raindrop Background.
When I'm cooking, I usually sling on an apron which is mainly black and has touches of hot pink and white, so that's what inspired my projects. The recipe card is in the form of a card so that it will stand up when I’m baking. On one side there is the ordinary recipe and on the other the gf recipe. I paper pieced the bowl and whisk, added Glossy Accents, the cute Hero Arts heart pearls and lots of faux stitching. I came across a wonderful tutorial on making corner bookmarks here and have made lots of different ones - it's a great way of using up scraps. The apron, bowl and whisk are paper pieced and I added Glossy Accents to the bowl. The scallops and sentiment are embossed in white. I just added lots of faux stitching and the pearl hearts to finish.
I'm submitting these project to the Paper Piecing Challenge in the Moxie Fab World.
Carrot Cake
Ingredients
140 ml vegetable oil
2 eggs
200 g dark brown sugar
300 g grated carrots
100 g sultanas
50 g chopped walnuts
180 g self-raising flour
pinch of salt
1 tsp ground cinnamon
1tsp mixed spice
250g cream cheese
50 g butter
1 tsp lemon juice
275 g icing sugar
1. Beat the eggs then add the oil, brown sugar, grated carrot, sultanas and chopped nuts.
2. Sift the flour, spices and salt into the mixture. Mix well.
3. Pour the mixture into an oiled loaf tin and bake at 150C for approx 1 hour 5 minutes, or until a skewer inserted into the middle of the cake comes out clean.
4. After taking it out of the oven allow it to cool for about 5 mins before removing from the tin. Cool on a wire rack.
5. Icing: beat the cream cheese and butter together in a bowl until well combined. Add the icing sugar and lemon juice. Mix until the icing is smooth and thick. Spread the icing over the cake.
********************************************************************************************************
Gluten Free Carrot Cake Buns
Ingredients
4oz dark brown sugar
6oz grated carrots
1 tsp mixed spice
1 tsp cinnamon
¼ pint water
8oz gluten free self raising flour (I use Odlums Tritamyl)
6tbsp clear honey
6oz sultanas
3oz chopped walnuts
4oz margarine
2 eggs
7oz low fat cream cheese
1tsp lemon juice
1. In a saucepan mix together the sugar, carrots, spices, water, honey, sultanas, walnuts and margarine.
2. Bring to the boil and simmer for 5 mins. Pour into mixing bowl and leave to cool.
3. When the mixture is cold beat in the eggs and fold in the flour. Mix together well.
4. Put mixture into bun cases and bake at 180 C for approx 15 minutes (until the bun centres spring back up when lightly pressed).
5. Cool on wire rack.
6. Beat the cream cheese and lemon juice together and spread over tops of buns.
7. Top with a walnut.

I love carrot cake and my hubby loves it too but since he was diagnosed as a coeliac a few years ago I usually make the gluten free version. Sometimes gf baked goods like scones and pastry can taste quite dry, but because carrot cake is moist the gf version is as nice as the one using ordinary flour. Normally I’d never put both of these on the same plate in case some gluten got on the gf version but just did so for the photo – it meant an extra bun for me too! If you’d like to take part in the challenge the details are here. I’ll be sending a prize out to a winner picked by a random drawing. The prize will include the cookbook in the photo, "101 Cupcakes and Small Bakes", plus some other small goodies that I'll get when I’m shopping over the weekend.

Stamps (Hero Arts) – What’s Cooking, Envelope Pattern, Scallop Borders and Raindrop Background.
When I'm cooking, I usually sling on an apron which is mainly black and has touches of hot pink and white, so that's what inspired my projects. The recipe card is in the form of a card so that it will stand up when I’m baking. On one side there is the ordinary recipe and on the other the gf recipe. I paper pieced the bowl and whisk, added Glossy Accents, the cute Hero Arts heart pearls and lots of faux stitching. I came across a wonderful tutorial on making corner bookmarks here and have made lots of different ones - it's a great way of using up scraps. The apron, bowl and whisk are paper pieced and I added Glossy Accents to the bowl. The scallops and sentiment are embossed in white. I just added lots of faux stitching and the pearl hearts to finish.
I'm submitting these project to the Paper Piecing Challenge in the Moxie Fab World.
Carrot Cake
Ingredients
140 ml vegetable oil
2 eggs
200 g dark brown sugar
300 g grated carrots
100 g sultanas
50 g chopped walnuts
180 g self-raising flour
pinch of salt
1 tsp ground cinnamon
1tsp mixed spice
250g cream cheese
50 g butter
1 tsp lemon juice
275 g icing sugar
1. Beat the eggs then add the oil, brown sugar, grated carrot, sultanas and chopped nuts.
2. Sift the flour, spices and salt into the mixture. Mix well.
3. Pour the mixture into an oiled loaf tin and bake at 150C for approx 1 hour 5 minutes, or until a skewer inserted into the middle of the cake comes out clean.
4. After taking it out of the oven allow it to cool for about 5 mins before removing from the tin. Cool on a wire rack.
5. Icing: beat the cream cheese and butter together in a bowl until well combined. Add the icing sugar and lemon juice. Mix until the icing is smooth and thick. Spread the icing over the cake.
********************************************************************************************************
Gluten Free Carrot Cake Buns
Ingredients
4oz dark brown sugar
6oz grated carrots
1 tsp mixed spice
1 tsp cinnamon
¼ pint water
8oz gluten free self raising flour (I use Odlums Tritamyl)
6tbsp clear honey
6oz sultanas
3oz chopped walnuts
4oz margarine
2 eggs
7oz low fat cream cheese
1tsp lemon juice
1. In a saucepan mix together the sugar, carrots, spices, water, honey, sultanas, walnuts and margarine.
2. Bring to the boil and simmer for 5 mins. Pour into mixing bowl and leave to cool.
3. When the mixture is cold beat in the eggs and fold in the flour. Mix together well.
4. Put mixture into bun cases and bake at 180 C for approx 15 minutes (until the bun centres spring back up when lightly pressed).
5. Cool on wire rack.
6. Beat the cream cheese and lemon juice together and spread over tops of buns.
7. Top with a walnut.
Subscribe to:
Posts (Atom)

