Showing posts with label Envelope Pattern. Show all posts

Friday, March 15, 2013

ATC Heaven!

I was so excited when I got home from work the other night and discovered a package from the very talented and sweet Libby Hickson. Libby and I were paired up in an ATC swap over at the Hero Arts Flickr group. We did our swap at a leisurely pace, in my case at a very leisurely pace indeed as I mislaid the first set of ATCs I had made for Libby! Anyway I'm hoping that Libby will receive the ATCs I made any day now, but for the moment I'd love to show you the amazing ATCs I received from Libby. It's a pity my photos don't do any justice to just how beautiful they are in real life.

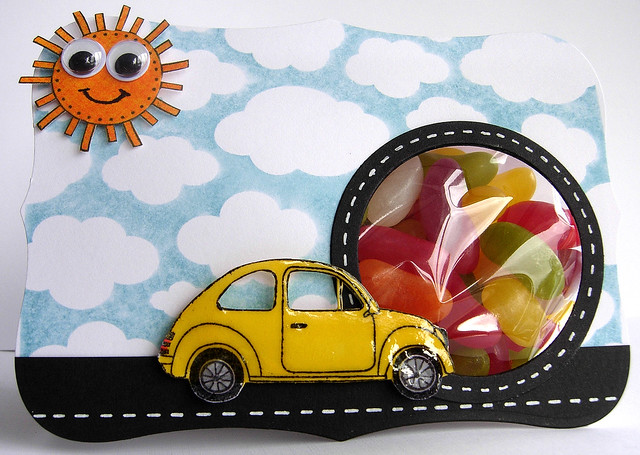
For our swap Libby came up with the great idea of making ATCs based on what we love and I had fun guessing what Libby would come up with. Lol now why is it that I don't have a chocolate stamp in my stash?! If you know Libby at all, you'll know that one of her big loves is cycling so I was delighted to see this fun biking scene with the cute glittery bicycle and sweet banners. Being a bit of a fabric fiend I just love the way Libby used canvas on the seashell ATC and layered the images so beautifully, to show her love for the oceans, aquariums and fish. Not only does the ATC look pretty but it feels lovely too.


Stamps (Hero Arts) - 1. Cloud Backgrounds, Envelope Pattern, 2. Antique Engravings

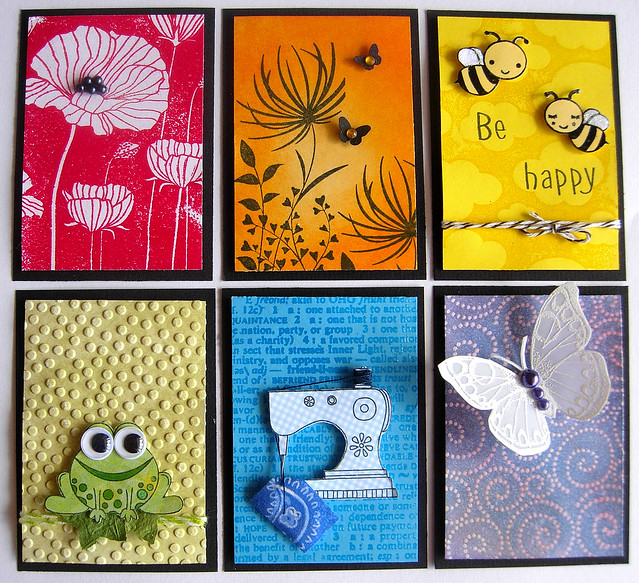
Next up is a gorgeous, gorgeous ATC representing Libby's love of poppies, flowers and gardens. Not only is the colouring fab but I wish you could see the wonderful glimmering gold background in all its glory. Isn't the veggie ATC showing Libby's love for cooking and vegetables just the cutest? I have to say I'm a girl (or I should say auld wan!) who loves her veggies and this ATC just makes me smile.


Stamps (Hero Arts)- 1. Delicate Blossoms & Friend Definition 2. Kiss the Cook

Now we're off travelling with Libby to a couple of her favourite places - Texas and New York. Again there's wonderful colouring, distressing and layering on Libby's Texas ATC and it's just such a fun one. I've never been to Texas but I'm with Libby on loving New York City. It's such a brilliant place to visit and I love the wonderful, atmospheric sky Libby has created as a backdrop to this lovely skyscraper skyline stamp.


Stamps (Hero Arts)- 1. Howdy, Magical Background 2. Newspaper Skyline

As you can probably tell I just LOVE all of these ATCs! I included the names of stamps when I recognise them but I'm afraid I've missed out on a few. Libby, thanks again for swapping with me, I enjoyed it so much! Also thanks for all the yummy goodies you included in your package, I'm going to have great fun playing with them:)You can find Libby's inspiring blog here.


Thursday, March 22, 2012

Flower Pot Treat Containers

I wanted to make some treat holders and ended up making these little flower pot treat containers.

Flower Pot Treat Containers
Stamps (Hero Arts) - Blossom Art, Envelope Pattern, Be Happy and Woodland Creatures

To make the flower pots I cut strips of card (thanks again Trinh!) 6 x 2 3/4 and scored them at 1/2, 2 1/2, 3 1/2 and 5 1/2.


I marked dots 1/2 inch in from the sides and added lines (see photo below)


Then I cut out the excess pieces...


...and was left with a flower pot shape.


Then I added the grass to the outside of the pots and stuck down the rims of the pots.


I put little treats - conversation hearts (thanks again Trinh!) wrapped in organza in the containers and adhered the top edges of the pots together. I might add little packets of seeds if I make these again.

Flower Pot Treat Containers

The stems were made by wrapping baker's twine (thanks again Linda!) around cocktail sticks and adding leaves from some May Arts ribbon. The flowers were white embossed and distress inks (barn door, spiced marmalade and mustard seed) applied. I just added some stickles for sparkle and little ladybirds to each pot.

I’m submitting these into to the Household Items Challenge in the Moxie Fab World (used cocktail sticks for the stems), the Paper Scraps Challenge in the Moxie Fab World (used lots of scraps to make these) and the current Hero Arts Challenge.

Thursday, August 25, 2011

Sending U Warm Fuzzies

Today I wanted to make a card with a mix of textures and materials. It started out because I was doing a sort out of my kids’ clothes and saved pieces of worn out jeans. Bits and pieces of these will probably end up on a patchwork bag but I took a little bit of denim for the card below.

Sending You Warm Fuzzies
Stamps (Hero Arts) - Everyday Sayings & Envelope Pattern

For the denim card base I adhered a piece of denim to a piece of card and die cut a scallop circle. The flowers were die cut from the denim and some pink felt. A “u” was also die cut from a little scrap of the felt. I had only one button with a check pattern on it, so for the smaller button I used a plain blue button and white embossed the envelope pattern on it. Appropriately enough, the sentiment was stamped using faded jeans distress ink.

I'm submitting the card into the following challenges:

Moxie Fab World - Fabulous Felt Challenge
Lily Pad Cards – Felt\Fabric Challenge
Creative Card Crew - Hand Made Flowers
Paper Creations Ink - Show Us Your Flowers


Wednesday, August 10, 2011

Happy Birthday Honey

I love the cute little bees from the Be Happy set and decided to use them on my hubby’s birthday card this year.

Happy Birthday Honey
Stamps (Hero Arts) - Be Happy, Clouds, Magical Background, Birthday Messages, Envelope Pattern & Heart Owls

The clouds are stamped with tumbled glass distress ink which had been lightly spritzed with water. All of the hills and the sun came from pieces in my scrap mountain. I coloured the little bees with a ProMarker and colouring pencil. To finish I just added a little diamond stickles to the bees’ wings and Glossy Accents to all the hearts. It’s hard to tell from the photo, but the red background is stamped with the Magical Background using VersaMark.

A quick post today, but right now I have a slice of birthday cake calling me!

Thursday, May 19, 2011

Thanks a Million

This is a card I made recently using a lot of my favourite things – the particular stamps, hand dyed fabric and some stitching.

Thanks a Million:)
Stamps (Hero Arts) - Antique Engravings, Scallop Borders, Thank You and Envelope Pattern.

To start with I stamped the butterfly on a piece of hand dyed fabric. Then I sandwiched a piece of wadding between it and another piece of the same fabric. I added some tight machine stitching to the butterfly and trimmed close to the stitched outer edges.


The bottom part of the panel was stamped with the Thank You and Envelope Pattern backgrounds using tumbled glass distress ink. The Scallop Borders were also stamped with the same ink and attached to the card with some machine stitching.

I'm still without my usual pc so hope the photos are okay!

Sunday, May 15, 2011

Critters in Love ATCs

I had so much fun making my last set of ATCs and couldn’t resist making more for the current Hero Arts challenge. This time it’s critters in love. I’ve uploaded the photos from a laptop (pc in for repairs:( ) and it’s a really cloudy day here, so sorry if the photo is terrible!

Critters in Love ATCs
Stamps (Hero Arts) – Adorable Baby Girl, Heart Owls, Designer Woodgrain, Be Happy, Envelope Pattern, Woodland Creatures & Clouds Background.

Ladybirds card
For the sky I applied tumbled glass distress ink to white card and spritzed lightly with water. Shabby shutters distress ink was applied to white card and one of the hills was stamped with the Envelope Pattern. The tree was coloured with watercolours pencils and the hearts coloured with a ProMarker and covered with Glossy Accents.

Owls card
I applied distress inks (pumice stone & walnut stain) to white card and stamped the woodgrain using walnut stain distress ink. The owls were coloured with watercolour pencils. I stamped the leaves on patterned paper and the hearts were coloured with a ProMarker and Glossy Accents applied. For the background I applied shabby shutters distress in to white card and stamped with the Envelope Pattern.

Raccoons card
The grass was stamped on patterned paper and the clouds stamped on white card. I coloured the raccoons with watercolours pencils. The hearts were coloured with a ProMarker and I applied Glossy Accents to them.

Hope you are all having a wonderful weekend!

Monday, May 9, 2011

Rainbow of ATCs

Part of the May challenge on the Hero Arts blog is to make ATCs. I haven’t made ATCs in a while and had forgotten how fun it is to make them. Another bonus to making ATCs is all the scraps I get to use up!

I wanted to make an ATC for each colour of the rainbow so just picked the first stamp that came to mind when I thought of each colour. All stamps mentioned are by Hero Arts.
Rainbow of ATCs


The Poppy Background was embossed in red and I added some beads to the flower centre.


I applied spiced marmalade distress ink to white card and stamped the Exotic Bloom in black. Then I just added punched butterflies.


I clear embossed the Clouds Background on yellow card. The bees were embossed in black and I coloured them with a yellow ProMarker and added diamond stickles to the wings. Trinh, thanks again for the black & white baker's twine:)


For the background I applied shabby shutters distress ink to white card, using the same ink stamped with the Envelope Pattern and embossed. Froggy was stamped on patterned paper and coloured in places with a ProMarker. To finish I added some leaves and green & white baker's twine (thanks again, Linda!).


On this one I clear embossed the Friend Definition on blue card for the background. The sewing machine was stamped on gingham patterned paper and I just added some thread and a fabric scrap to finish.


I applied some worn lipstick distress ink to white card, clear embossed the Magical Background and then applied dusty concord and faded jeans distress inks. The butterfly from the Antiques Engravings set was embossed in white and some purple pearls (thanks again, Sharon!) added to the centre.


Now I better go catch up on what I should have done yesterday instead of making these!

Tuesday, May 3, 2011

Card with Flower ATC

This is a card I made for the current Hero Arts challenge (Fabulous Flowers, ATCs or using colouring pencils) and this week’s Play Date Cafe Challenge.


Since I'm sending this card to a dear friend, I'm also submitting this card into Lisa Spangler's Mate-It+Mail-It Challenge #2.


I’m trying to make more cards using colour combinations that I wouldn’t normally use. The PDCC colours this week certainly fit the bill! I had to go rummaging around in my supplies to find some grey card and the nearest I had to lime green was shabby shutters distress ink.

Flower ATC on card
Stamps (Hero Arts) - Large Blossom, Messages & Envelope Pattern

The flower panel is the size of an ATC. For the background I clear embossed the Large Blossom stamp on some grey card. I coloured the flower, petals and stem with barn door and shabby shutters distress inks. The card base was also stamped with barn door distress ink using the Envelope Pattern.

Monday, April 25, 2011

Bee Friends

A rare happening - two posts in the one day from me! The Hero Hostess Inspired By Challenge is in the post below this one.

Lisa Spangler is having a fun challenge, “Make-It + Mail it Challenge” on her blog. I made this card to send to a friend so I’m submitting it into Lisa’s challenge. I have loads of tissue paper and wanted to make another card for the Tissue Paper Magic Challenge in the Moxie Fab World. Though with the small amount of tissue paper I used on this card and my other card for the challenge, I haven’t used up much of my stash! I am also submitting the card into the Simon Says Emboss It Challenge.

Bee Friends
Stamps (Hero Arts) – Be Happy & Envelope Pattern

I was trying to come up with interesting ways of using tissue paper on a card and what struck me was that I could use it for the wings of some kind of insect. So out came Hero Arts’ super cute Be Happy set. I embossed the bees in black on white card and coloured them with a ProMarker and watercolour pencil. Next I crumpled some white tissue paper (didn’t have to crumple it too much as I’d recycled it from a pressie I had received!) and black embossed the bees on it. Then I cut out the tissue paper wings, adhered them to the bees which had been coloured and applied some diamond stickles.


For the background, I applied mustard seed distress ink to white card, spritzed lightly with water and stamped the Envelope Pattern using the same ink. Then I cut out lots of little hexagons and put them together to hopefully make something that resembled a honeycomb! To finish I embossed the sentiment and bee trails in white.


I couldn't get a great photo of the wings but they are semitransparent and sparkly in real life.

Tuesday, April 12, 2011

Card, Treat Holder and Jelly Beans

I’ve wanted to make a couple of projects for the past few days and was delighted to finally get a bit of time to make them today.


The first one is a card I made for Kathy's Colour Throw Down at Lily Pad Cards. I didn’t have the exact colours for the challenge but used colours as close as possible to them. I used a sketch from the current Hero Arts challenge and because of the masculine theme in the challenge went for a card for a little (or maybe not so little!) guy.

Lily Pad and Sketch challenge
Stamps (Hero Arts) – Clouds, Going, Envelope Pattern, Magical Background, Be Happy and Birthday Messages.

To start with I applied broken china distress ink to the Clouds Background, spritzed liberally with water and stamped on white card. I coloured the car with Promarkers and applied a layer of Glossy Accents for some sheen. For the sun I applied spiced marmalade distress ink to white card and stamped with the Envelope Pattern using the same ink. On the bottom strip of the card I applied shabby shutters distress ink to white card and stamped the Magical Background using the same ink. The sentiment is embossed.

I made a treat container to go with the card and am submitting it into the Food Wrap Challenge in the Moxie Fab World.


Going Treat Container
Stamps (Hero Arts) – Clouds, Going, Envelope Pattern & Be Happy.

The cloud background, sun and car were all made in the same way as on the card above. I just added a little peep hole for the jelly beans. Both my kids said they preferred the treat container to the card but I’m wondering if that had anything to do with the jelly beans they had as a result of me making the container!

Wednesday, March 30, 2011

Birthday Owl

Birthday Owl
Stamps (Hero Arts)- Clouds, Tree Trunk, Heart Owls, Be Happy, Birthday Messages, Envelope Pattern & Adorable Baby Girl

For a while I’ve been intending to quilt a cloudy sky using the Clouds background stamp and finally got around to it. I stamped white fabric (which has a white pattern) with faded jeans distress ink, placed it on 2 layers of wadding & 1 layer of backing fabric and machine stitched around the clouds. A piece of green paper was stamped with the Envelope Pattern and the grass from the Be Happy set. I paper pieced the leaves and owl, who has a slightly startled expression due to my lack of smaller googly eyes!


I have a couple of busy days ahead and hopefully after that my computer problems will be finally sorted out and I’ll be able to go visiting blogs again - I'm having withdrawal symptoms:(

Sunday, March 27, 2011

Wild Flowers with Flower Brooches

After watching Kelly Rasmussen make fabulous fabric flowers and use them in brilliant ways in a video on the Hero Arts blog, I just had to give it a go. So I made quite a few the other day using different colours and fabrics. I'll add them to cards, bags, tops and like Kelly did use them for hair accessories.


I love the gorgeous colour combination for the Play Date Cafe Challenge this week and made a couple of the flowers using these colours. The flowers have pins on the backs so can be used as brooches.

Wild Flowers with Flower Brooches
Stamps (Hero Arts) - Wild Flowers and Birthday Messages

I applied broken china distress ink to the Wild Flowers stamp, spritzed with water and stamped on watercolour paper. Then I lightly distressed the edges to go with the slightly frayed flowers and added some gems. When I have very small scraps left over from projects, I often punch butterflies from them and keep them in a jar for another time. The butterfly here is one of these and had been from a project where I used dusty concord distress ink. I just added the little heart pearl to the body.

Below are some of the flowers I made – I won’t bore you with them all! All the stamps mentioned are by Hero Arts.

Denim from an old pair of jeans stamped with the Magical Background (the pattern is more obvious in real life) using faded jeans distress ink.


Gingham with the button stamped with the Envelope Pattern using worn lipstick distress in
k

Hand dyed fabric stamped with the Envelope Pattern


Another hand dyed fabric


Cotton on the bottom layer (stamped with Old Letter Writing)......


.... with a layer of organza petals on top


When I folded each petal in half, I didn’t fold them perfectly but offset them a bit to get a more ruffled look.


If you'd like to make these kind of fabric flowers you should watch Kelly's brilliant video.

Friday, March 25, 2011

Fresh Inspiration Friday Challenge - Inspiration Off the Wall

Today on the Hero Arts blog there is a Fresh Inspiration Friday Challenge. Inspired by gorgeous pictures in her house, Anita picked the colour combination for the challenge.


Tami from Hero Arts and Hero Hostesses Anita, Linda, Sharon, Sally and I made cards using this yummy colour combination. Links to all of our cards can be found at this post here on the Hero Arts website. The post also includes full details of the challenge - I hope you’ll join in on the fun!

DSCN7468
Stamps (Hero Arts) - Classic Fabric Design, Envelope Pattern, Exotic Bloom & It’s a Day for a Cupcake

To start with I applied broken china and faded jeans distress inks to the Classic Fabric Background, spritzed well with water and stamped on watercolour paper. Then I used broken china distress ink and the Envelope Pattern to stamp another layer. On the main panel I used the same inks on the Exotic Bloom stamp and this time lightly spritzed with water. The sentiment which was stamped using a chalk ink is from a cute set that Linda sent me last year – thanks again Linda! I just added some twine and a gem to finish.

Hope you all have a wonderful weekend! It looks like we're going to have another beautiful sunny weekend here so I'm really looking forward to that:)

Saturday, March 12, 2011

Dotty Butterflies

This is another card I made for the Moxie Fab World Paper Piecing Challenge, this month’s Hero Arts challenge and Simon Says Stamp Anything Goes Challenge and . It's great that because of these challenges I’m getting lots of birthday cards ready in advance for family and friends rather than rushing at the last minute as often happens with me!

DSCN7378
Stamps (Hero Arts) – Antique Engravings, Magical Background, Envelope Pattern and Birthday Wishes.

For the top part of the background I applied broken china distress ink to white card, spritzed with water, stamped the Envelope Pattern using the same ink and white embossed with the Magical Background.


I white embossed the butterflies on vellum, added beads and paper pieced some scraps of vellum which had alcohol inks applied. I had been messing around with vellum and alcohol inks after seeing Sue’s wonderful video here. The sentiment was stamped using broken china distress ink (can you tell that’s my favourite one?!) and I just added some machine stitching and string to finish.

Hope you are all having a wonderful weekend:)

Thursday, March 10, 2011

A Little Layering

This week on the Hero Art Blog, Shari shared some amazing cards and a brilliant video showing her technique for making layered stamped backgrounds. I don’t usually do a lot of layering of stamps on my cards so I thought I’d give her technique a try.

Layering with no walking or wiggling!
Stamps (Hero Arts) - Exotic Bloom, Earth Flowers and Envelope Pattern

To start with I dabbed faded jeans and broken china distress inks here and there on a large acrylic block, spritzed with lots of water and stamped on watercolour paper. Then I stamped this background with the Envelope Pattern using antique linen distress ink and white embossed the Earth Flowers. Unlike Shari, I didn't walk and wiggle (you'll have to watch Shari's video to see what I'm talking about!) but applied dusty concord distress ink on the Exotic Bloom image, spritzed with water, stamped once on scrap paper and then stamped on the panel. I applied dusty concord distress ink to a scrap of white card, spritzed with water and once dry punched out a butterfly, added Crackle Accents and some gems. Unfortunately my photo of the card isn't great, in real life it doesn’t look so dull and the Envelope Pattern looks more subtle because of the texture of the watercolour paper which isn’t being picked up in the photo.

I'm submitting this card into the Simon Says Stamp Challenge - Anything Goes.


Over the past couple of weeks I’ve been fairly busy with a few things so have become the worst in the world for visiting blogs. Hopefully from today on that will change and I can’t wait to catch up on what I’ve missed out on:)
Related Posts with Thumbnails